Hub Listing - Definitions Tab
In Studio (My APIs) for an API project, the Hub Listing > Definitions tab is used for the following purposes:
- Manage an API's endpoints
- Configuring API security
- Upload an updated OpenAPI document
- View the API's IDs
Manage an API's endpoints
The My APIs > Hub Listing > Definitions > Endpoints tab allows you to view and edit your API's endpoints. Endpoints are unique to each Version of your API.
Endpoints can be arranged in groups, allowing your API consumers to better understand the API.

Viewing an API's groups and endpoints in Studio.
Automatically creating endpoints
If you create the API and upload an OAS document (or other file) that describes the API, the endpoints should be automatically populated for you.
It is generally recommended that you modify endpoints by uploading a new OAS document (or other file) for the API rather than making the modifications manually as described here. This allows you to maintain a single source of truth for the API.
Adding groups
To create a new group for your API, click Create Group (see below).
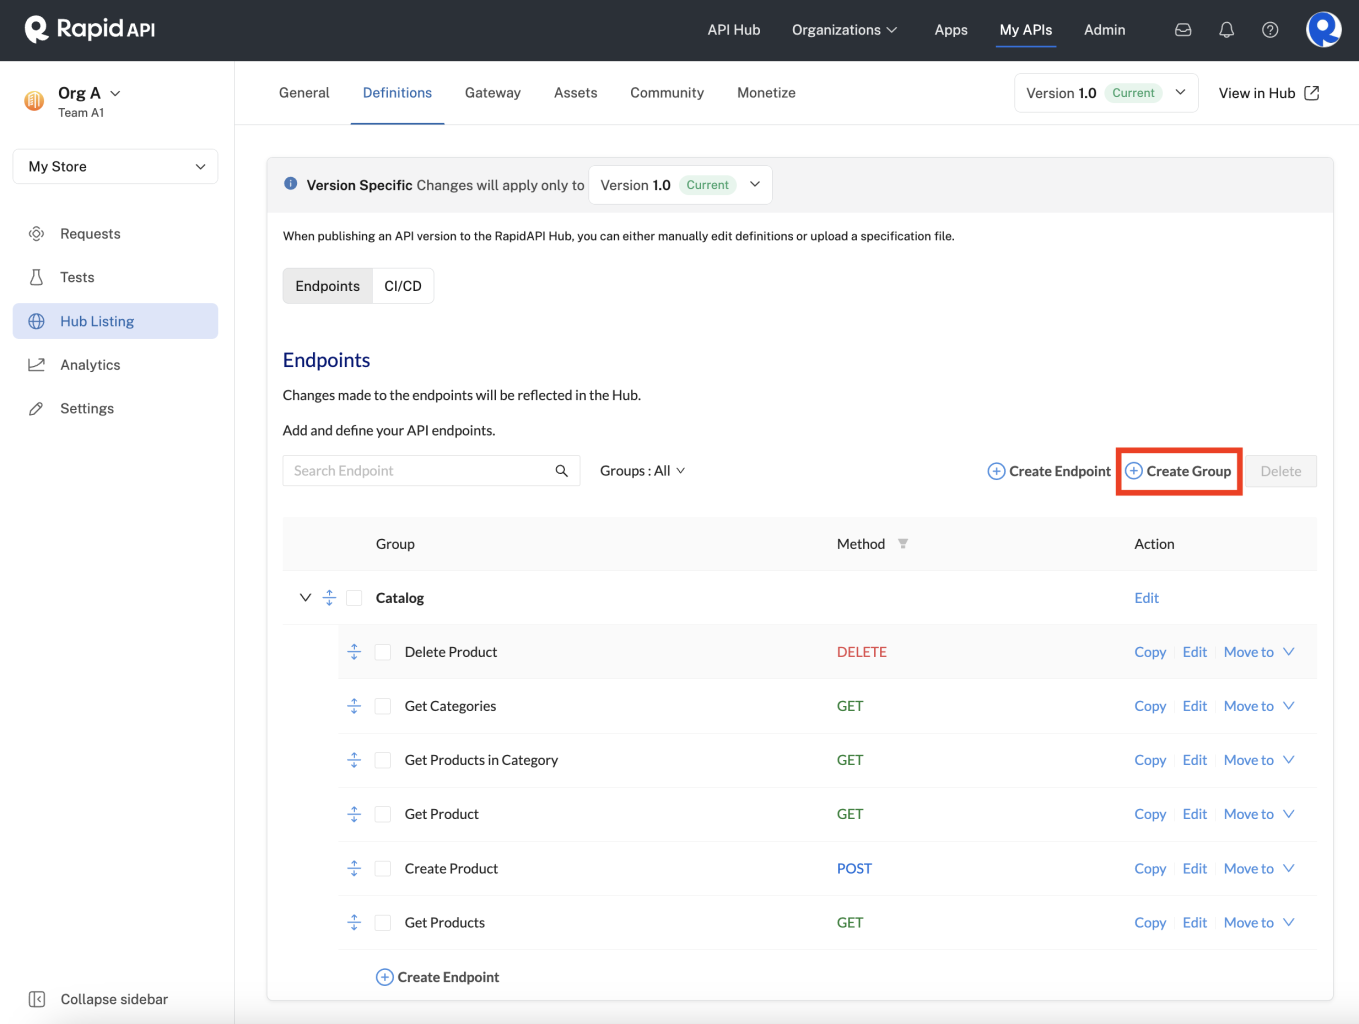
Creating a group for the API's endpoints.
The following dialog will appear:
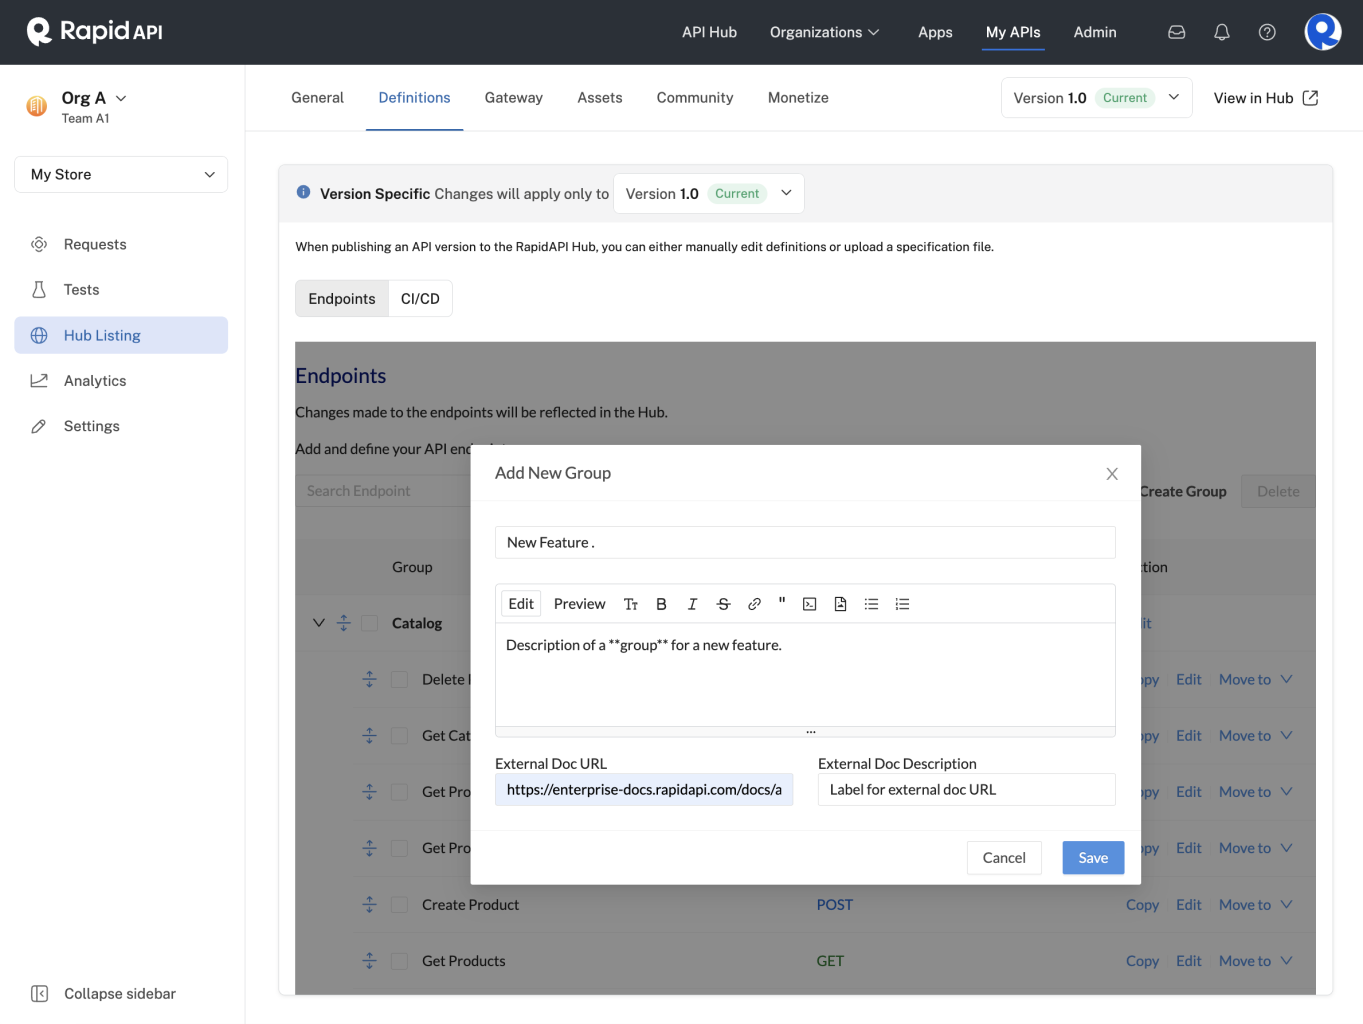
Defining the details for the new group.
In the Add New Group dialog, you can define the following:
- Group name (the group name above is "New Feature").
- Description (optional) of the group. Notice that the description accepts markdown and there is a handy toolbar to help you visually create the description. If a description is entered here, a small information icon will appear next to the group name in the API listing (see screenshot below). Clicking that icon will display the description.
- External Doc URL (optional): This is used to point the API consumer to more information related to the group. If a URL is entered here, a small information icon will appear next to the group name in the API listing (see screenshot below). Clicking that icon will display the link to the doc.
- External Doc Description (optional): This is the label for the link in External Doc URL.
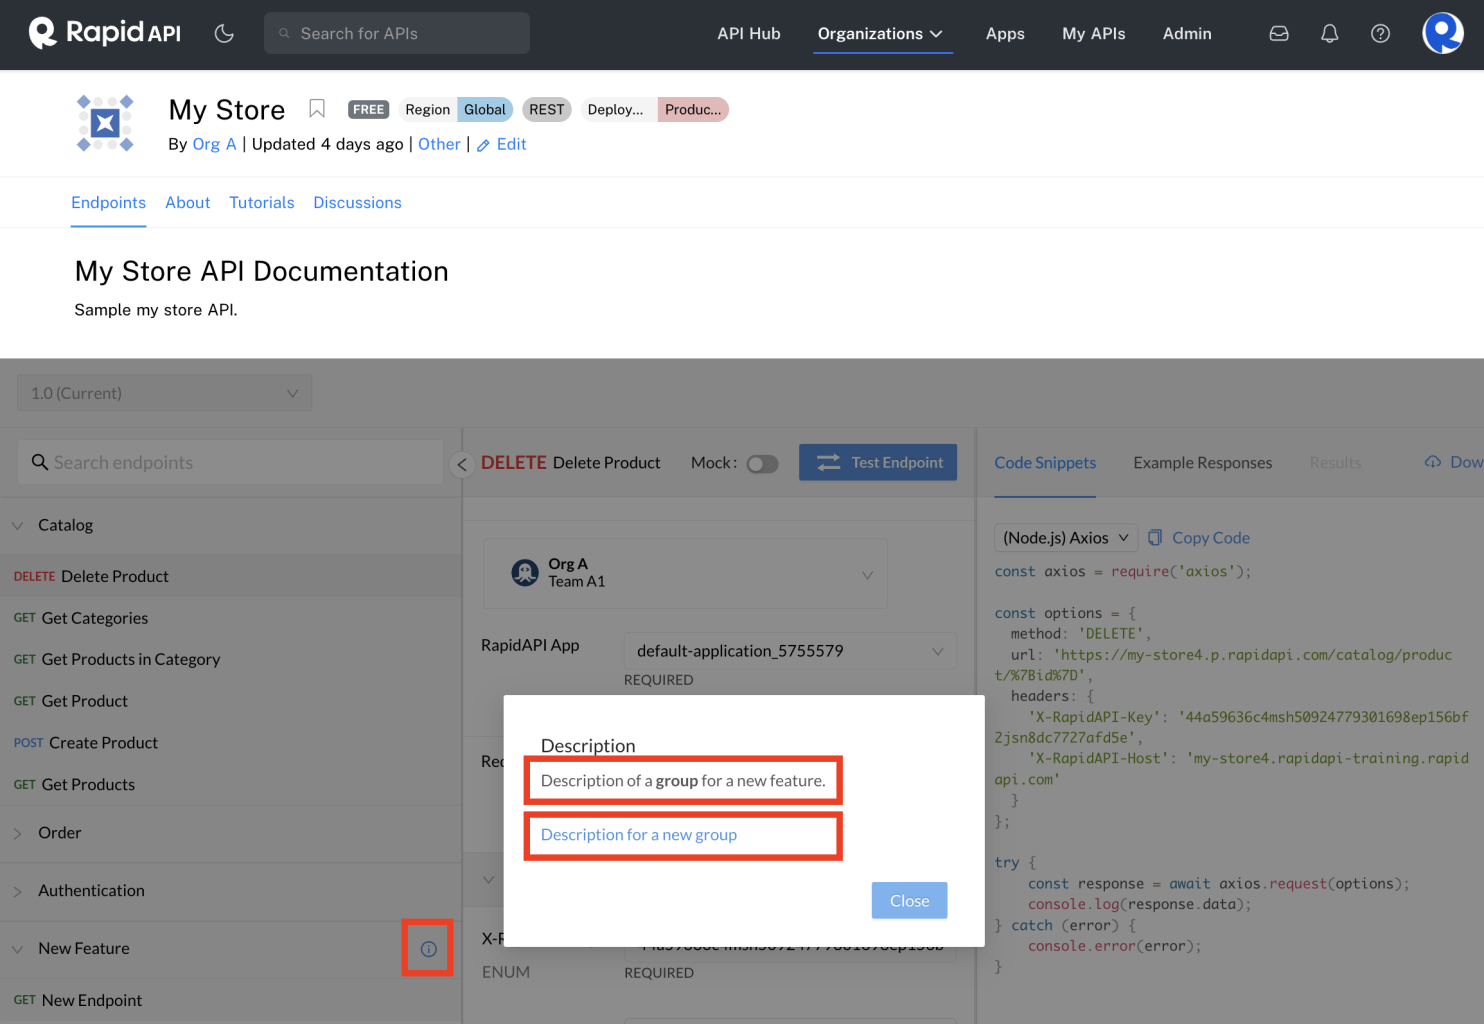
An endpoint group description icon in an API listing, which pops up a description and doc link for the group.
Once you have added one or more endpoints to the group (see below), API consumers will see the group in the API's listing.
Editing groups
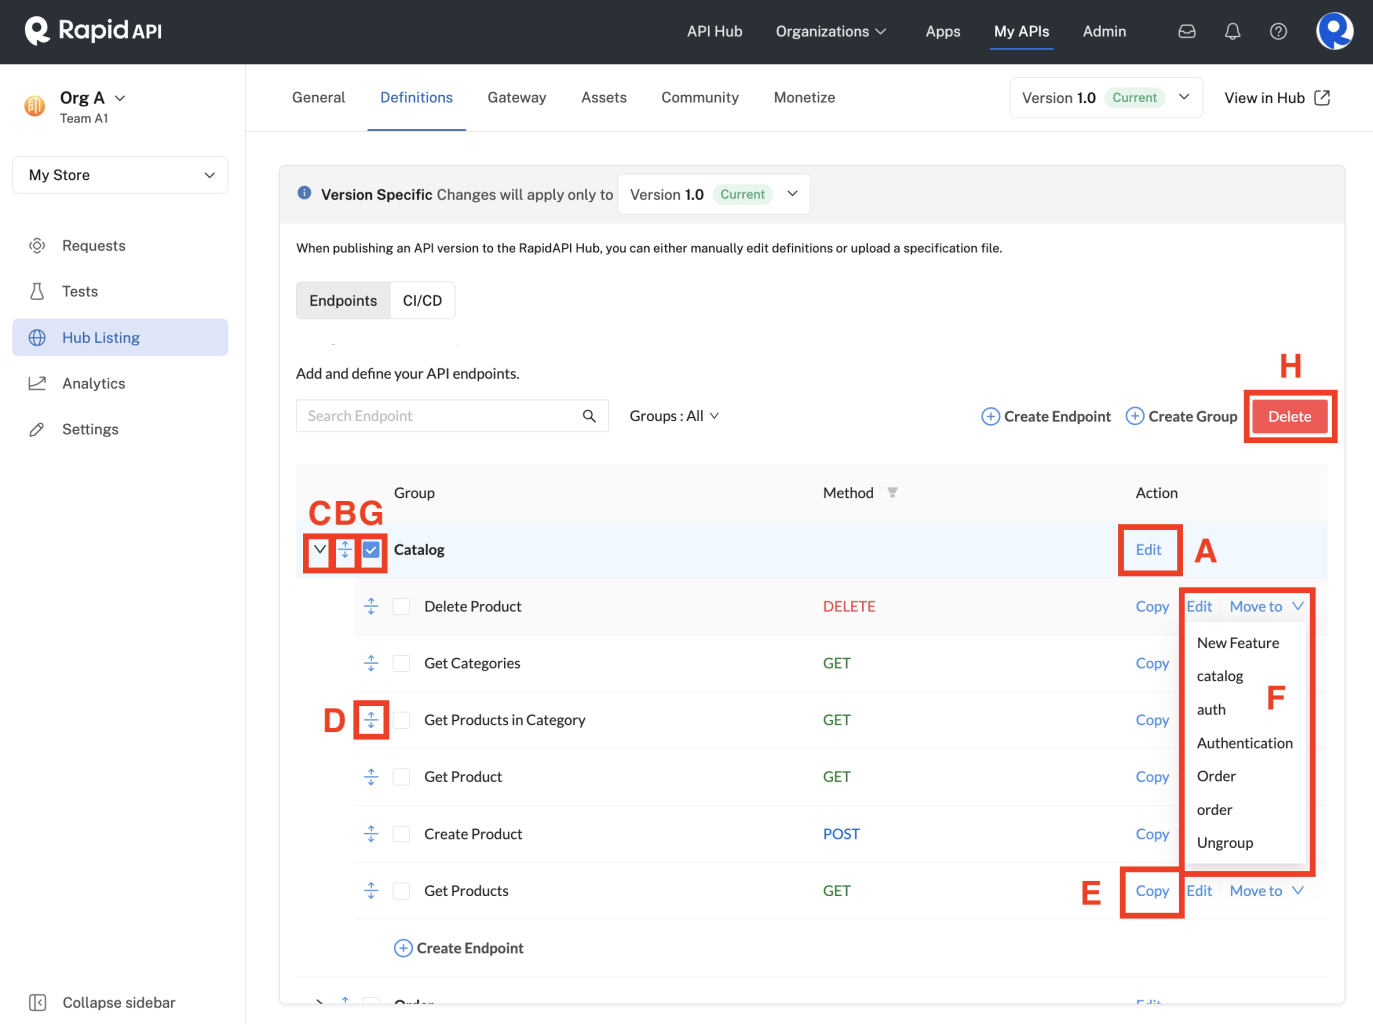
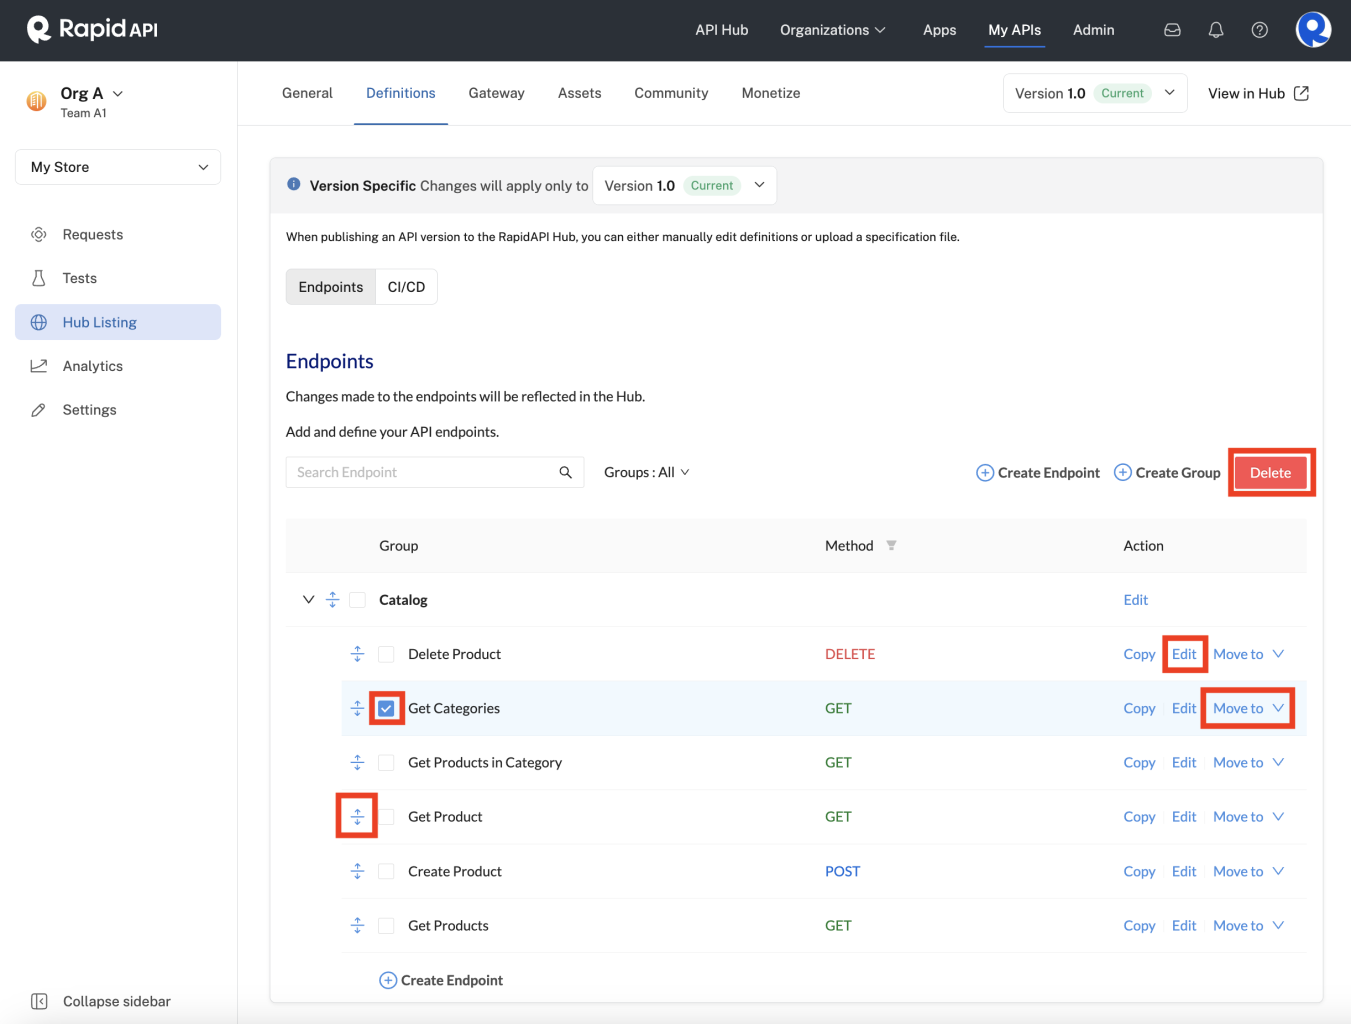
Editing a group.
Click Edit adjacent to the group name to change the group's name, description, and/or the external doc URL and description (see box A in the screenshot above).
To rearrange the group order, simply use the icon to the left of the group name (see box B) to drag the group to a new location. API consumers will see this new group order in the API listing.
To modify the endpoints in a group, expand the group by clicking the dropdown icon on the left (see box C). You can drag and drop endpoints to a new location (see box D). You can use the Copy link to the right of the endpoint (see box E) to duplicate it. You can use the Move to dropdown (see box F) to move the endpoint to a different group. To move an endpoint out of any group, select Ungroup from the Move to dropdown.
To delete a group, select the checkbox to the left of the group name (see box G) and then click the Delete button (see box H).
Adding endpoints
To create an endpoint for your API, click Create Endpoint or expand an existing group and click Create Endpoint. This creates the endpoint right in the group.
Copying an existing endpoint
If you want to add an endpoint that has similarities to an existing endpoint, consider copying the existing endpoint (see below) instead of creating one from scratch.
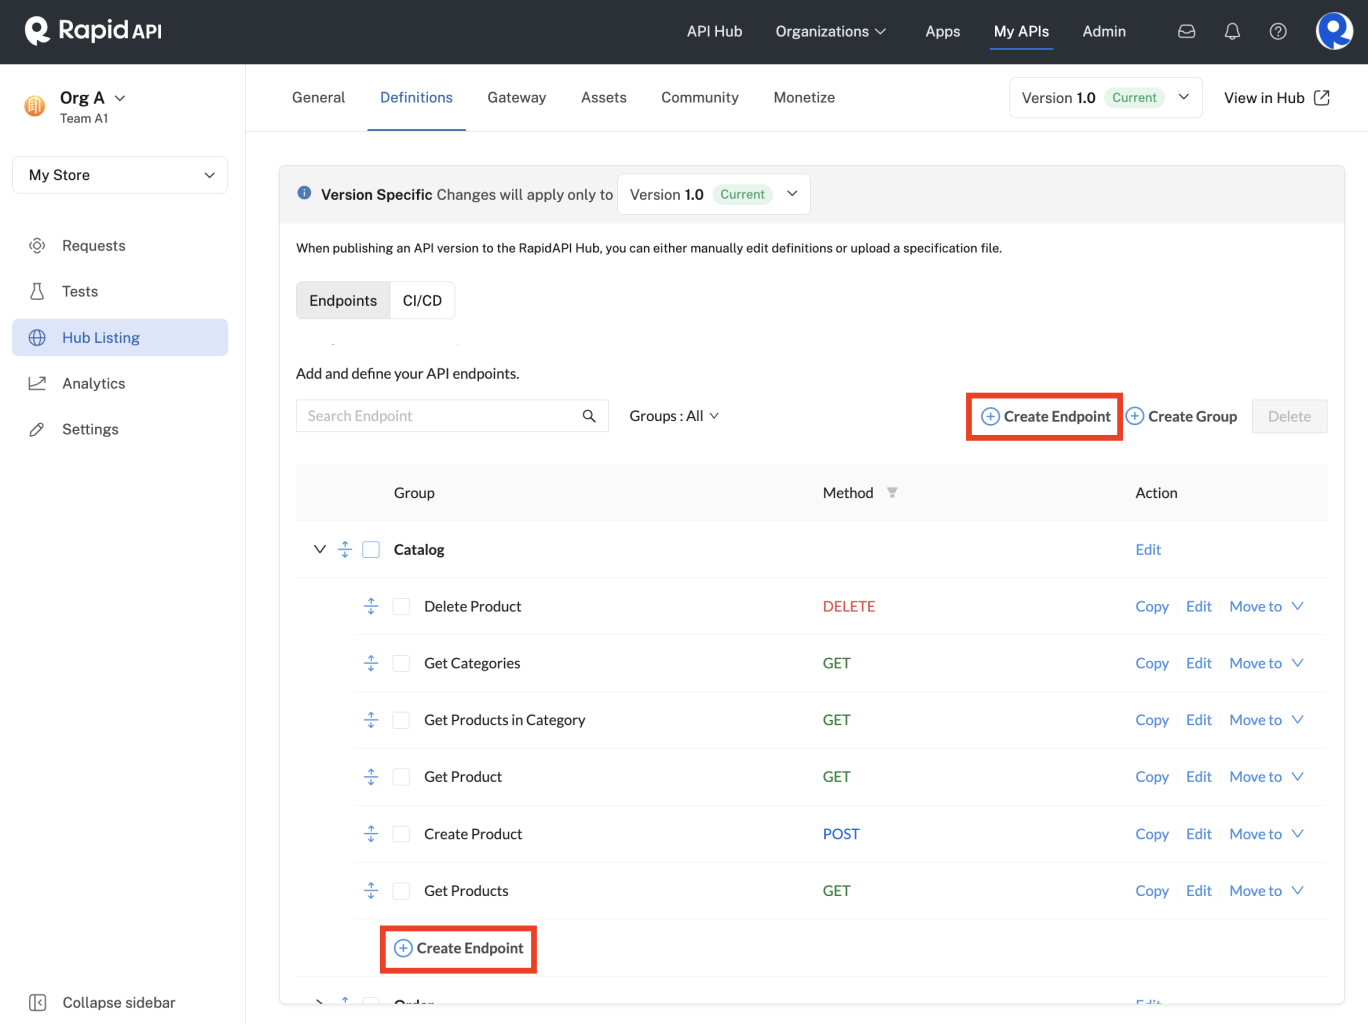
Creating an endpoint for an API.
The following dialog will appear:

Adding an endpoint to an API.
In the Add Endpoint page, you can define the following:
- Name: You can provide a descriptive name for the endpoint or just set the name to match the path. This will be the name visualized in the quick menu on the right-hand side of the Documentation explorer
- Description: This helps developers understand what the endpoint does. Markdown is accepted and there is a convenient visual toolbar to help create the description
- External Doc URL: This is used to point the API consumer to more information related to the endpoint.
- External Doc Description: This is the label for the link in External Doc URL.
- Method (the dropdown below External Doc URL): Defines the HTTP method that will be used to call your endpoint. Rapid supports GET, POST, PUT, PATCH, and DELETE.
- Path: The route to the endpoint. This path does not include your Base URL. In some cases, you might want to allow the user to specify a parameter in the route (path parameter). You can use curly braces to encapsulate the user-defined parameter. For example, if you enter “/status/{appid}” as a route, an additional parameter input box will be created for the user to specify the parameter’s value.
The remaining settings for an endpoint are described below.
Editing endpoints
Editing an endpoint.
To edit an endpoint, click on the Edit link associated with the endpoint. The dialog that opens has the same settings as the Add Endpoint dialog (see above).
You can drag and drop endpoints to a new location. You can use the Copy link to the right of the endpoint to duplicate it. You can use the Move to dropdown to move the endpoint to a different group. To move an endpoint out of any group, select Ungroup from the Move to dropdown.
To delete an endpoint, check the box to the left of endpoint name and click the Delete button.
Request headers
You can specify custom request headers to be passed to add API endpoint by the API consumer. The header can be required, meaning the API consumer must specify a value for the header, or optional.
To add a request header to an endpoint, navigate to the Header tab on the Add Endpoint or Edit Endpoint screen.
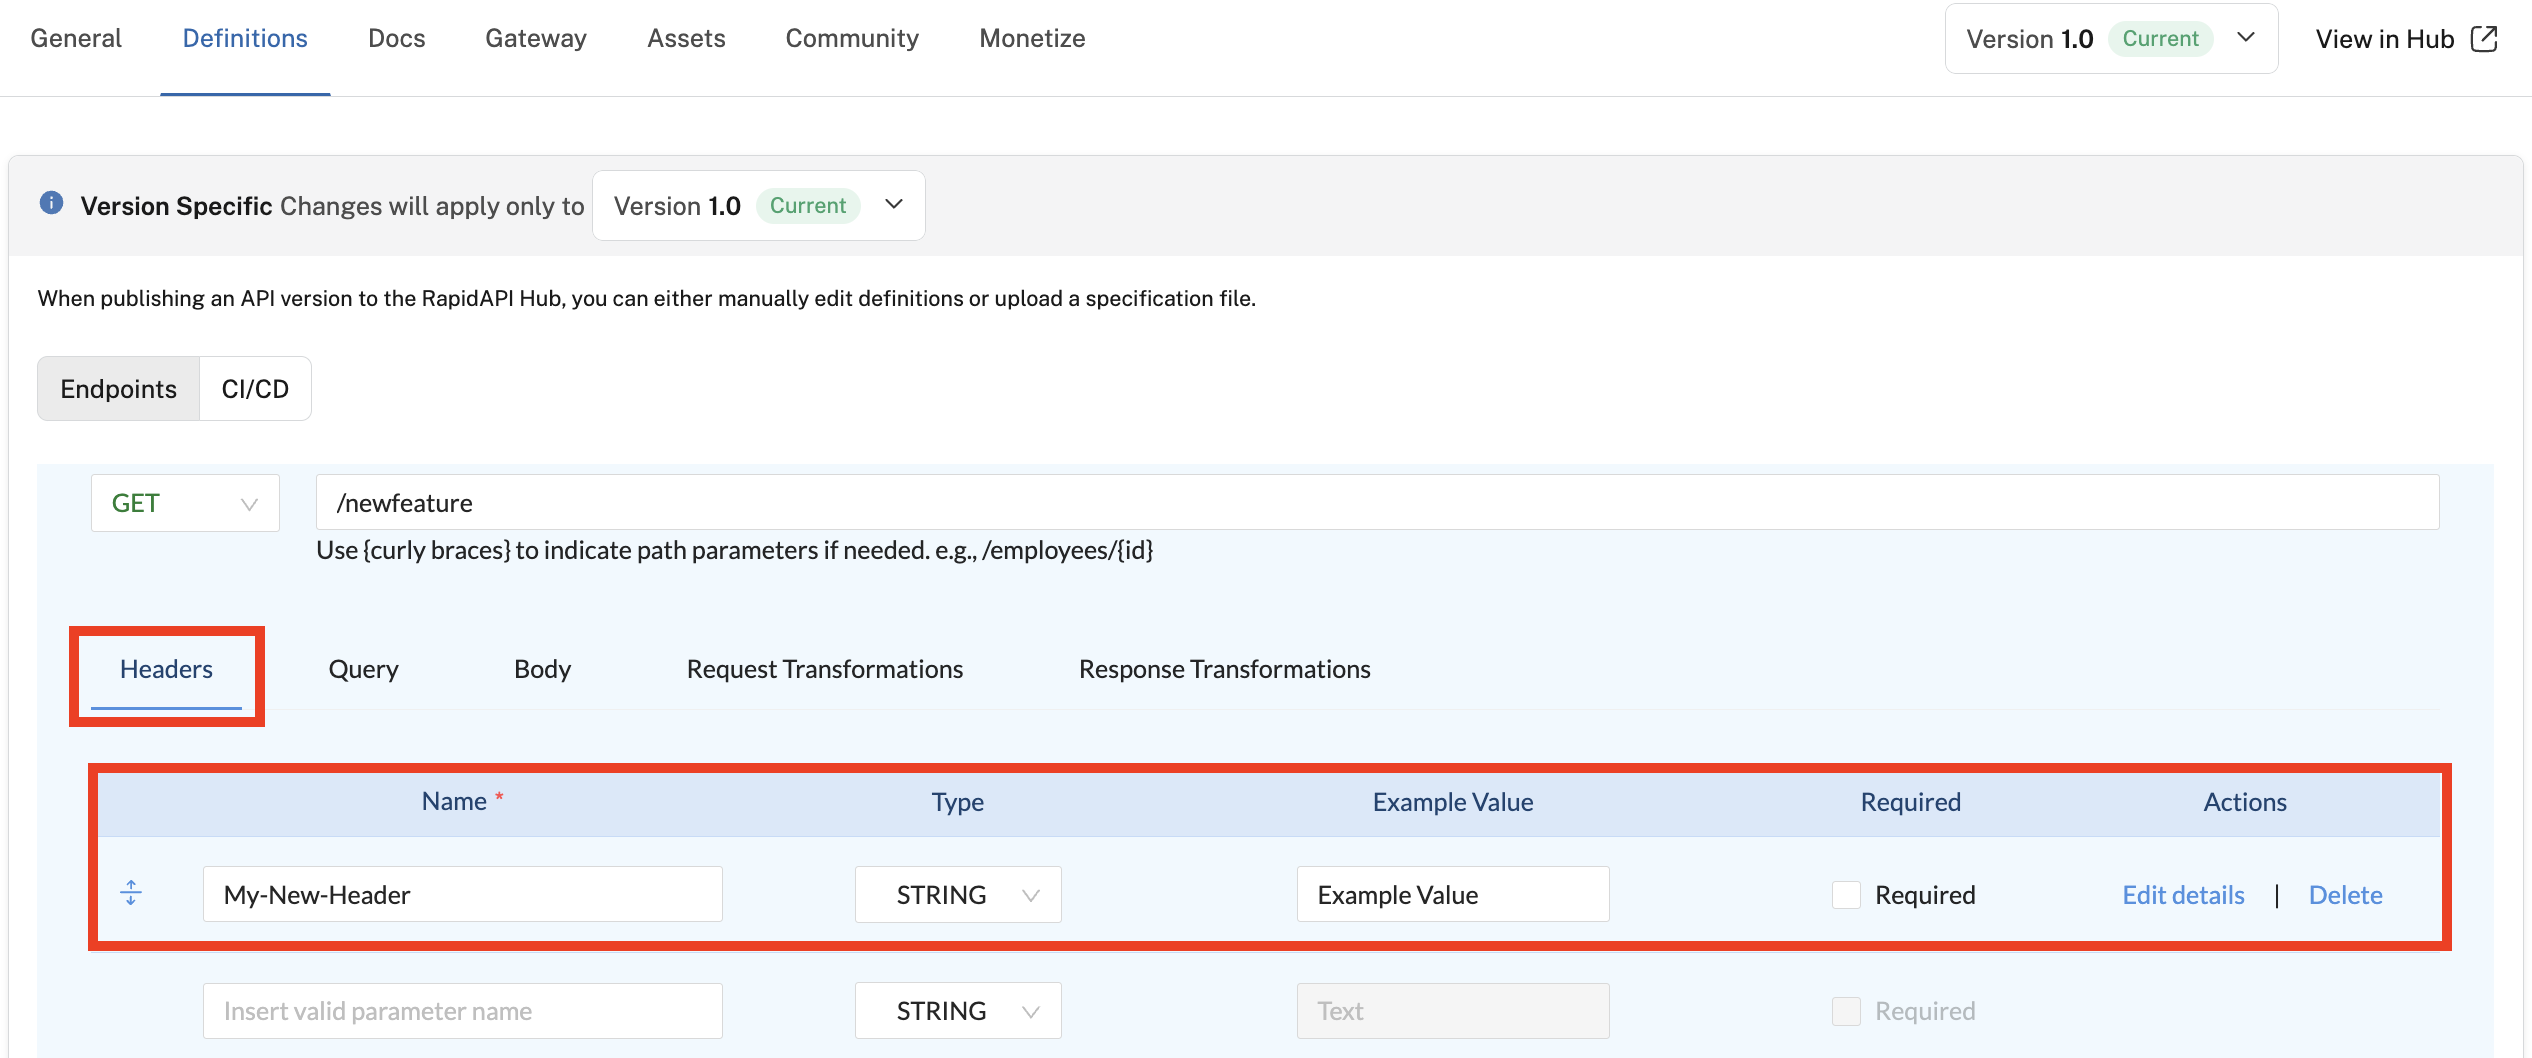
Adding an optional request header of type STRING.
You can provide the following information for request headers:
- Name: A name is required for your header parameter.
- Type: Choose from STRING, ENUM, NUMBER, BOOLEAN, DATE (YYYY-MM-DD), TIME (24-hour HH:MM), OBJECT, ARRAY, or GEOPOINT (latitude, longitude).
- Example Value: A value can be pre-filled when an API consumer tests the endpoint.
- Required: Check this box to make the request header required.
- Edit details: Click to display the Edit Parameter dialog (see below).
- Delete: Click to delete the request header.
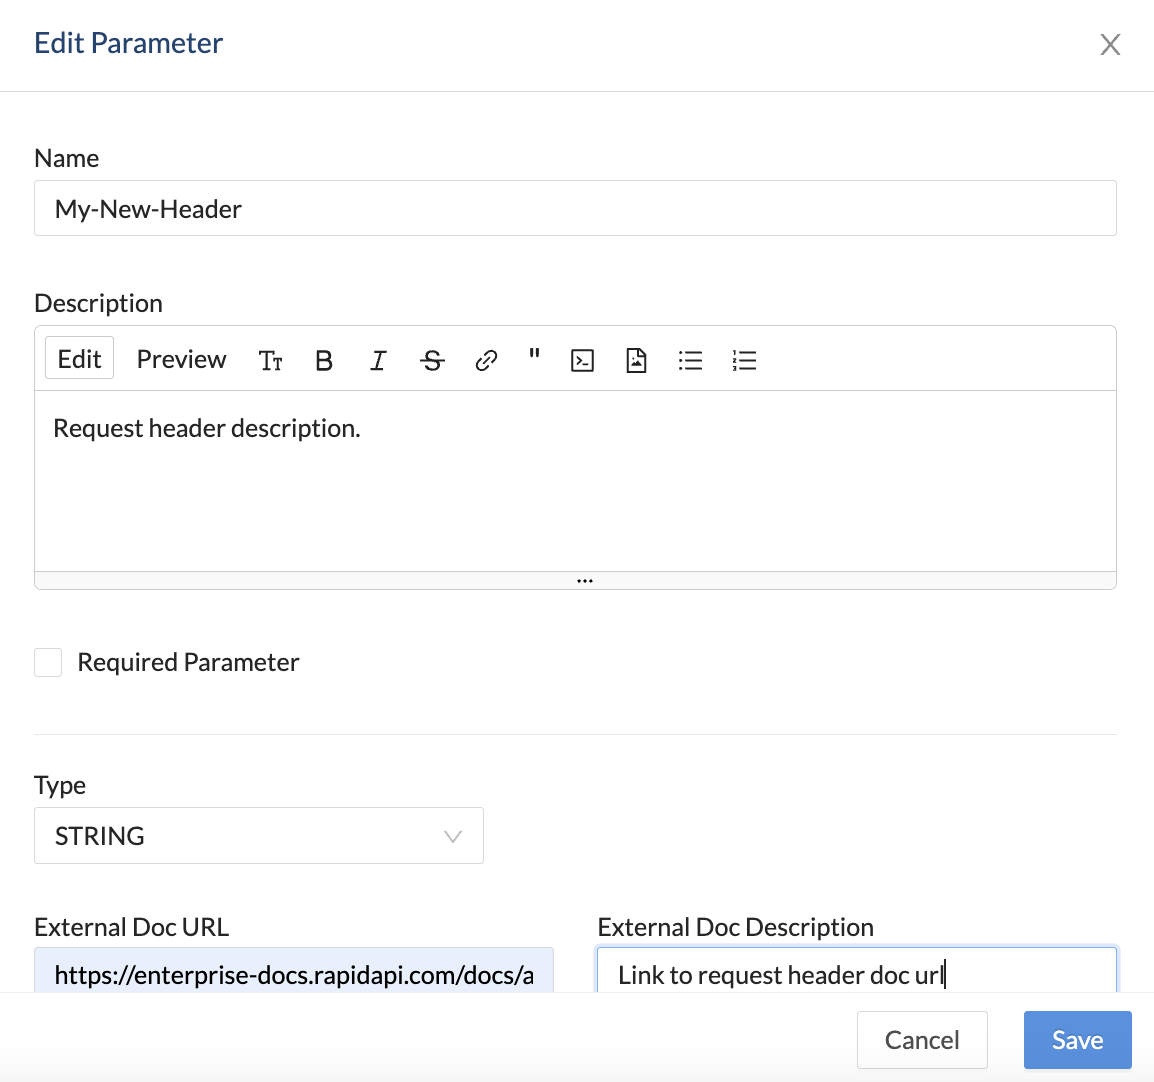
Clicking the Edit Details link for a Request Header displays this dialog.
If you have multiple request headers, you can use the drag-and-drop icon to the left of the header name to rearrange the order that API consumers see on the API Hub.
Query string parameters
Query string parameters are name-value pairs appended to a URL. They follow a ? in the URL. The names and values are separated with =, and multiple query string parameters are separated with &. For example, https://example.com?param1=hello¶m2=world.
The query string parameter can be required, meaning the API consumer must specify a value for the parameter, or optional.
To add a query string parameter to an endpoint, navigate to the Query tab on the Add Endpoint or Edit Endpoint screen.
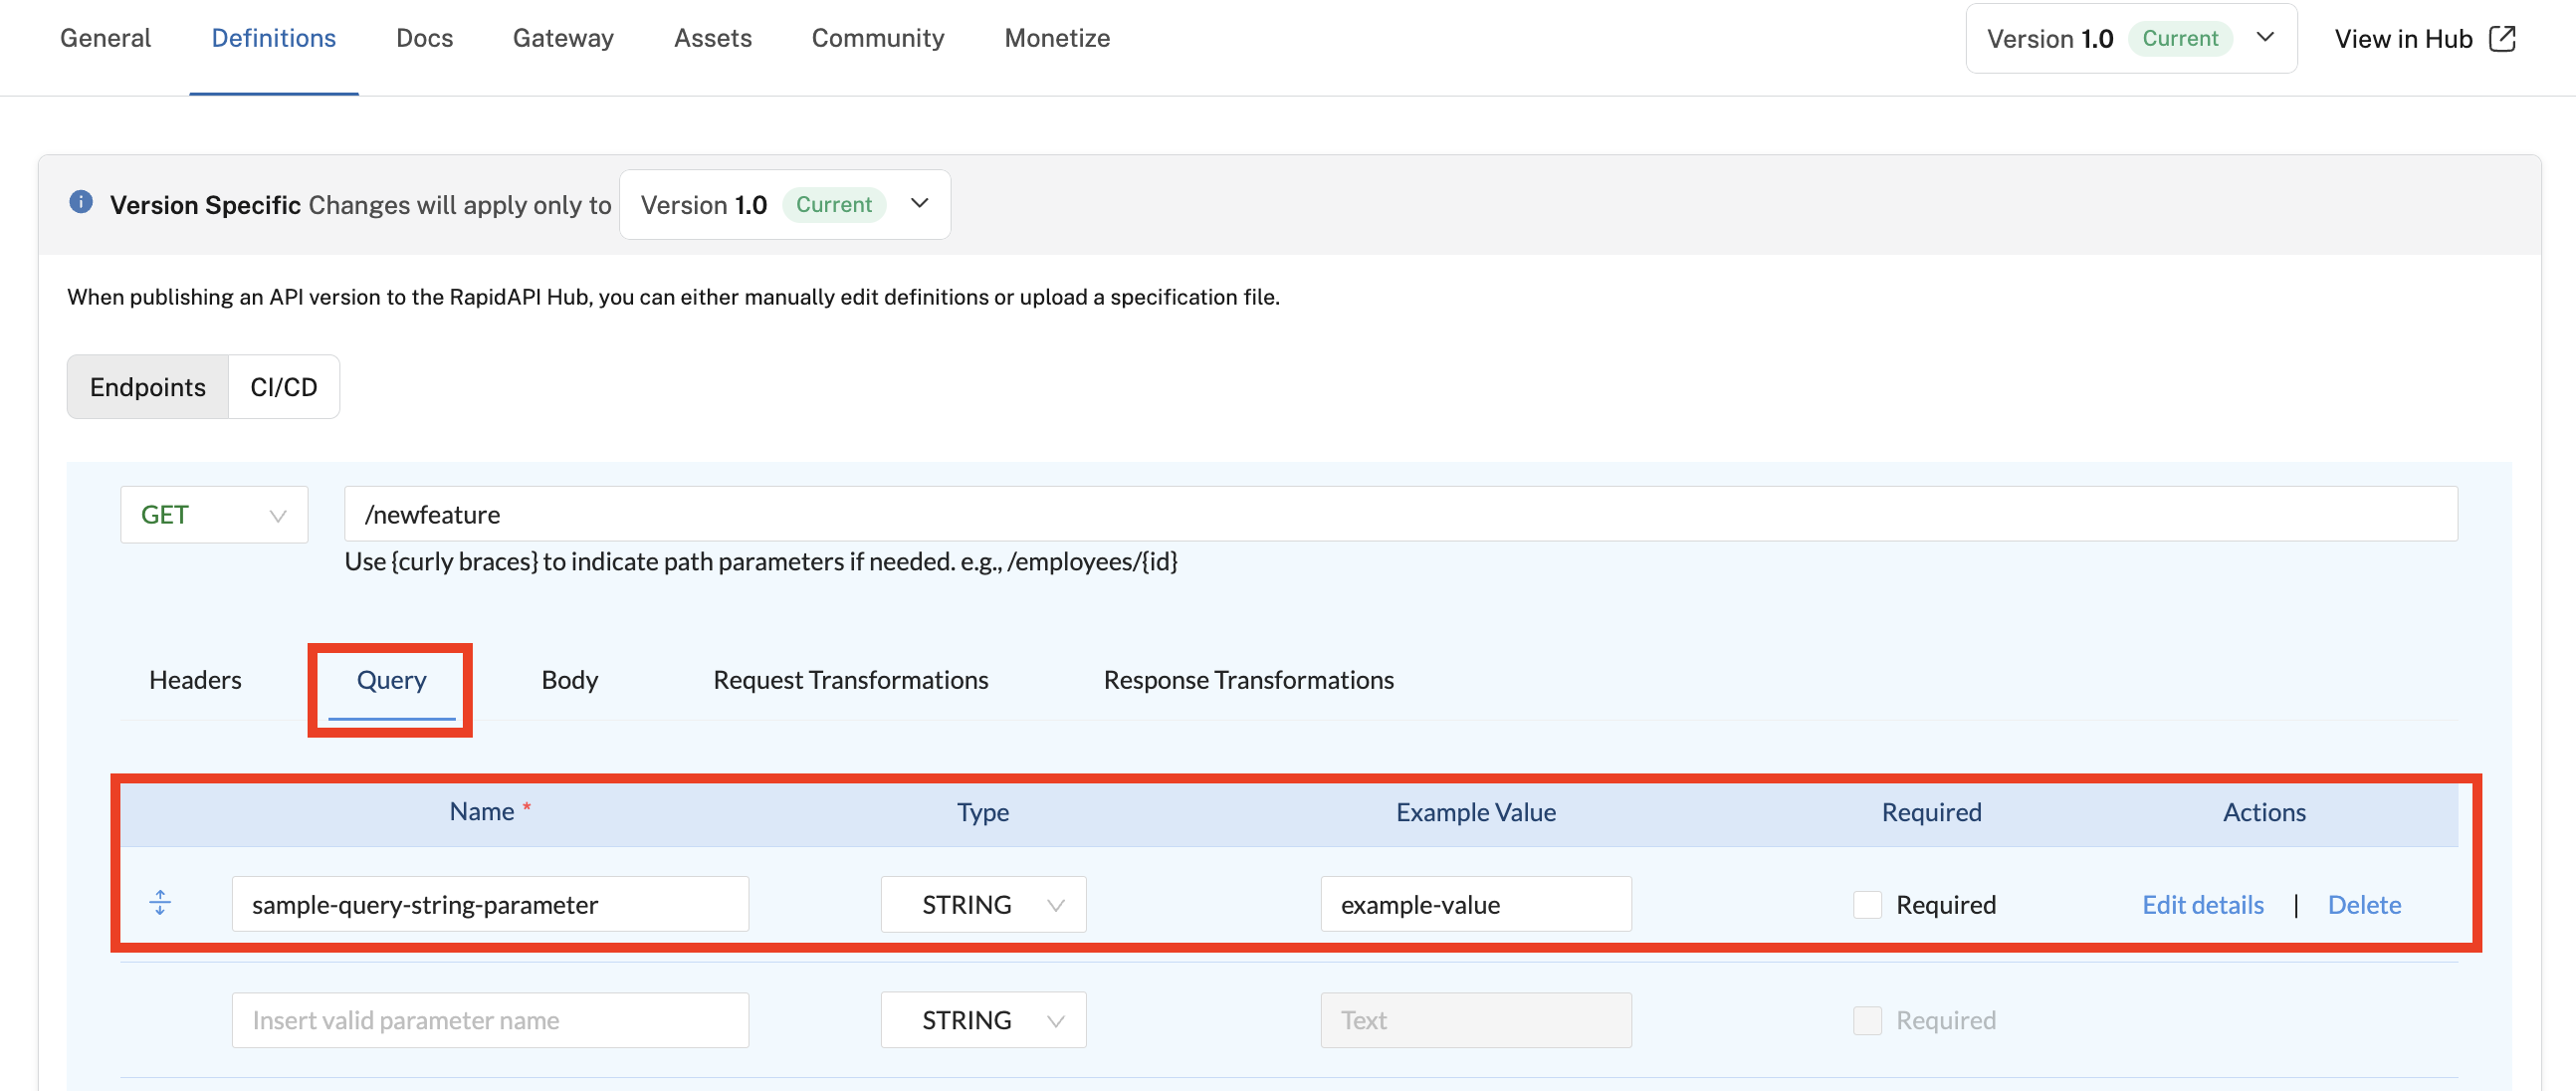
Specifying query string parameters for an endpoint.
Details for specifying a query string parameter are the same as for specifying a request header (see above)
Request bodies (only for POST, PUT and PATCH)
If the HTTP method selected for the endpoint is POST, PUT, or PATCH, you can define an example body for the request. The example body helps API consumers to properly format request bodies.
When defining a body, you specify the Media Type. The following Media Types are supported:
- application/json
- application/xml
- text/plain
- application/octet-stream
- form-data
Depending on the Media Type, you can specify multiple or nested types.
For application/json, you can provide one or more example bodies to be shown to API consumers. The lower left will display Valid example if your example JSON is valid. Click Schema to view the JSON schema for the JSON that you entered.
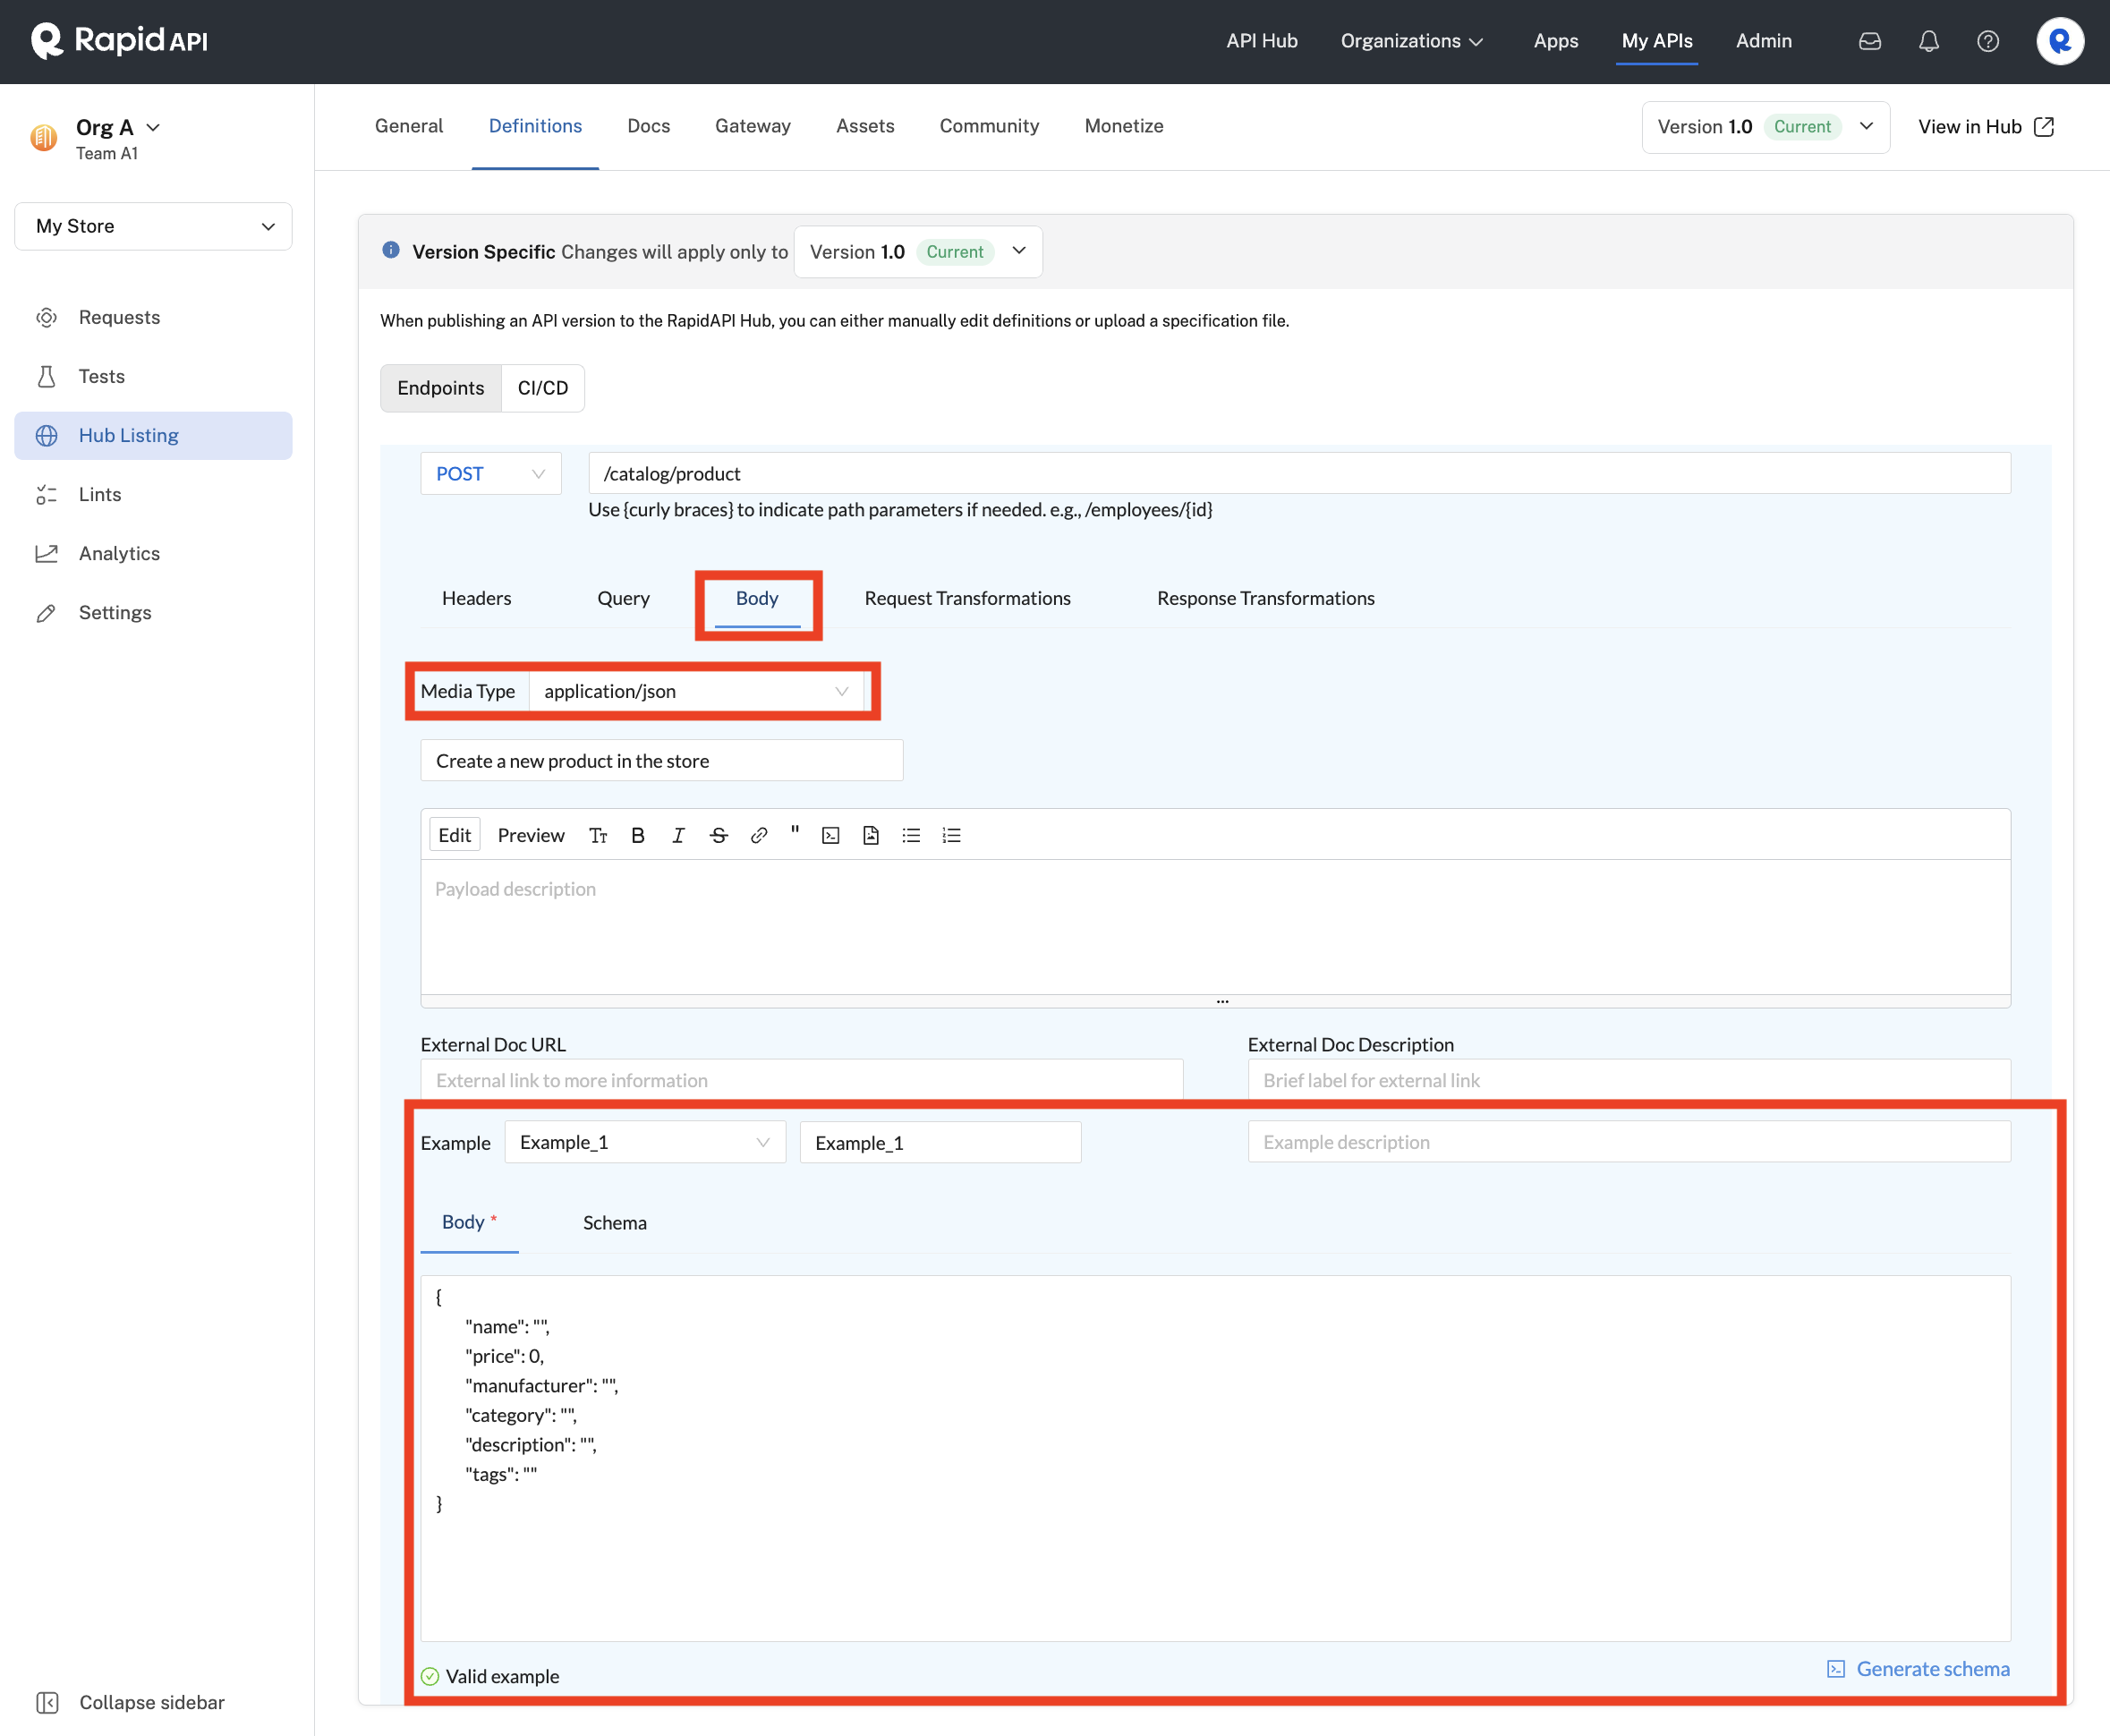
Specifying an application/json body.
For application/xml, you can provide one or more example bodies to be shown to API consumers. The lower left will display Valid example if your example XML is valid.
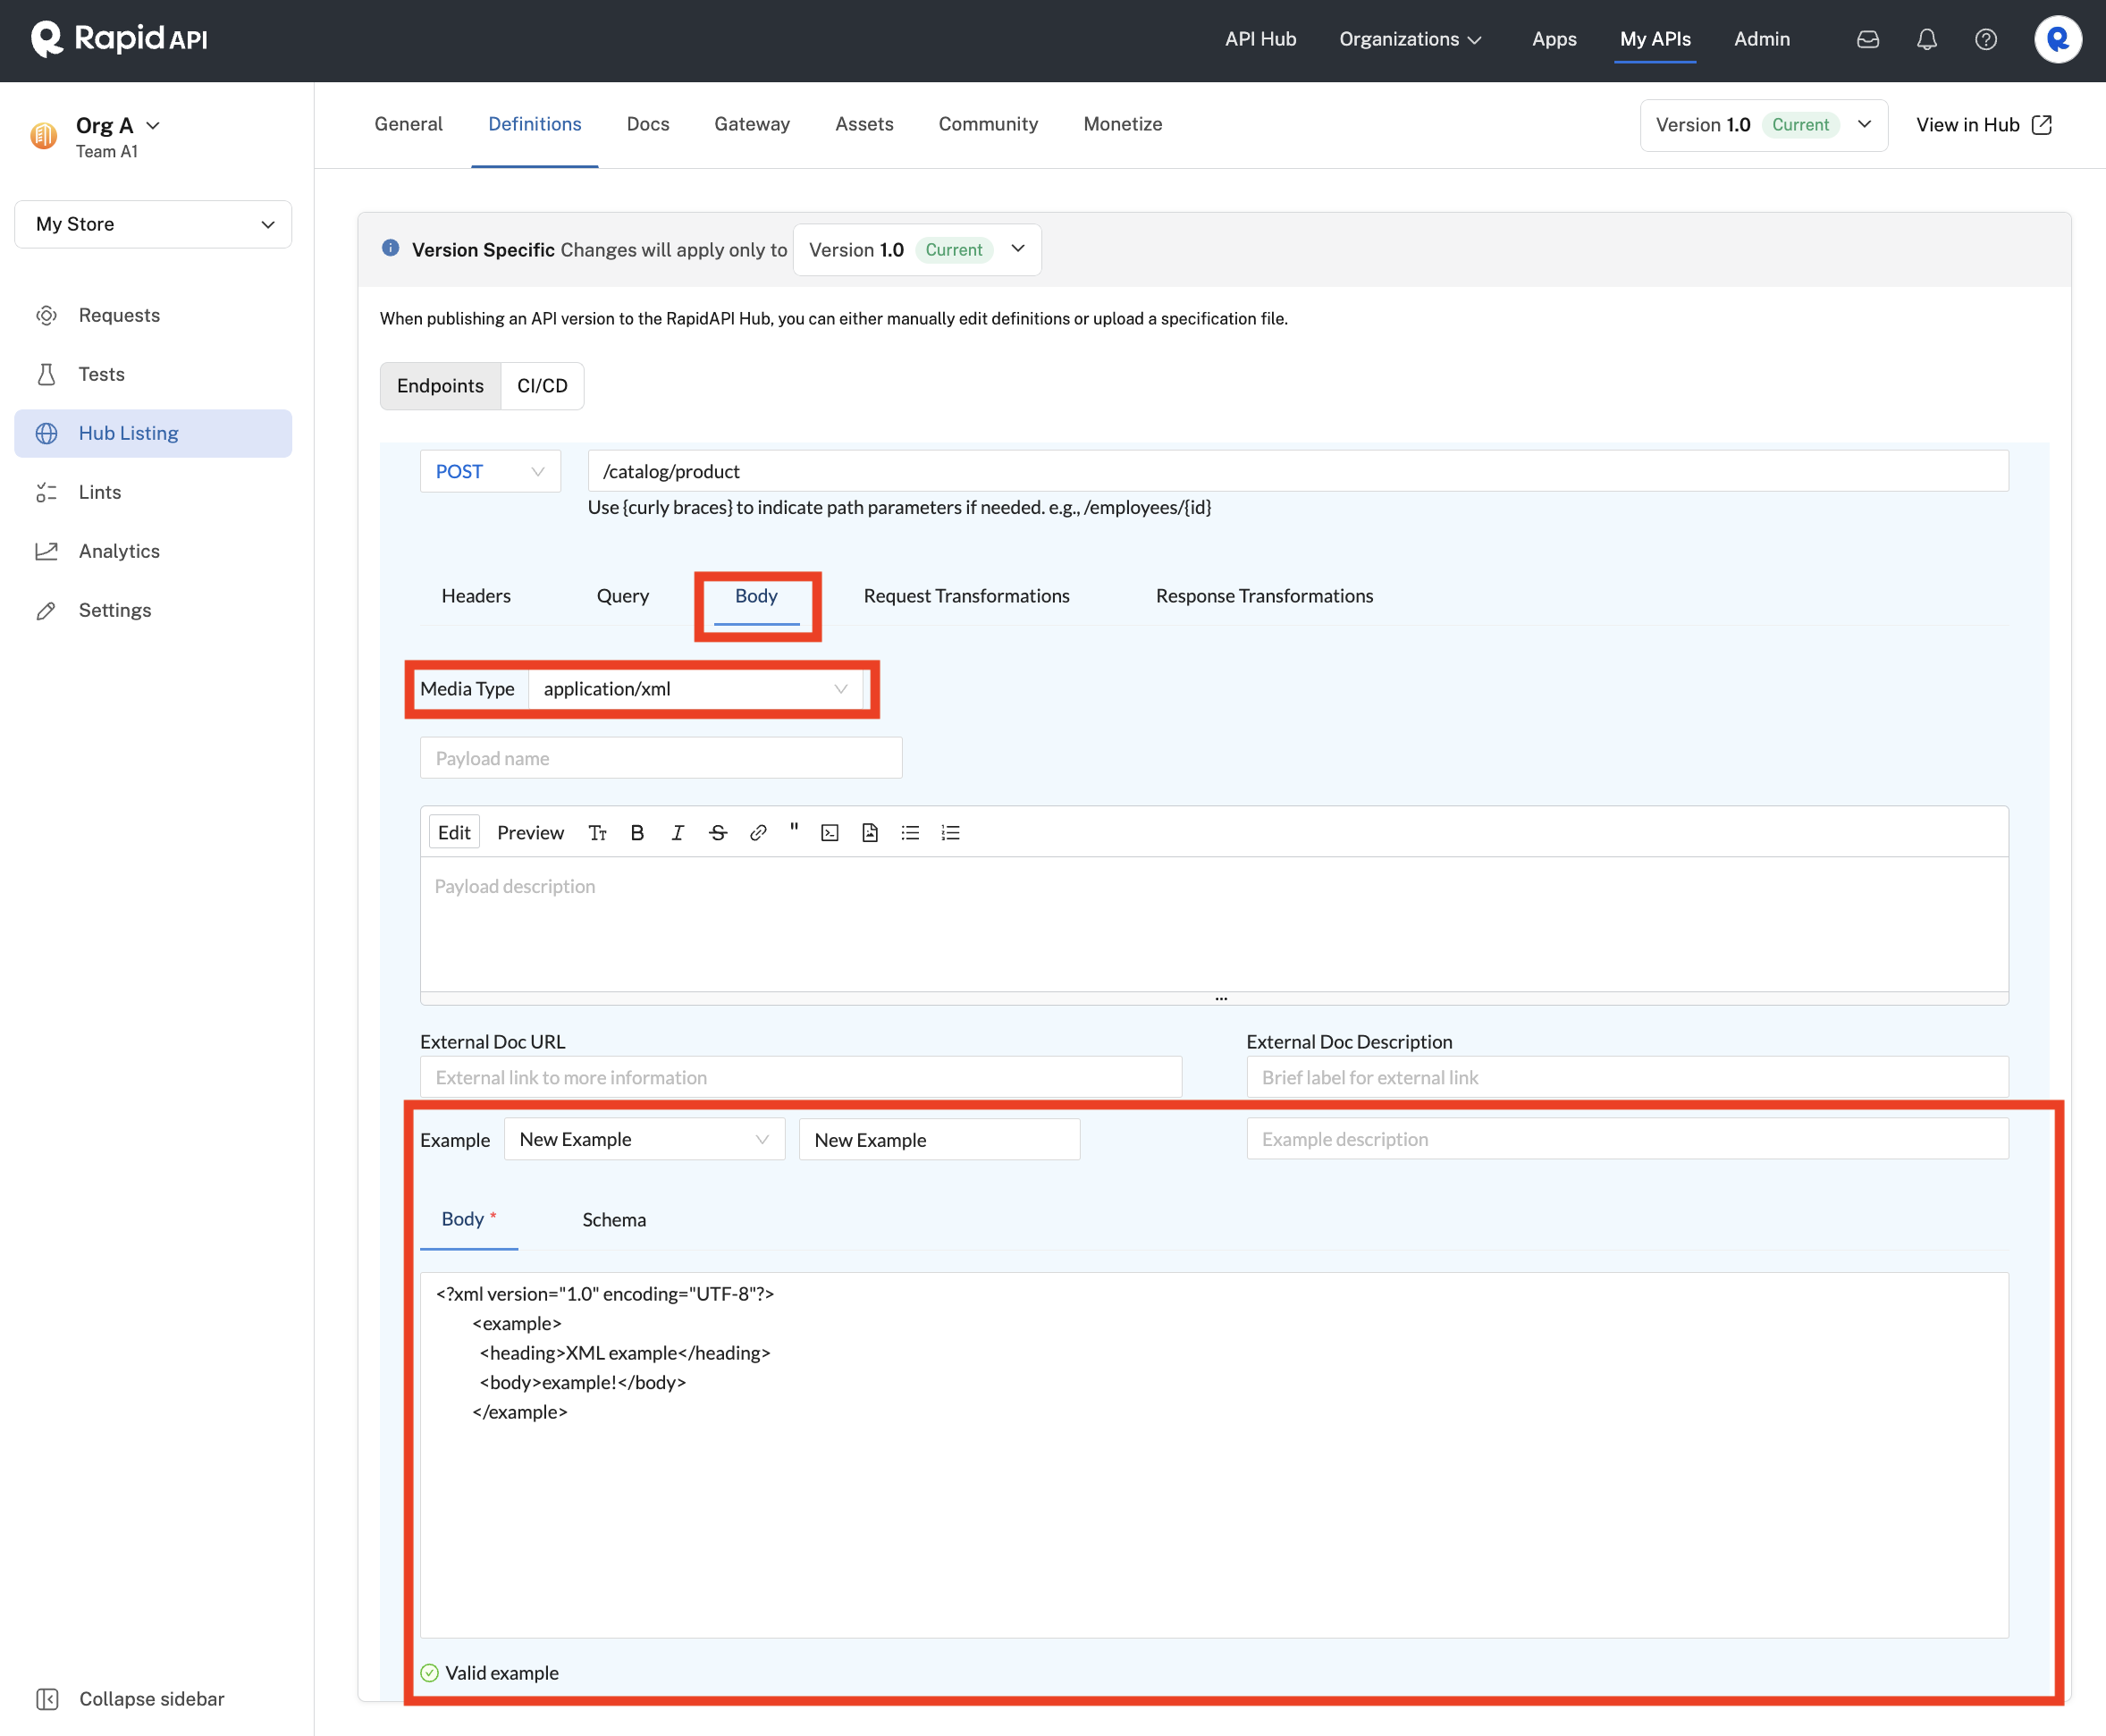
Specifying an application/xml body.
For text/plain, you can provide one or more example bodies to be shown to API consumers. API consumers can pass any plain text in the body.
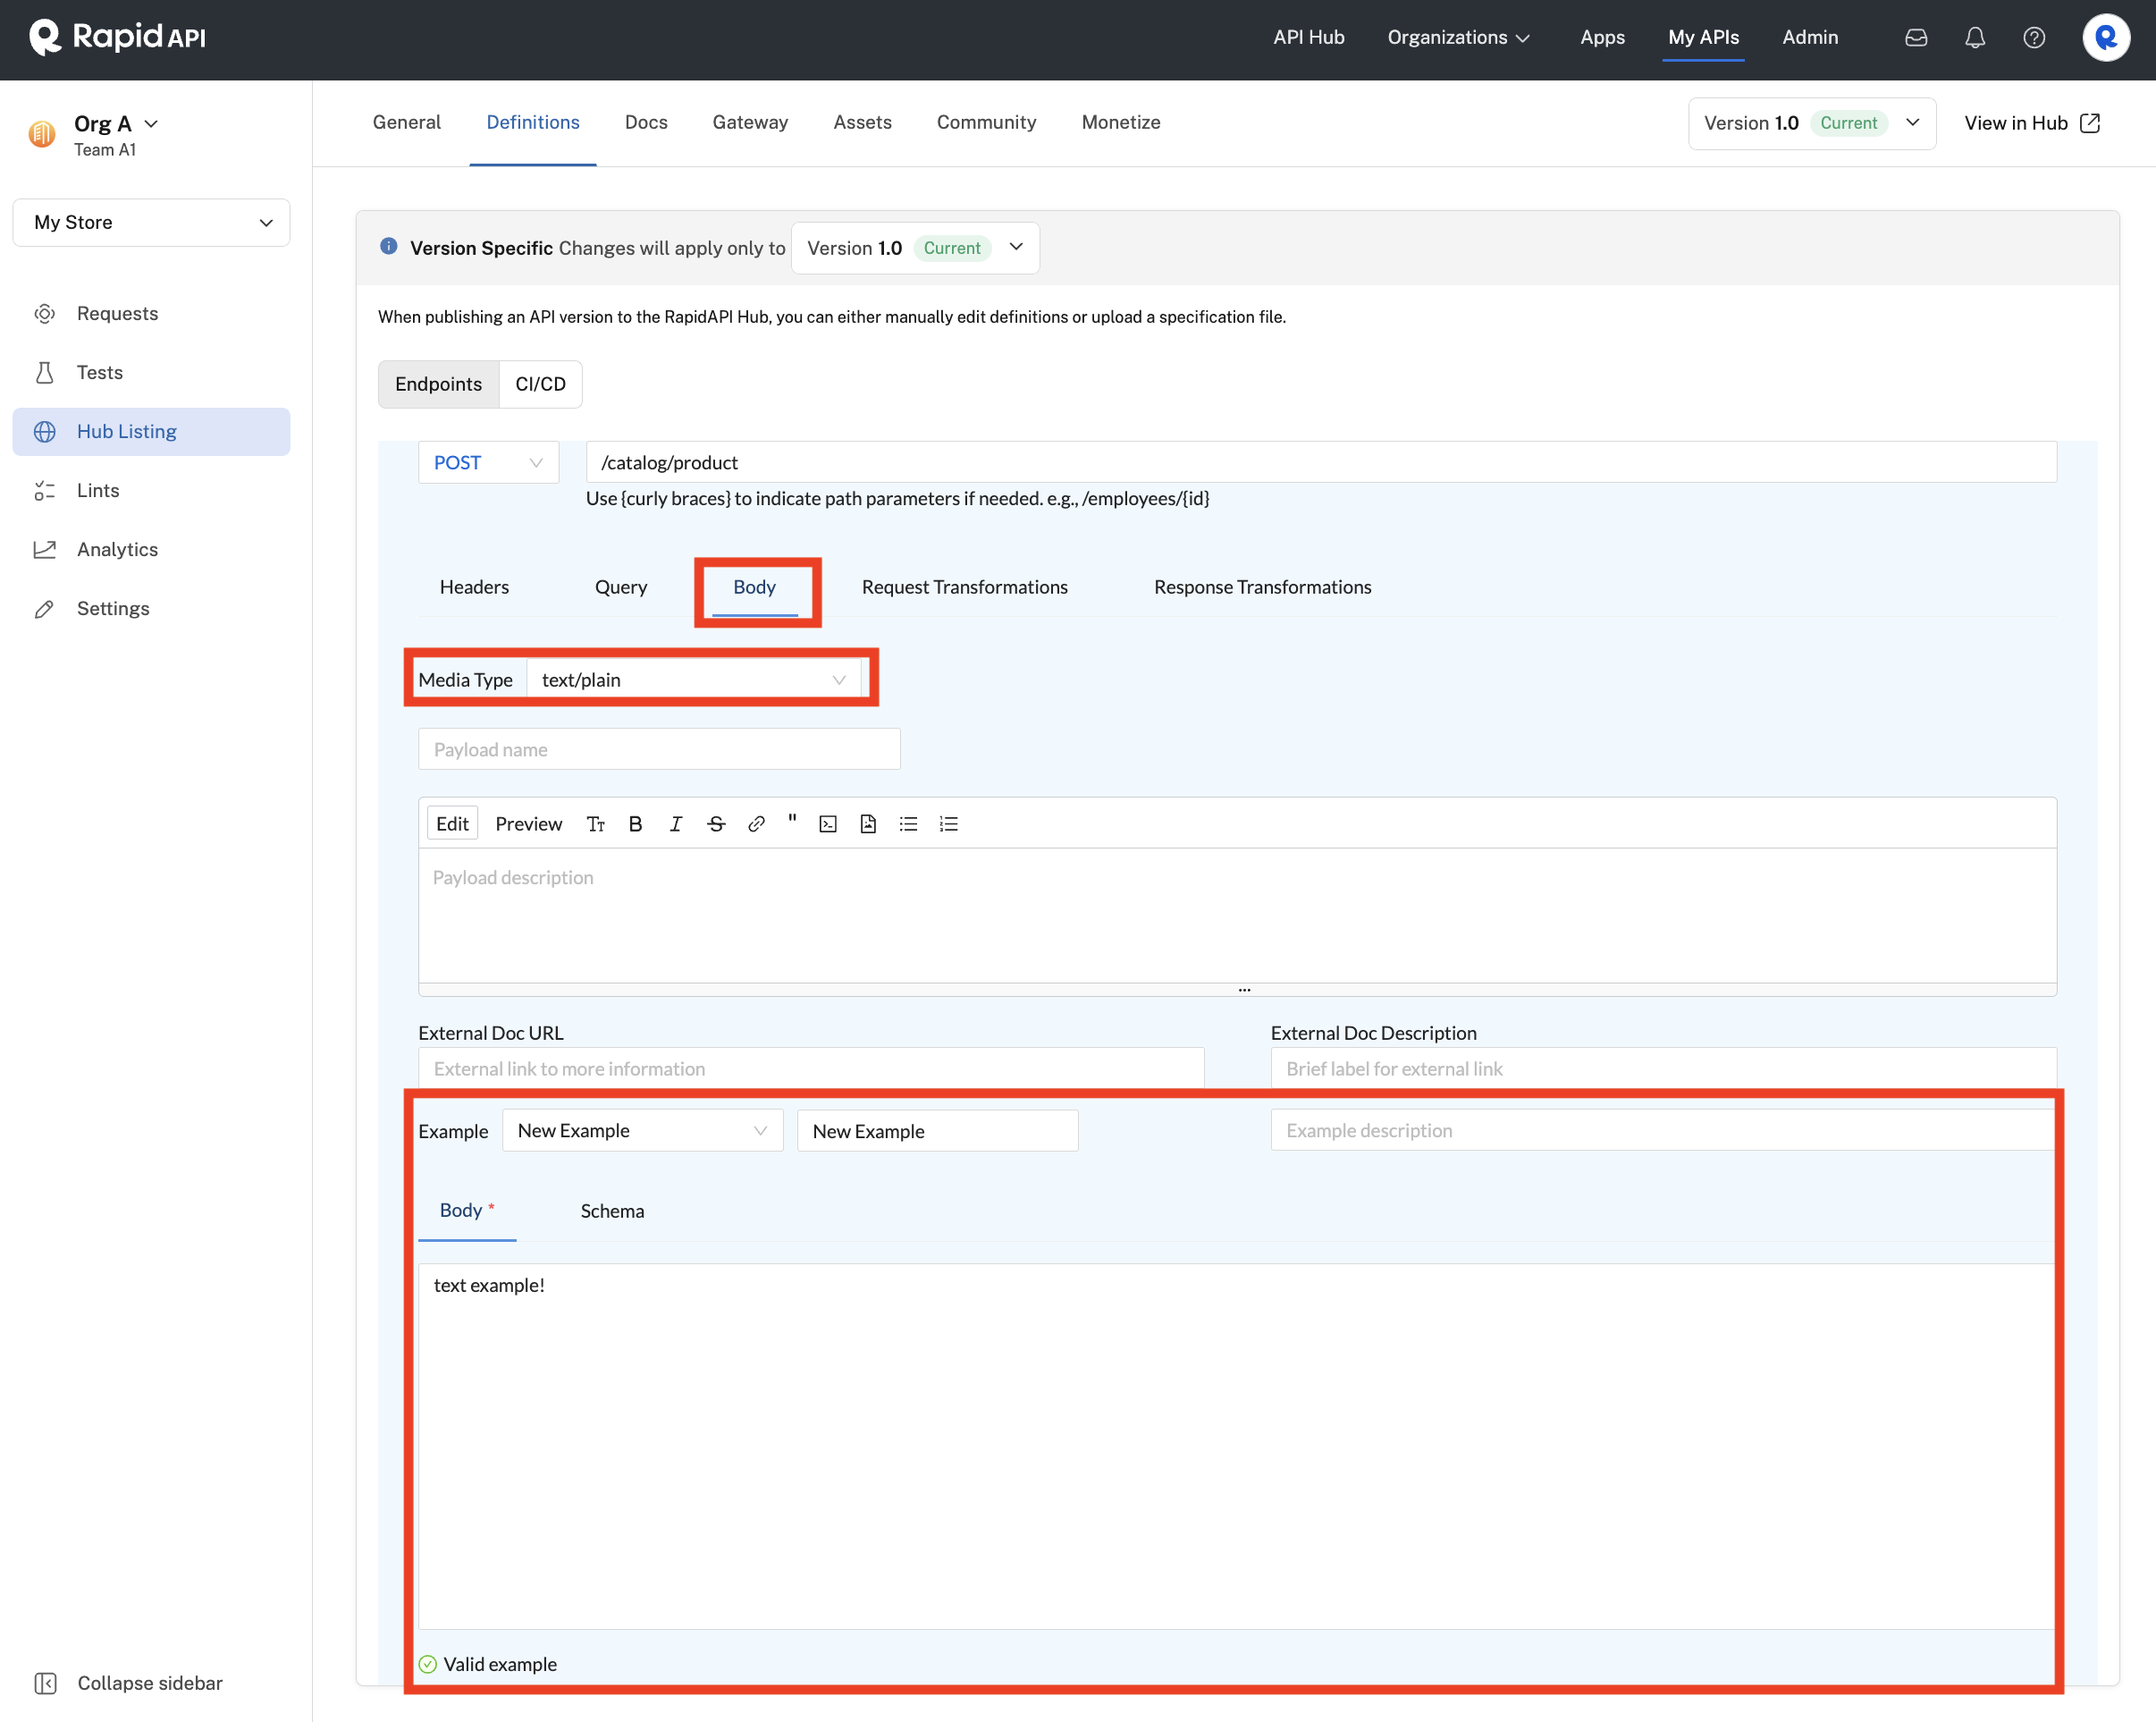
Specifying a text/plain body.
For application/octet-stream, the API consumer must upload a binary file for use as the request body.
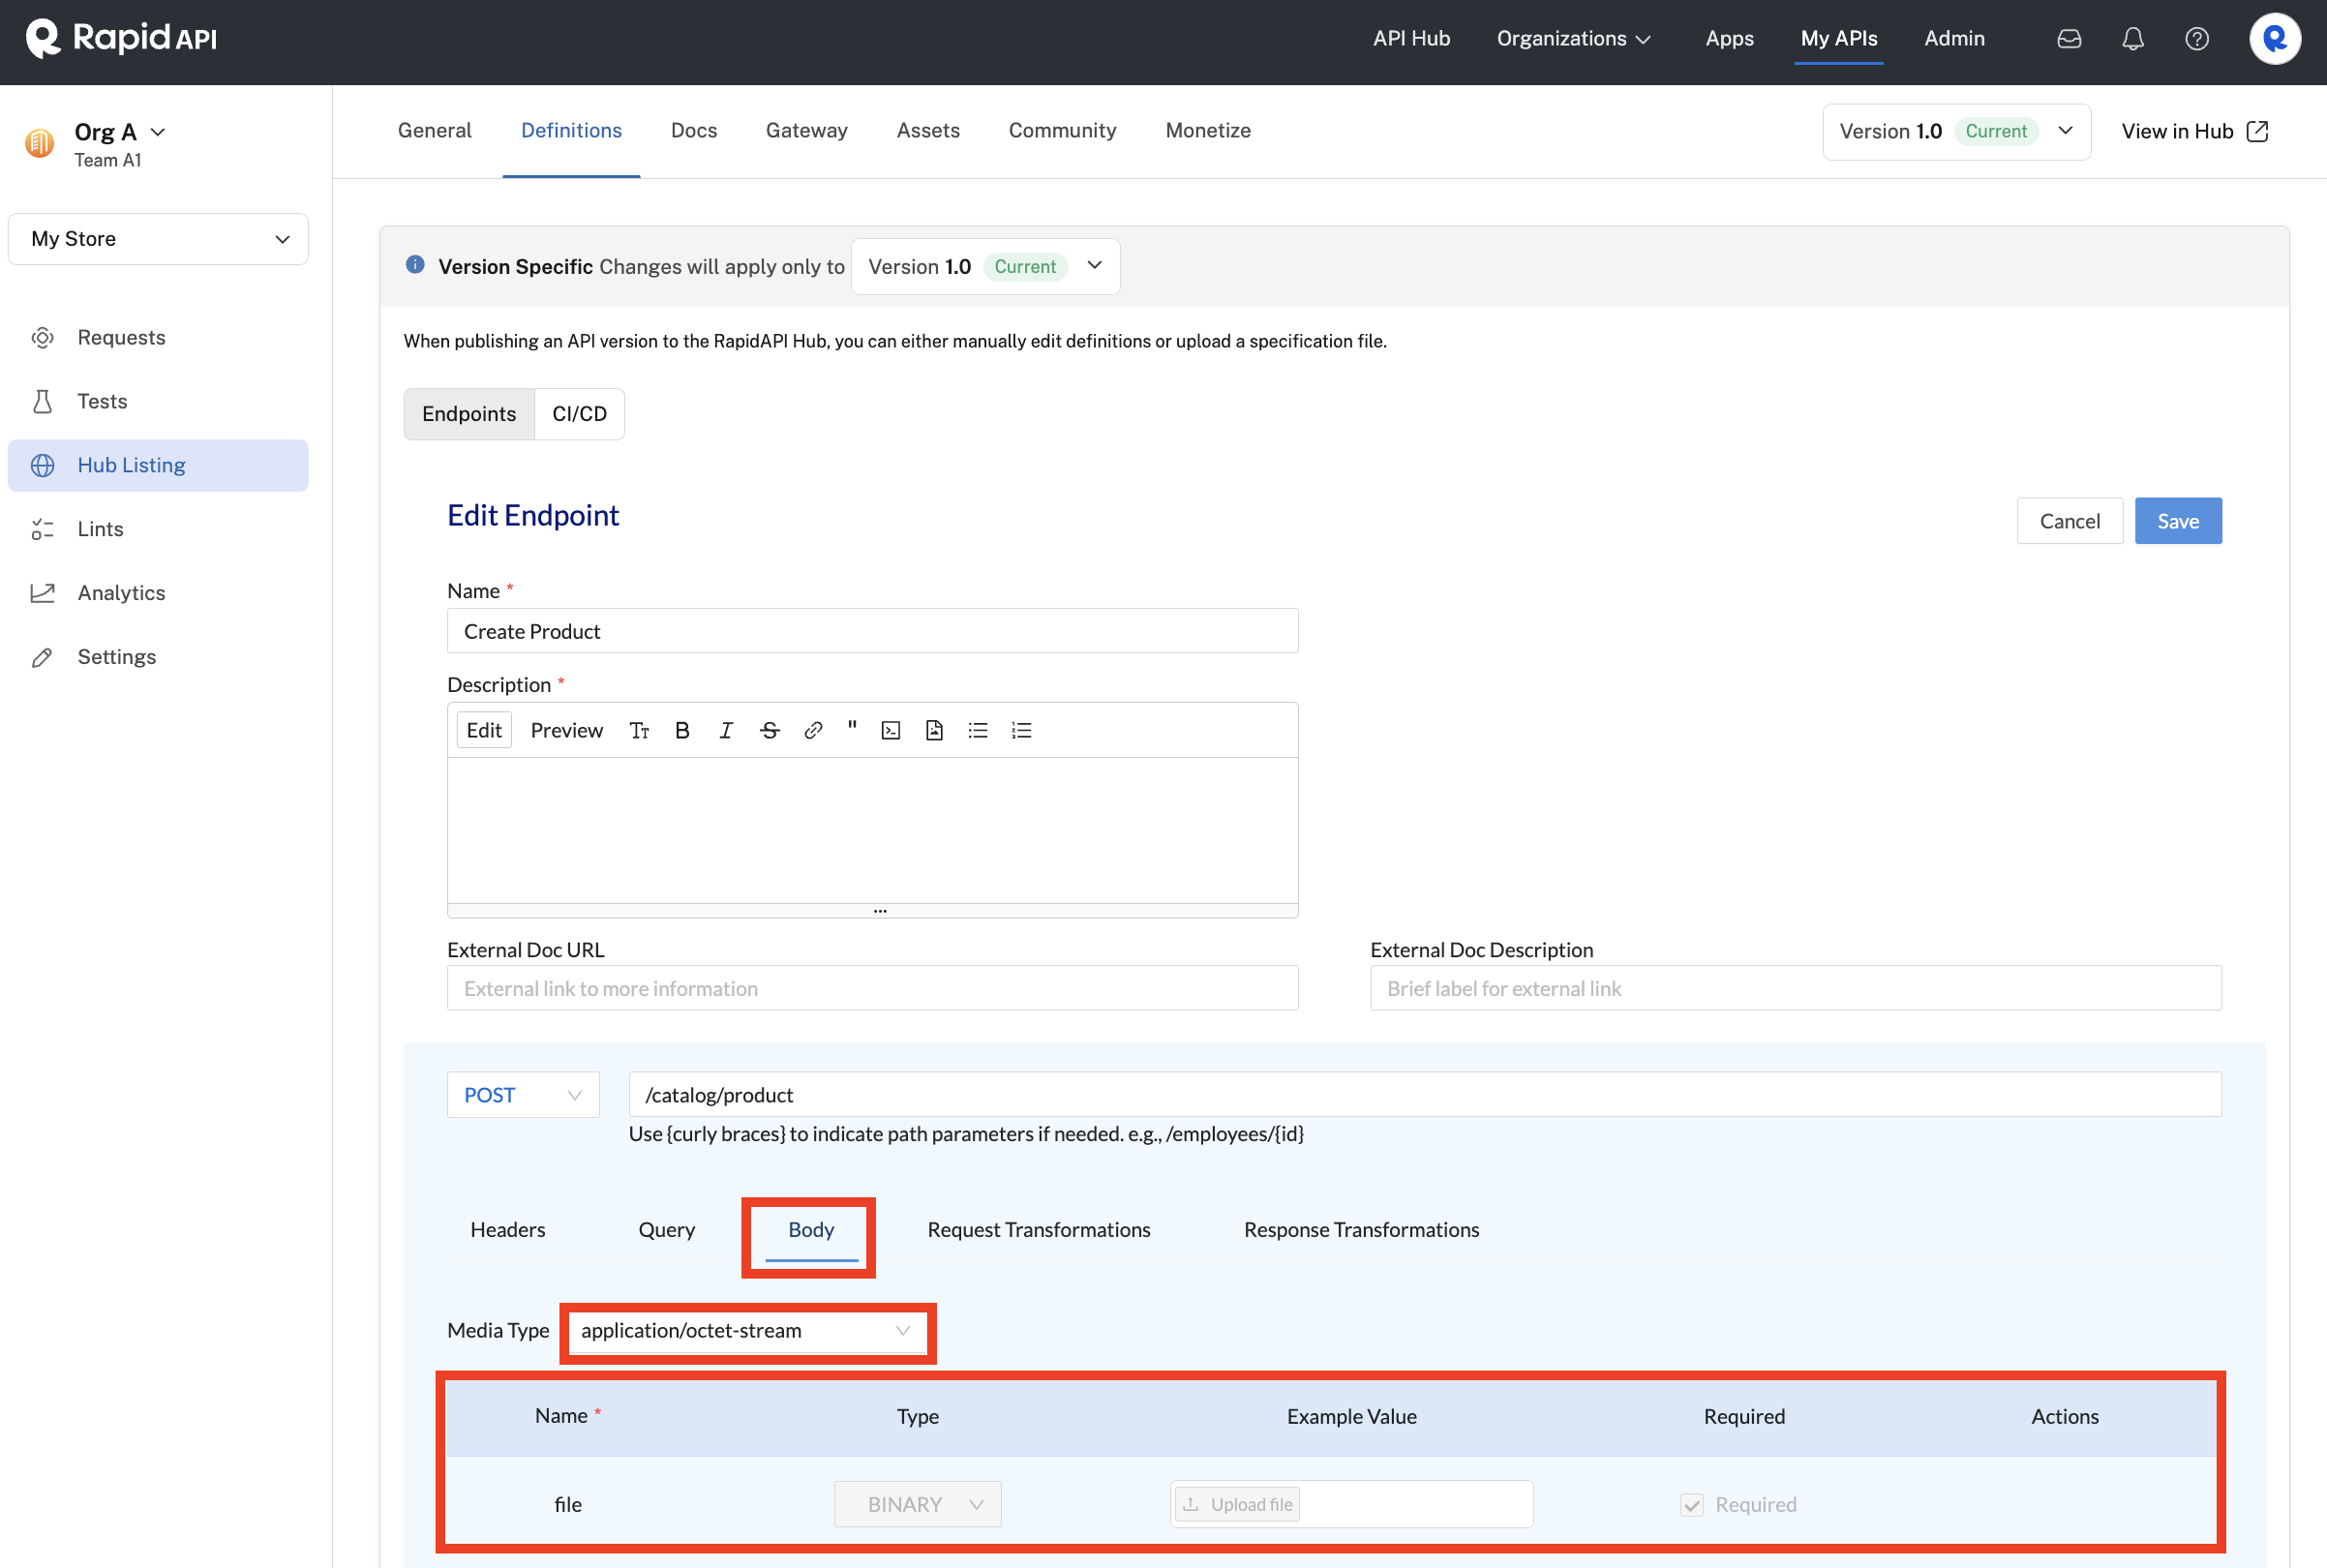
Specifying a binary file body.
For form-data, you can add and rearrange form fields, specifying the following information:
- Name: A name is required for your form field.
- Type: Choose from STRING, ENUM, NUMBER, BOOLEAN, DATE (YYYY-MM-DD), TIME (24-hour HH:MM), OBJECT, ARRAY, GEOPOINT (latitude, longitude), or BINARY.
- Example Value: A value can be pre-filled when an API consumer tests the endpoint.
- Required: Check this box to make the form field required.
- Edit details: Click to display the Edit Parameter dialog (see the example for request headers above).
- Delete: Click to delete the form field.
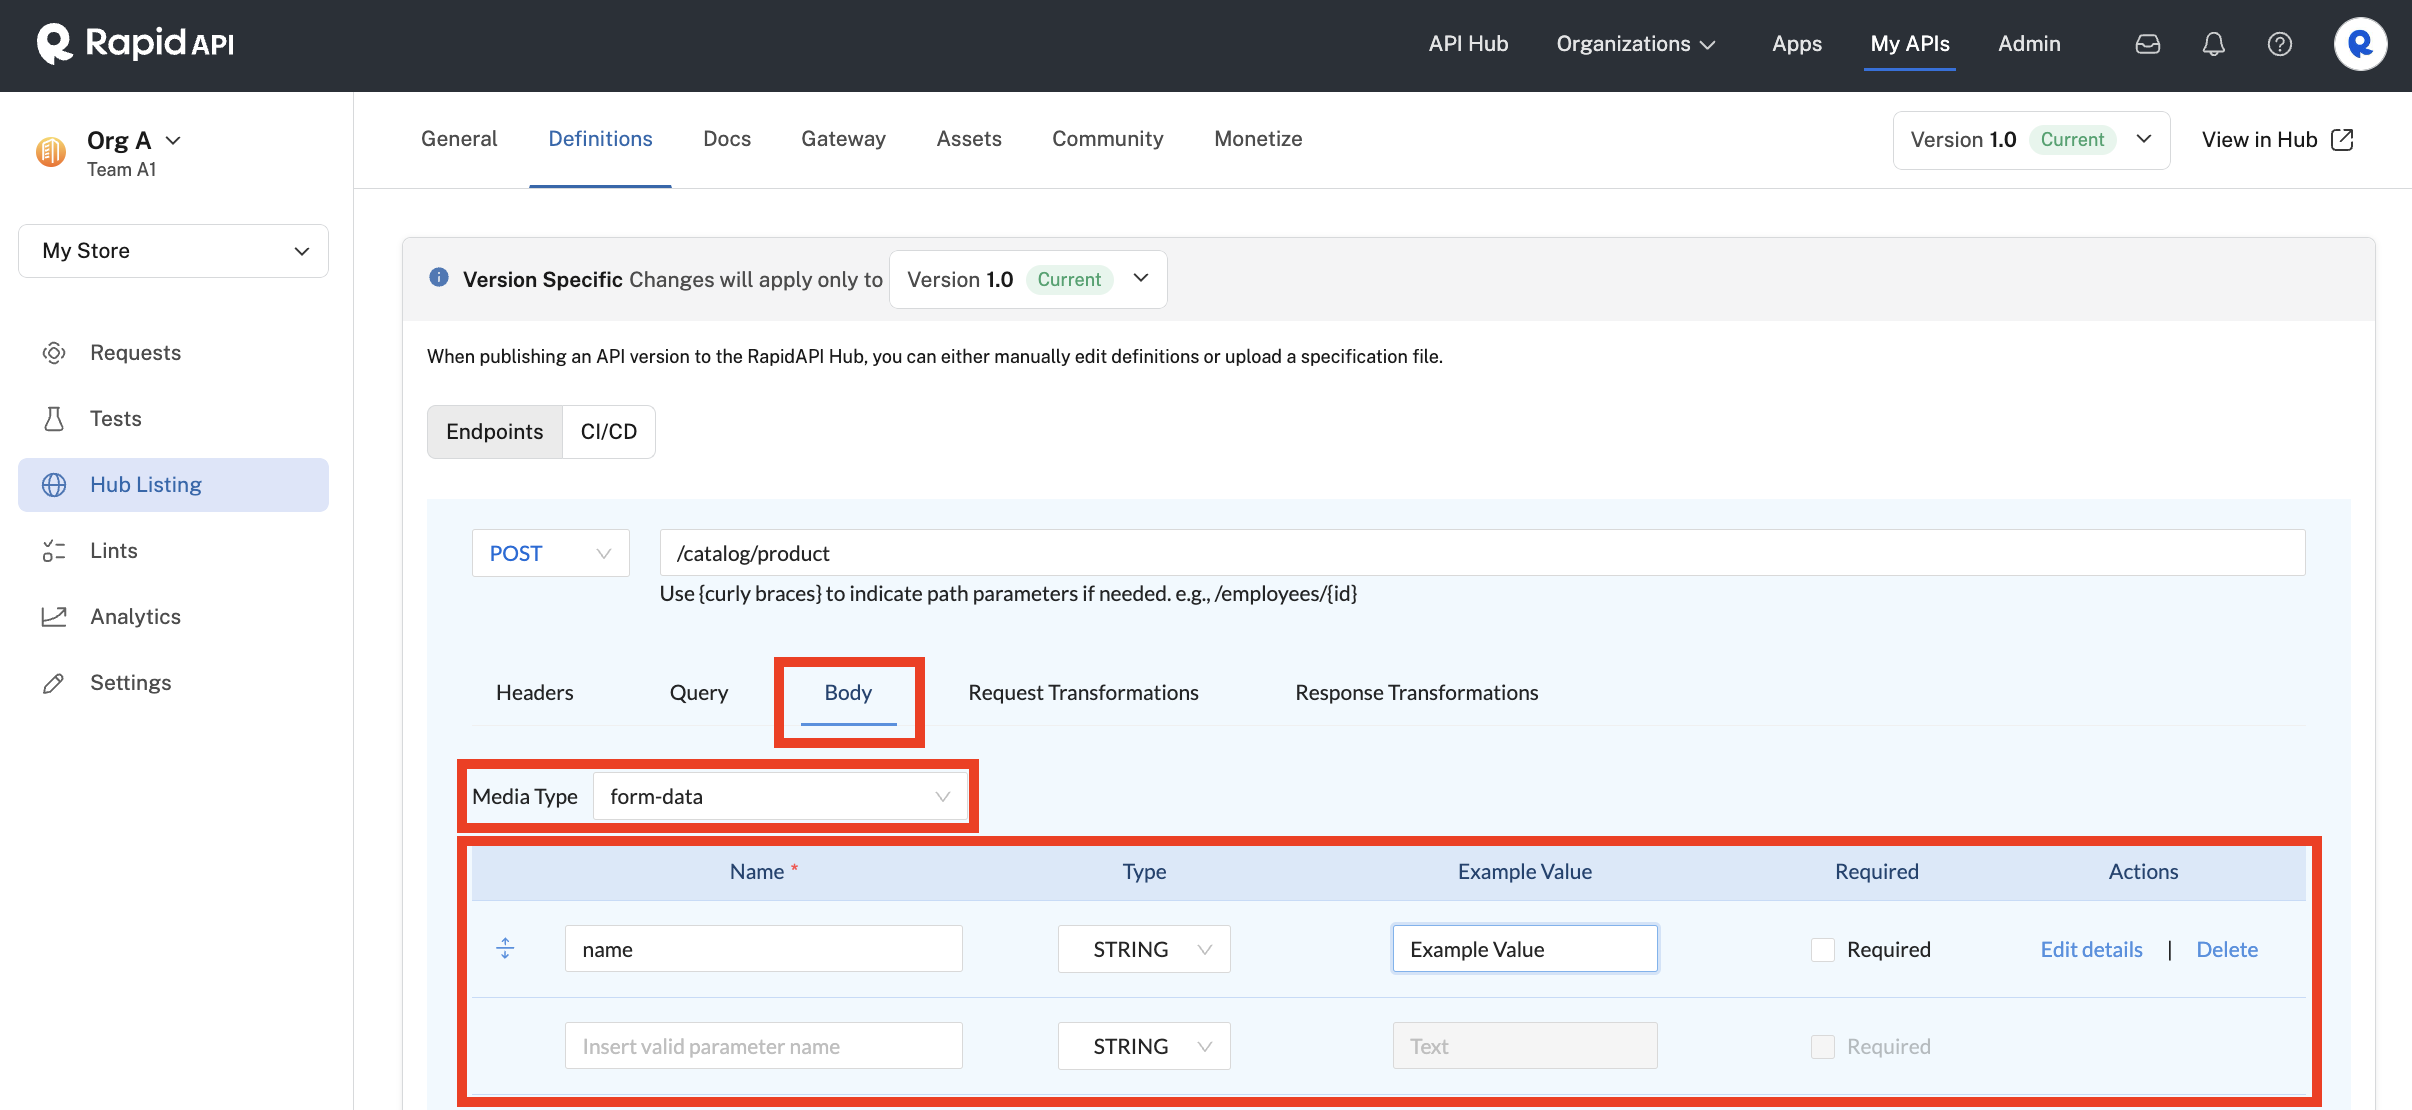
Specifying a form-data body.
Request and response transformations
See Hub Listing - Request and Response Transformations.
Example responses
API providers can make example responses available to API consumers. Scroll down to the Response section, then click Example Responses. You can supply the response status code, description (markdown is supported), example headers, and the example body.
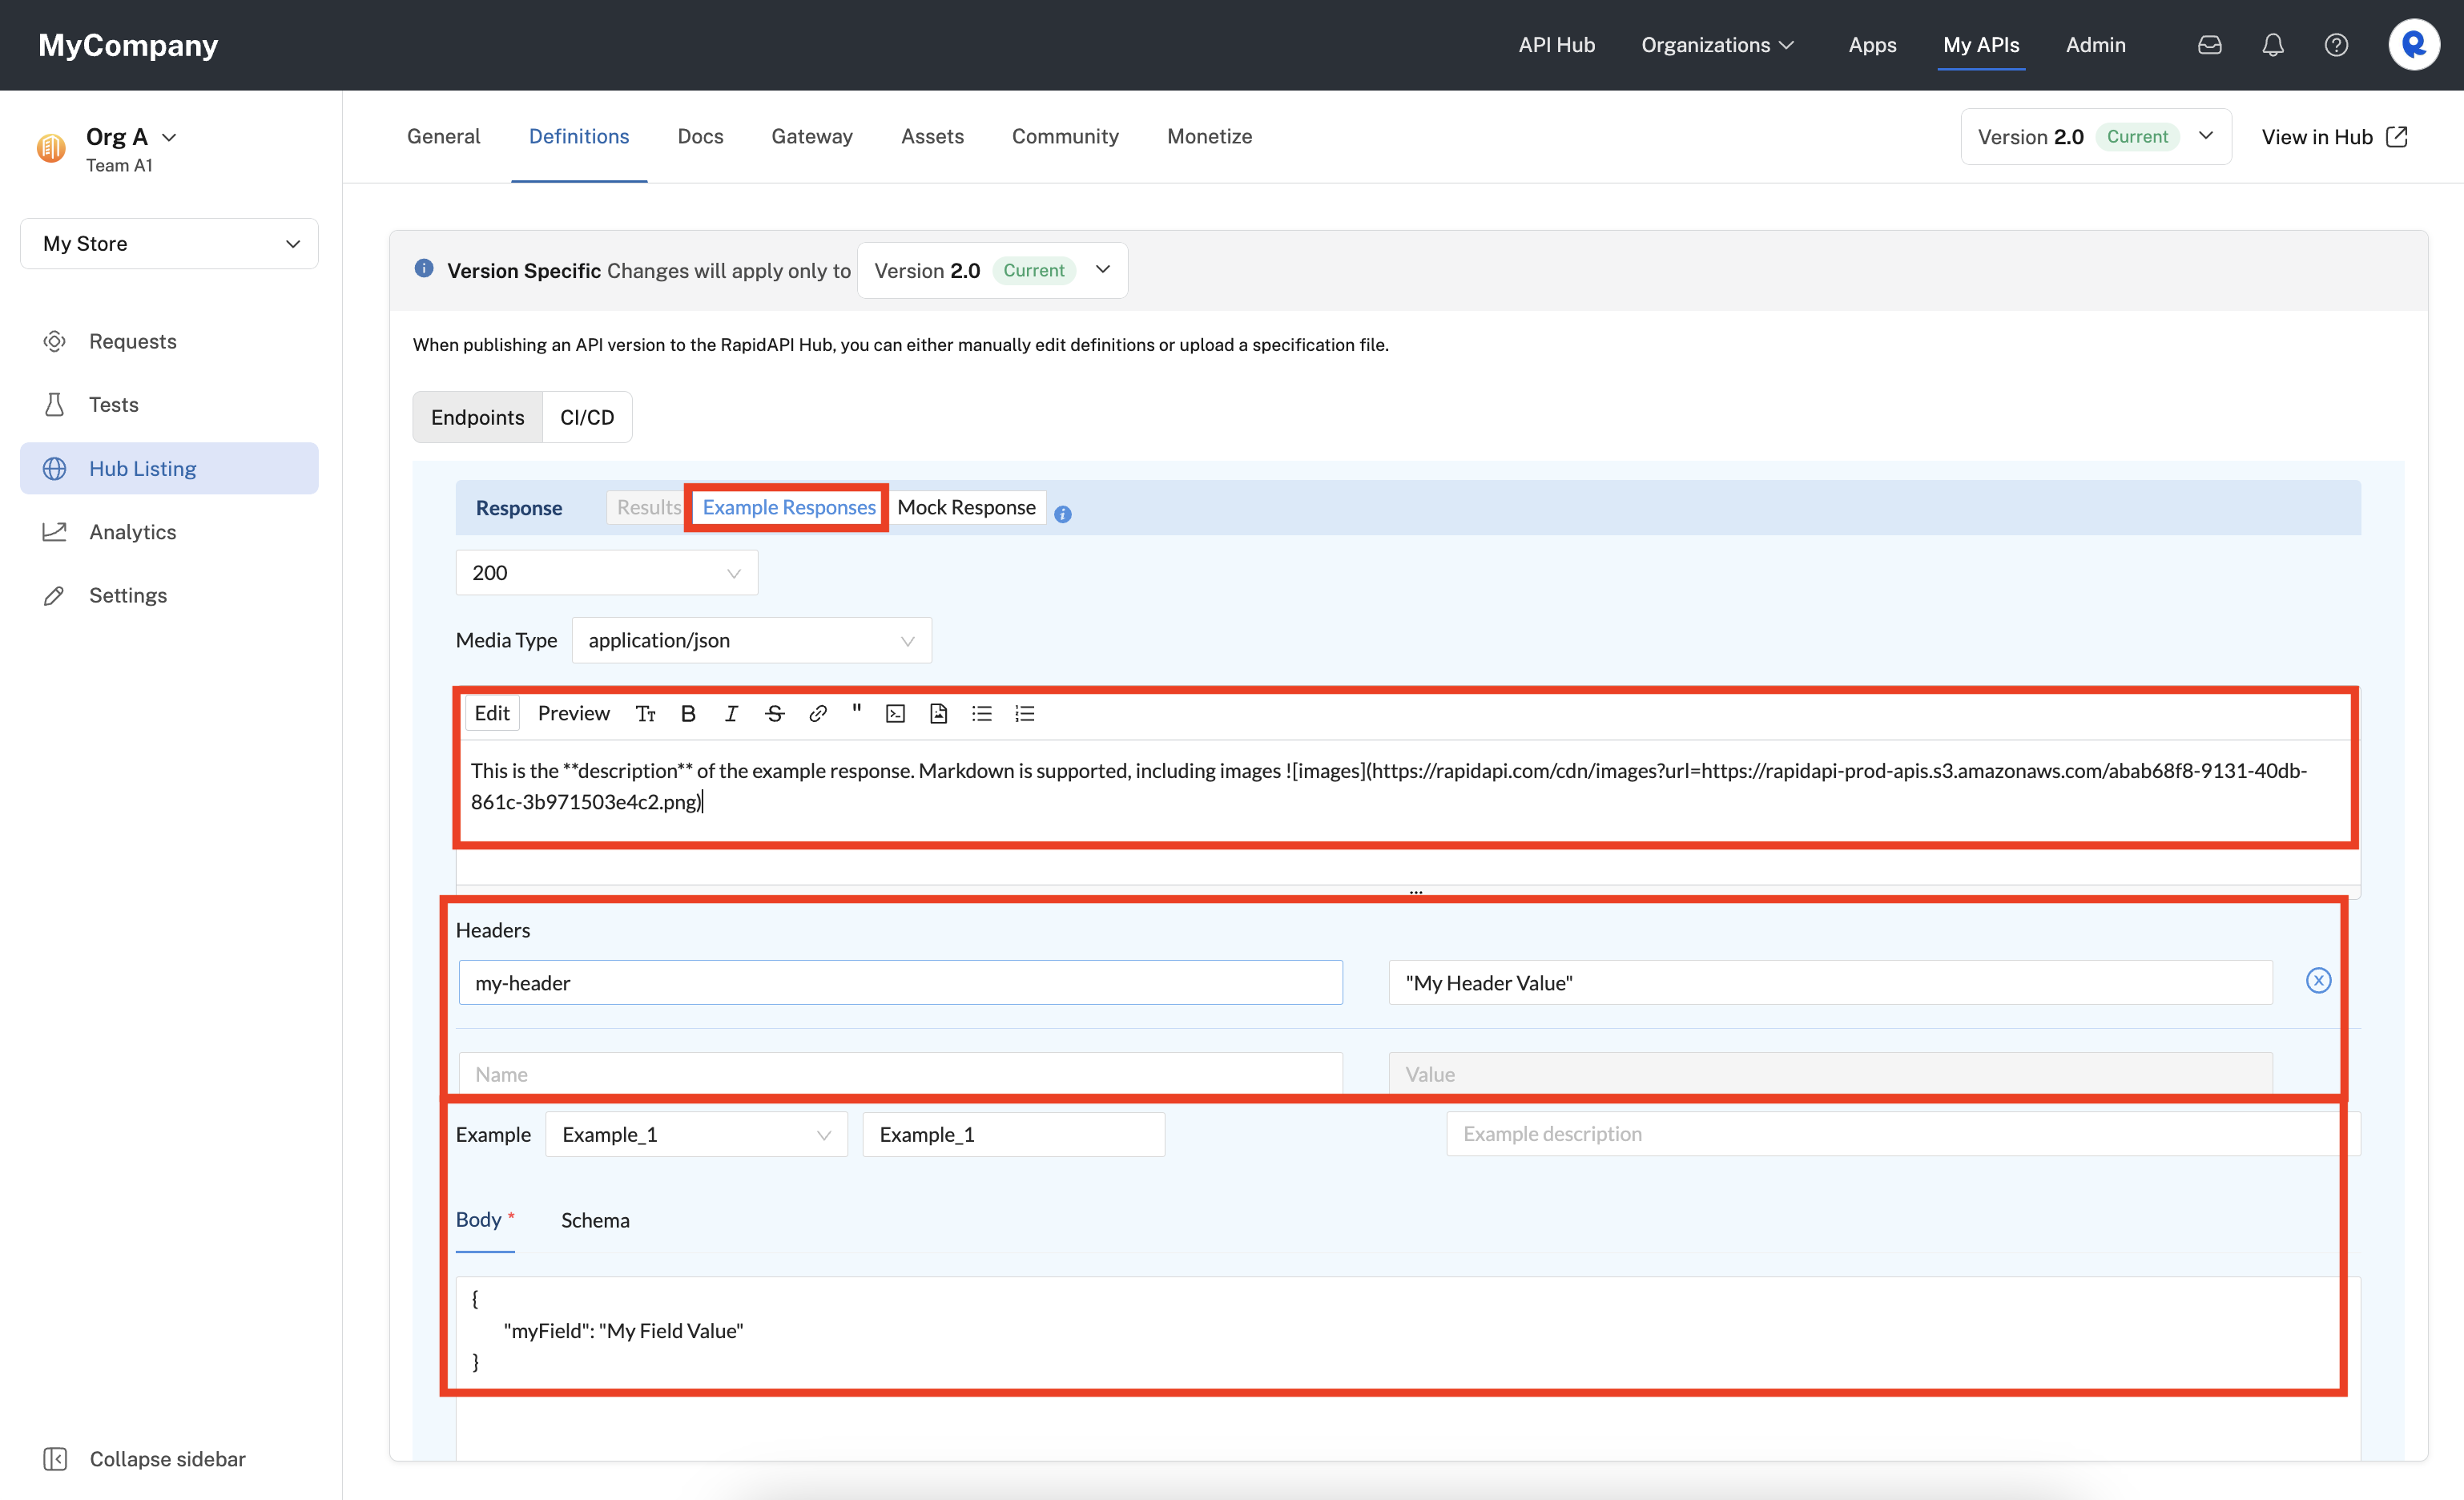
Configuring an endpoint's example responses.
API consumers can then view the example responses in the API's listing. Select an endpoint, then in the right window, click Example Responses. You can view the example's description, as well as example status code, body, and headers.
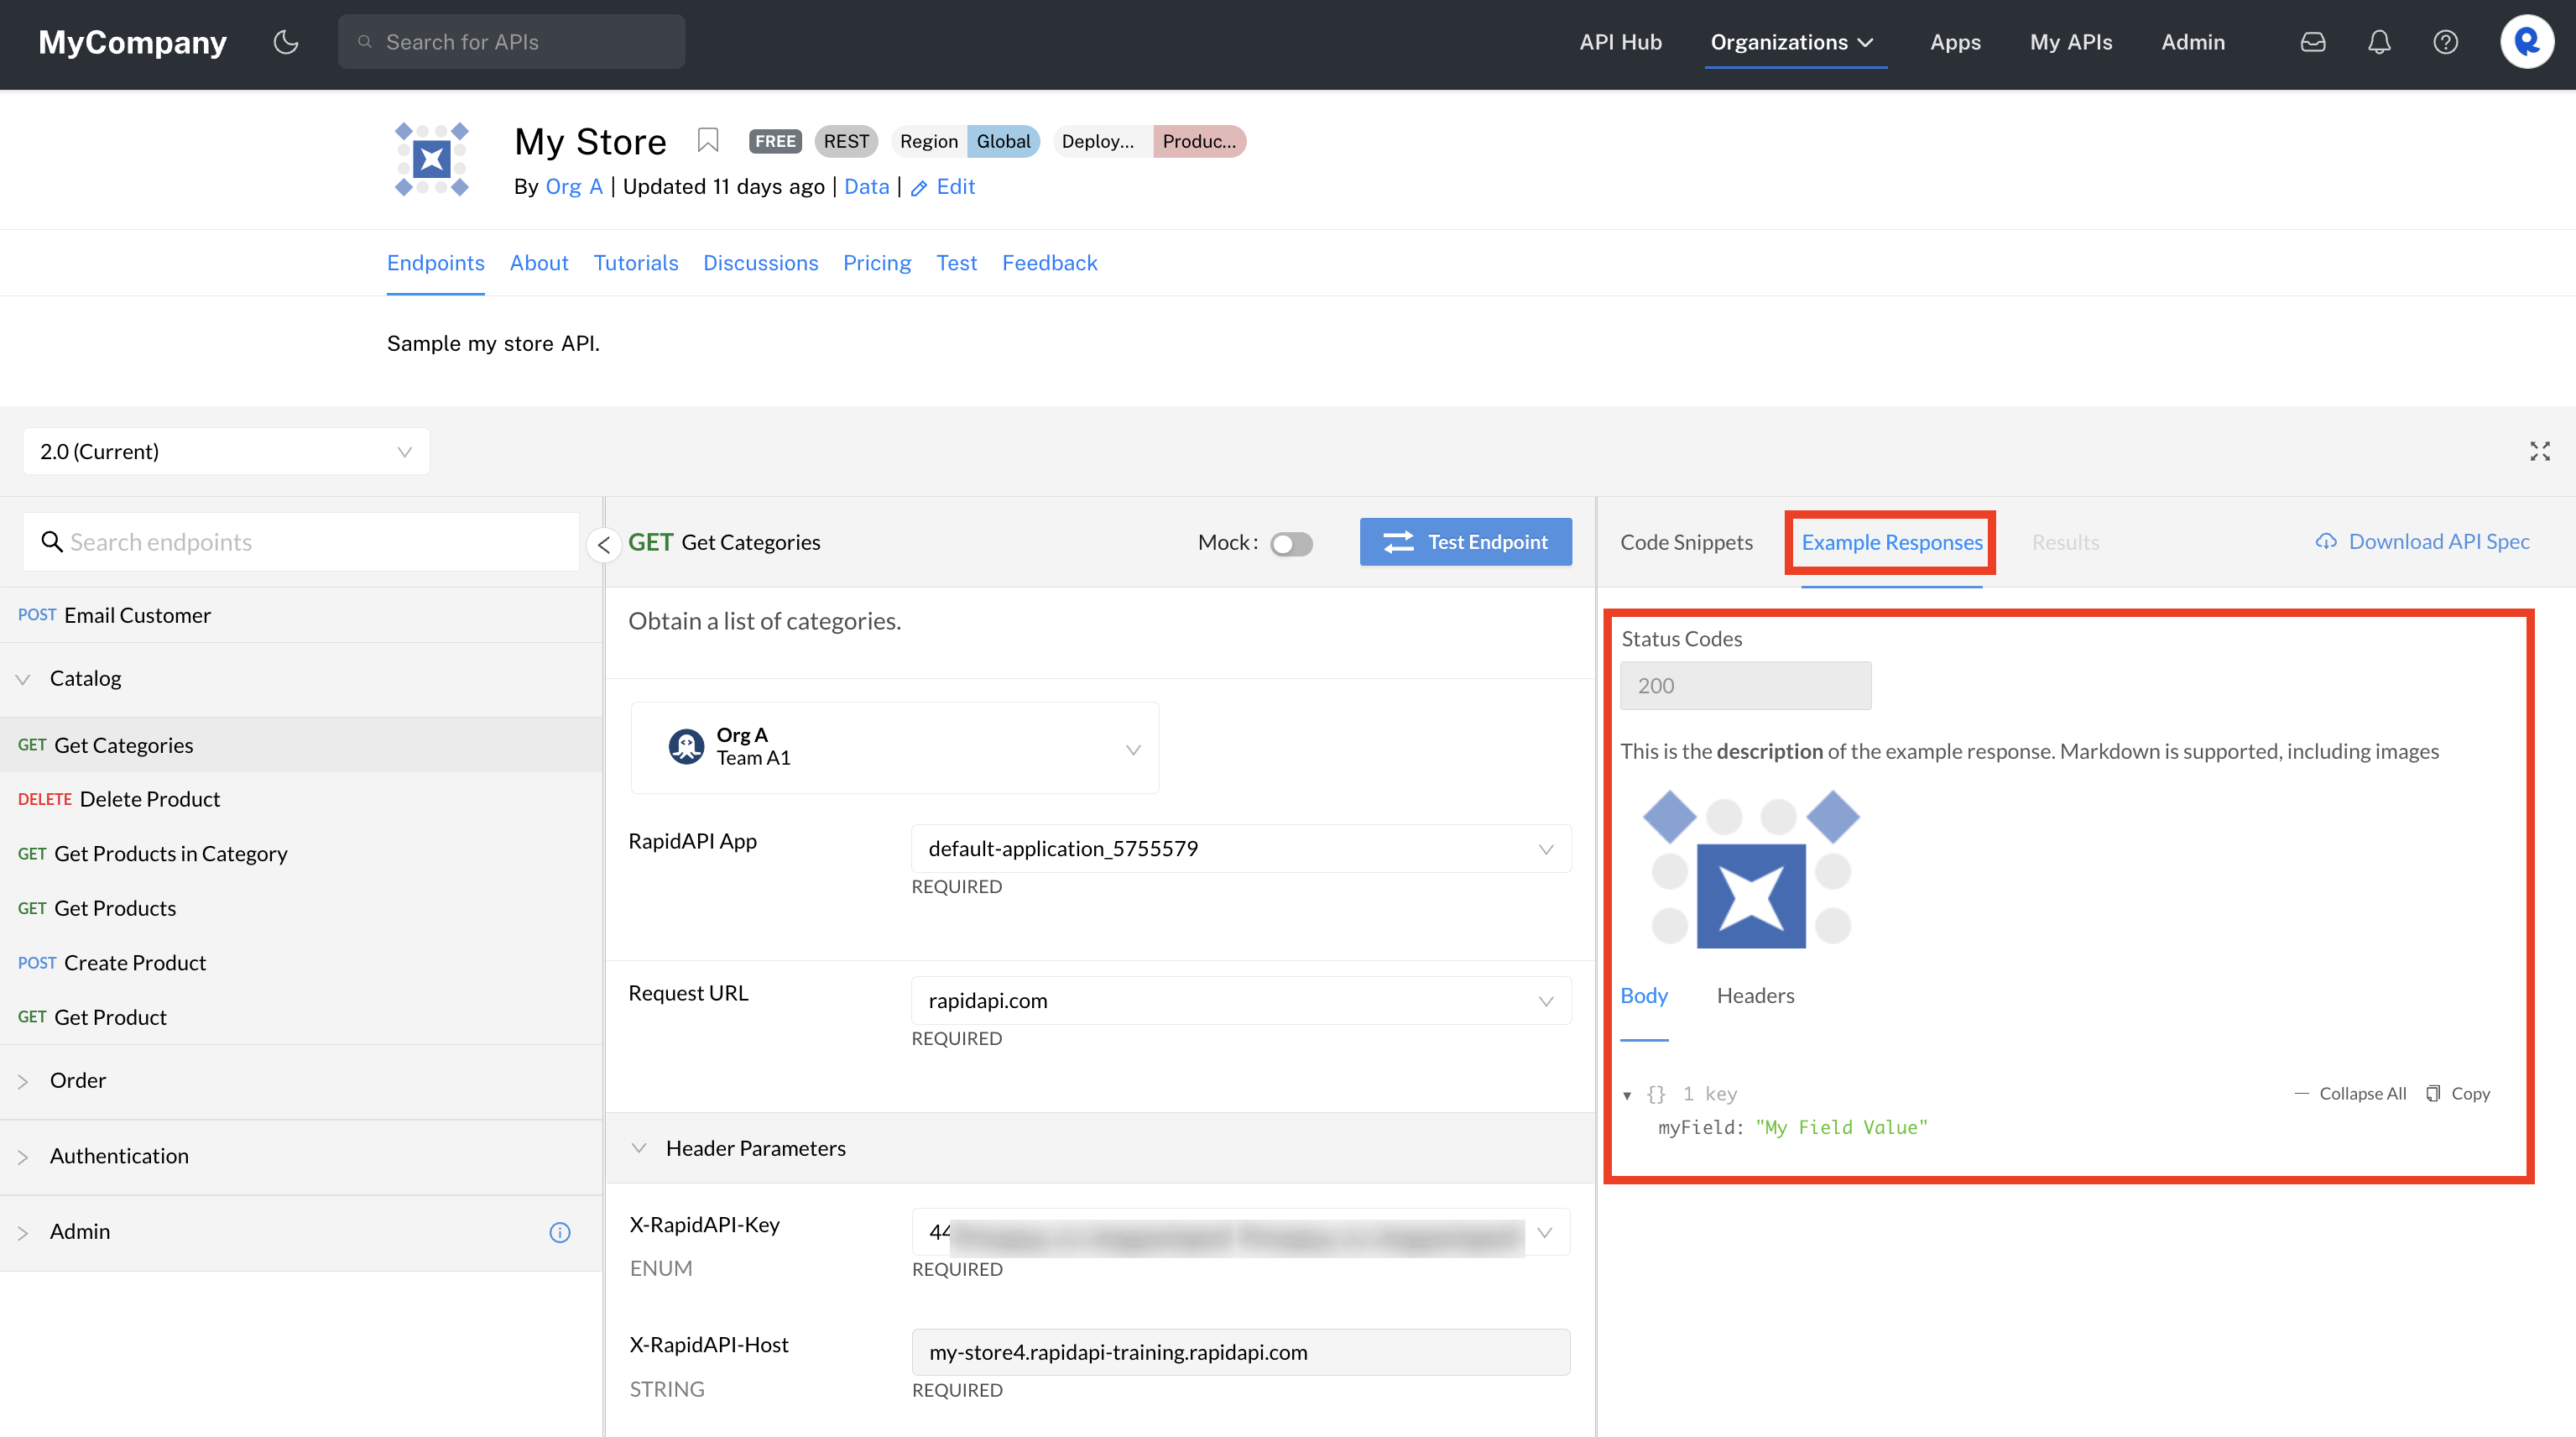
An API consumer viewing an example response for an endpoint.
Mock responses
Rapid Runtime only
Mock responses as described here are only available if your API uses the Rapid Runtime.
Mock responses allow you to develop and test related services and apps while the API itself is still under development. Rather than forwarding requests to an actual endpoint, the Rapid Runtime returns a "mock", or hard-coded, response to the API consumer.
There are two main ways to mock an API's endpoint:
- Simple mocking
- Multiple status code mocking
Enabling a simple mock response
From Studio, navigate to the API's Hub Listing > Definitions tab. Select the Endpoints tab. Click Edit next to the endpoint for which you would like to set up a mock response.
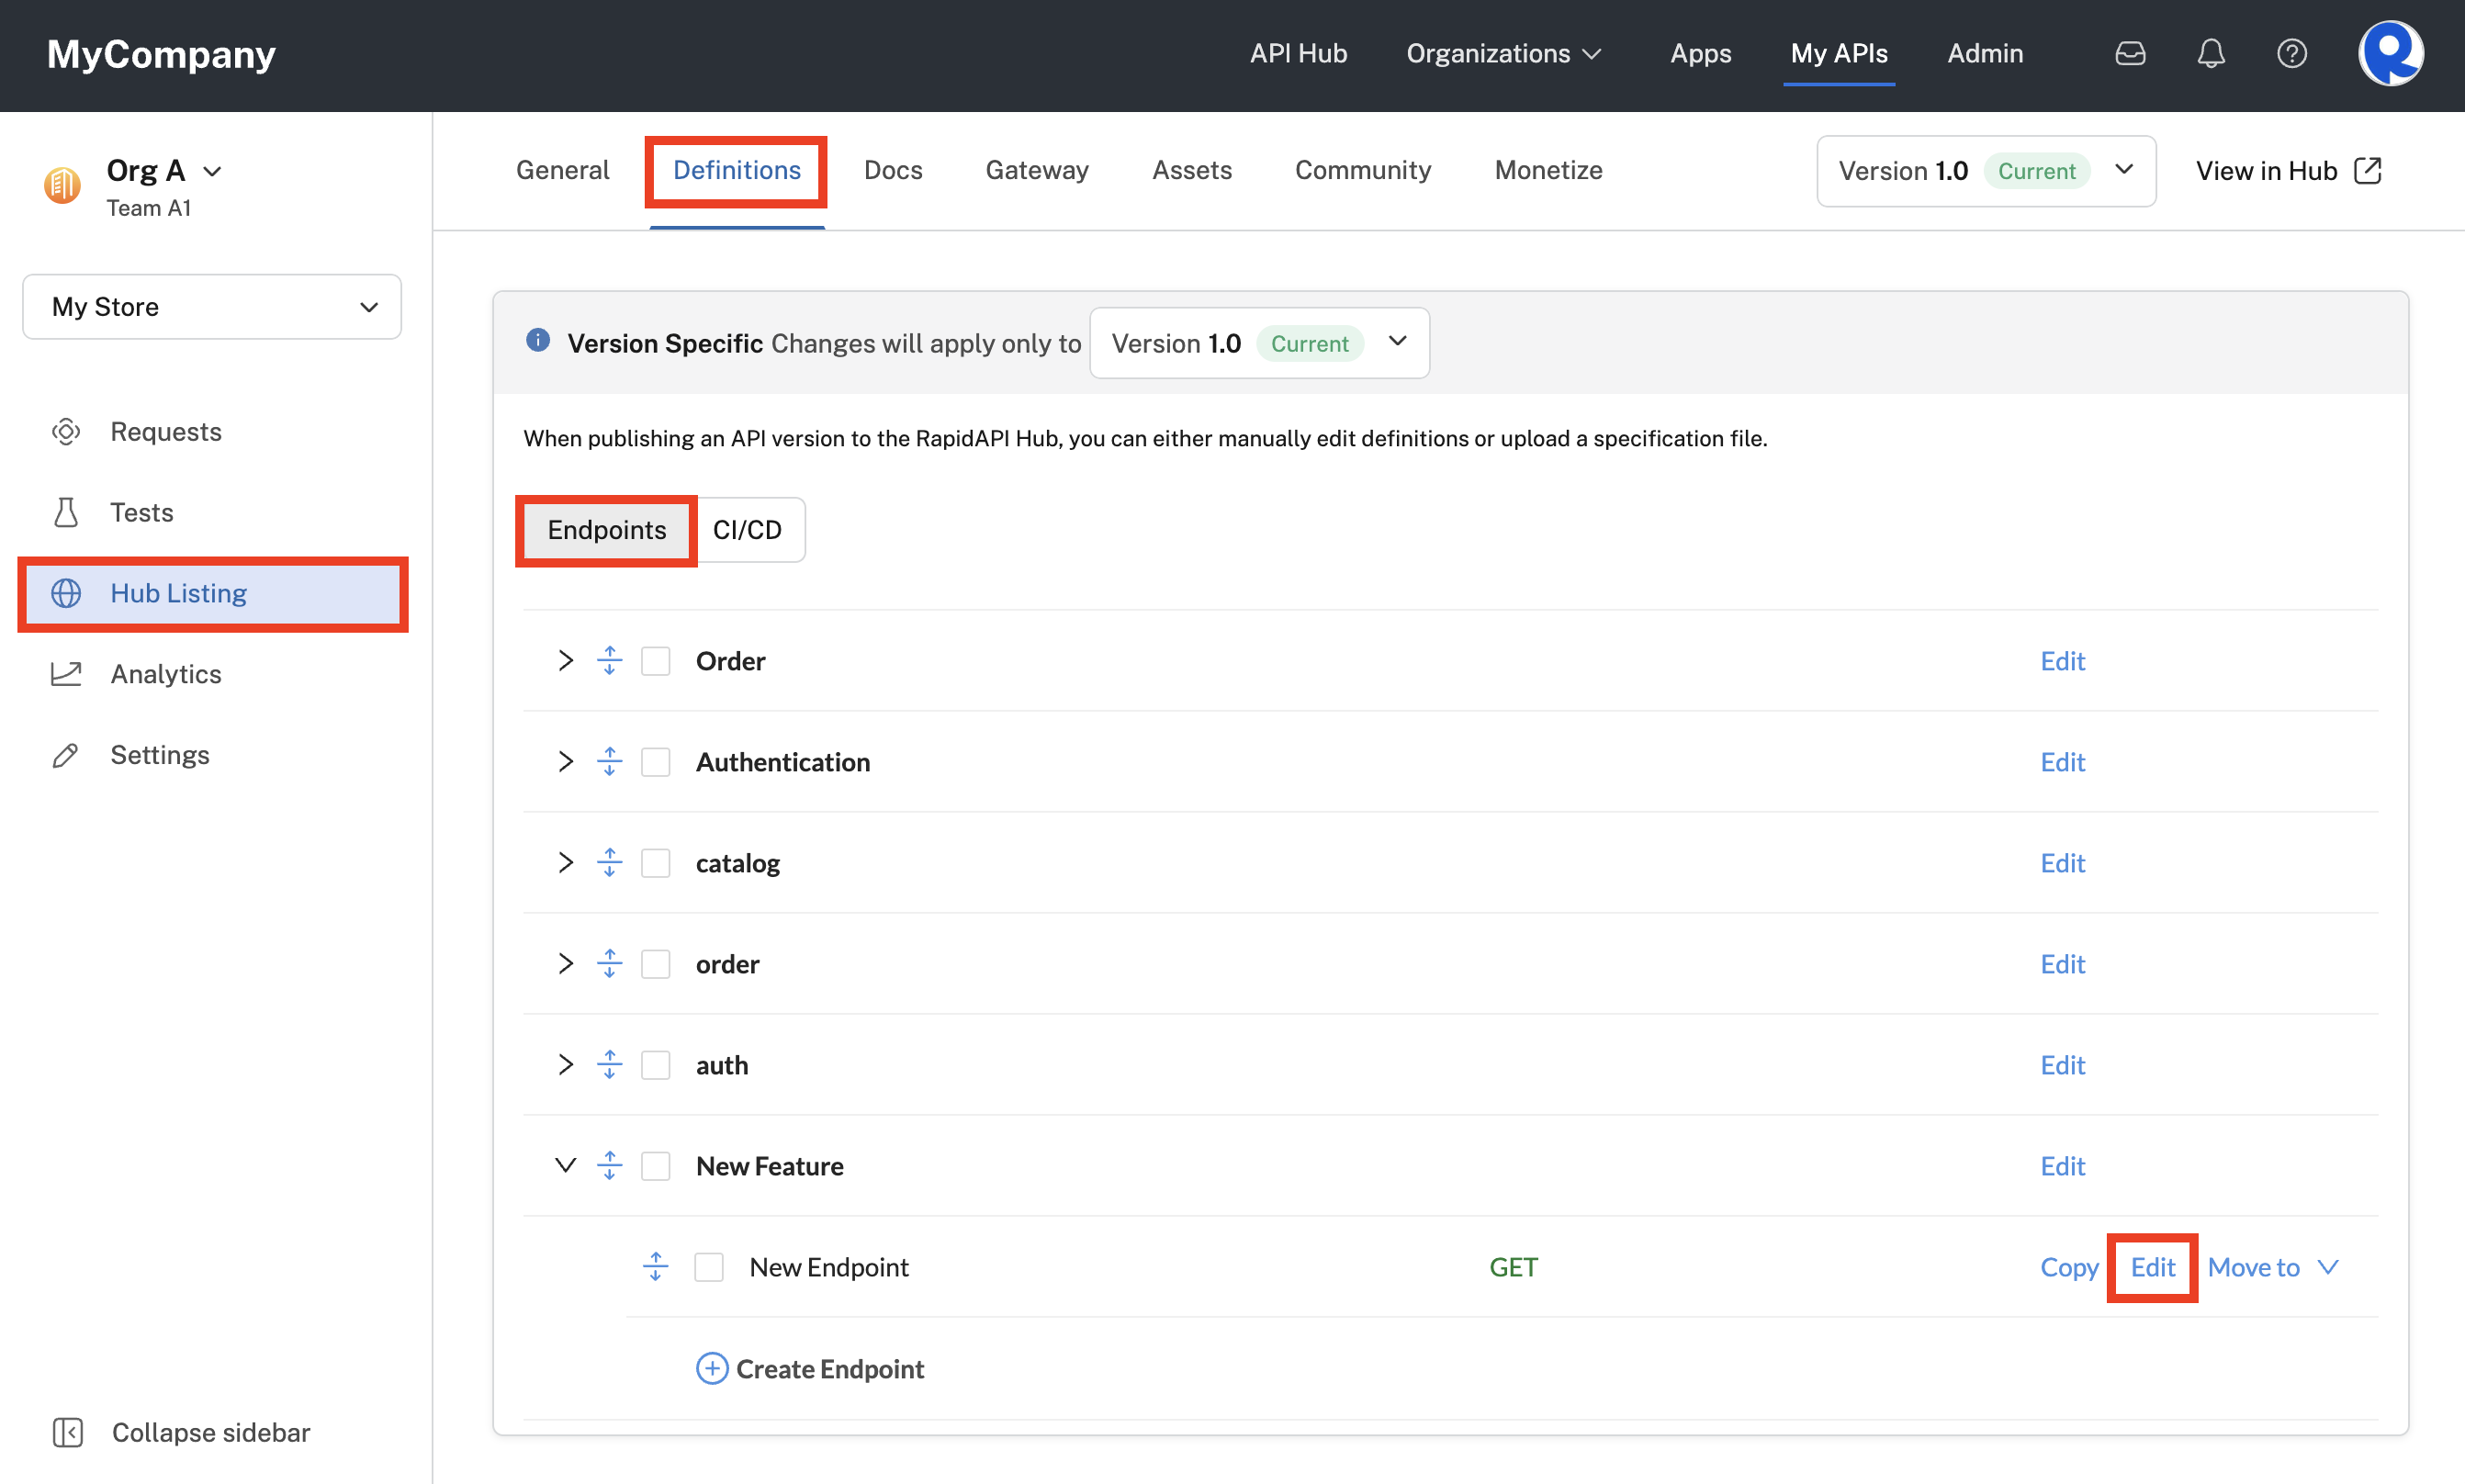
Edit an endpoint to set up mocking.
Scroll to the bottom of the edit endpoint screen and click the Mock Response button. Specify a response Code, optional response Headers, and response Body. Enable mock response with the slider, and Save the changes to the endpoint.

Enabling a simple mock response for an endpoint.
You can specify a separate mock response for each endpoint. You can also override an actual response from the API by enabling a mock response for the endpoint.
An API consumer testing the API on the Hub will see the response that you set up above.
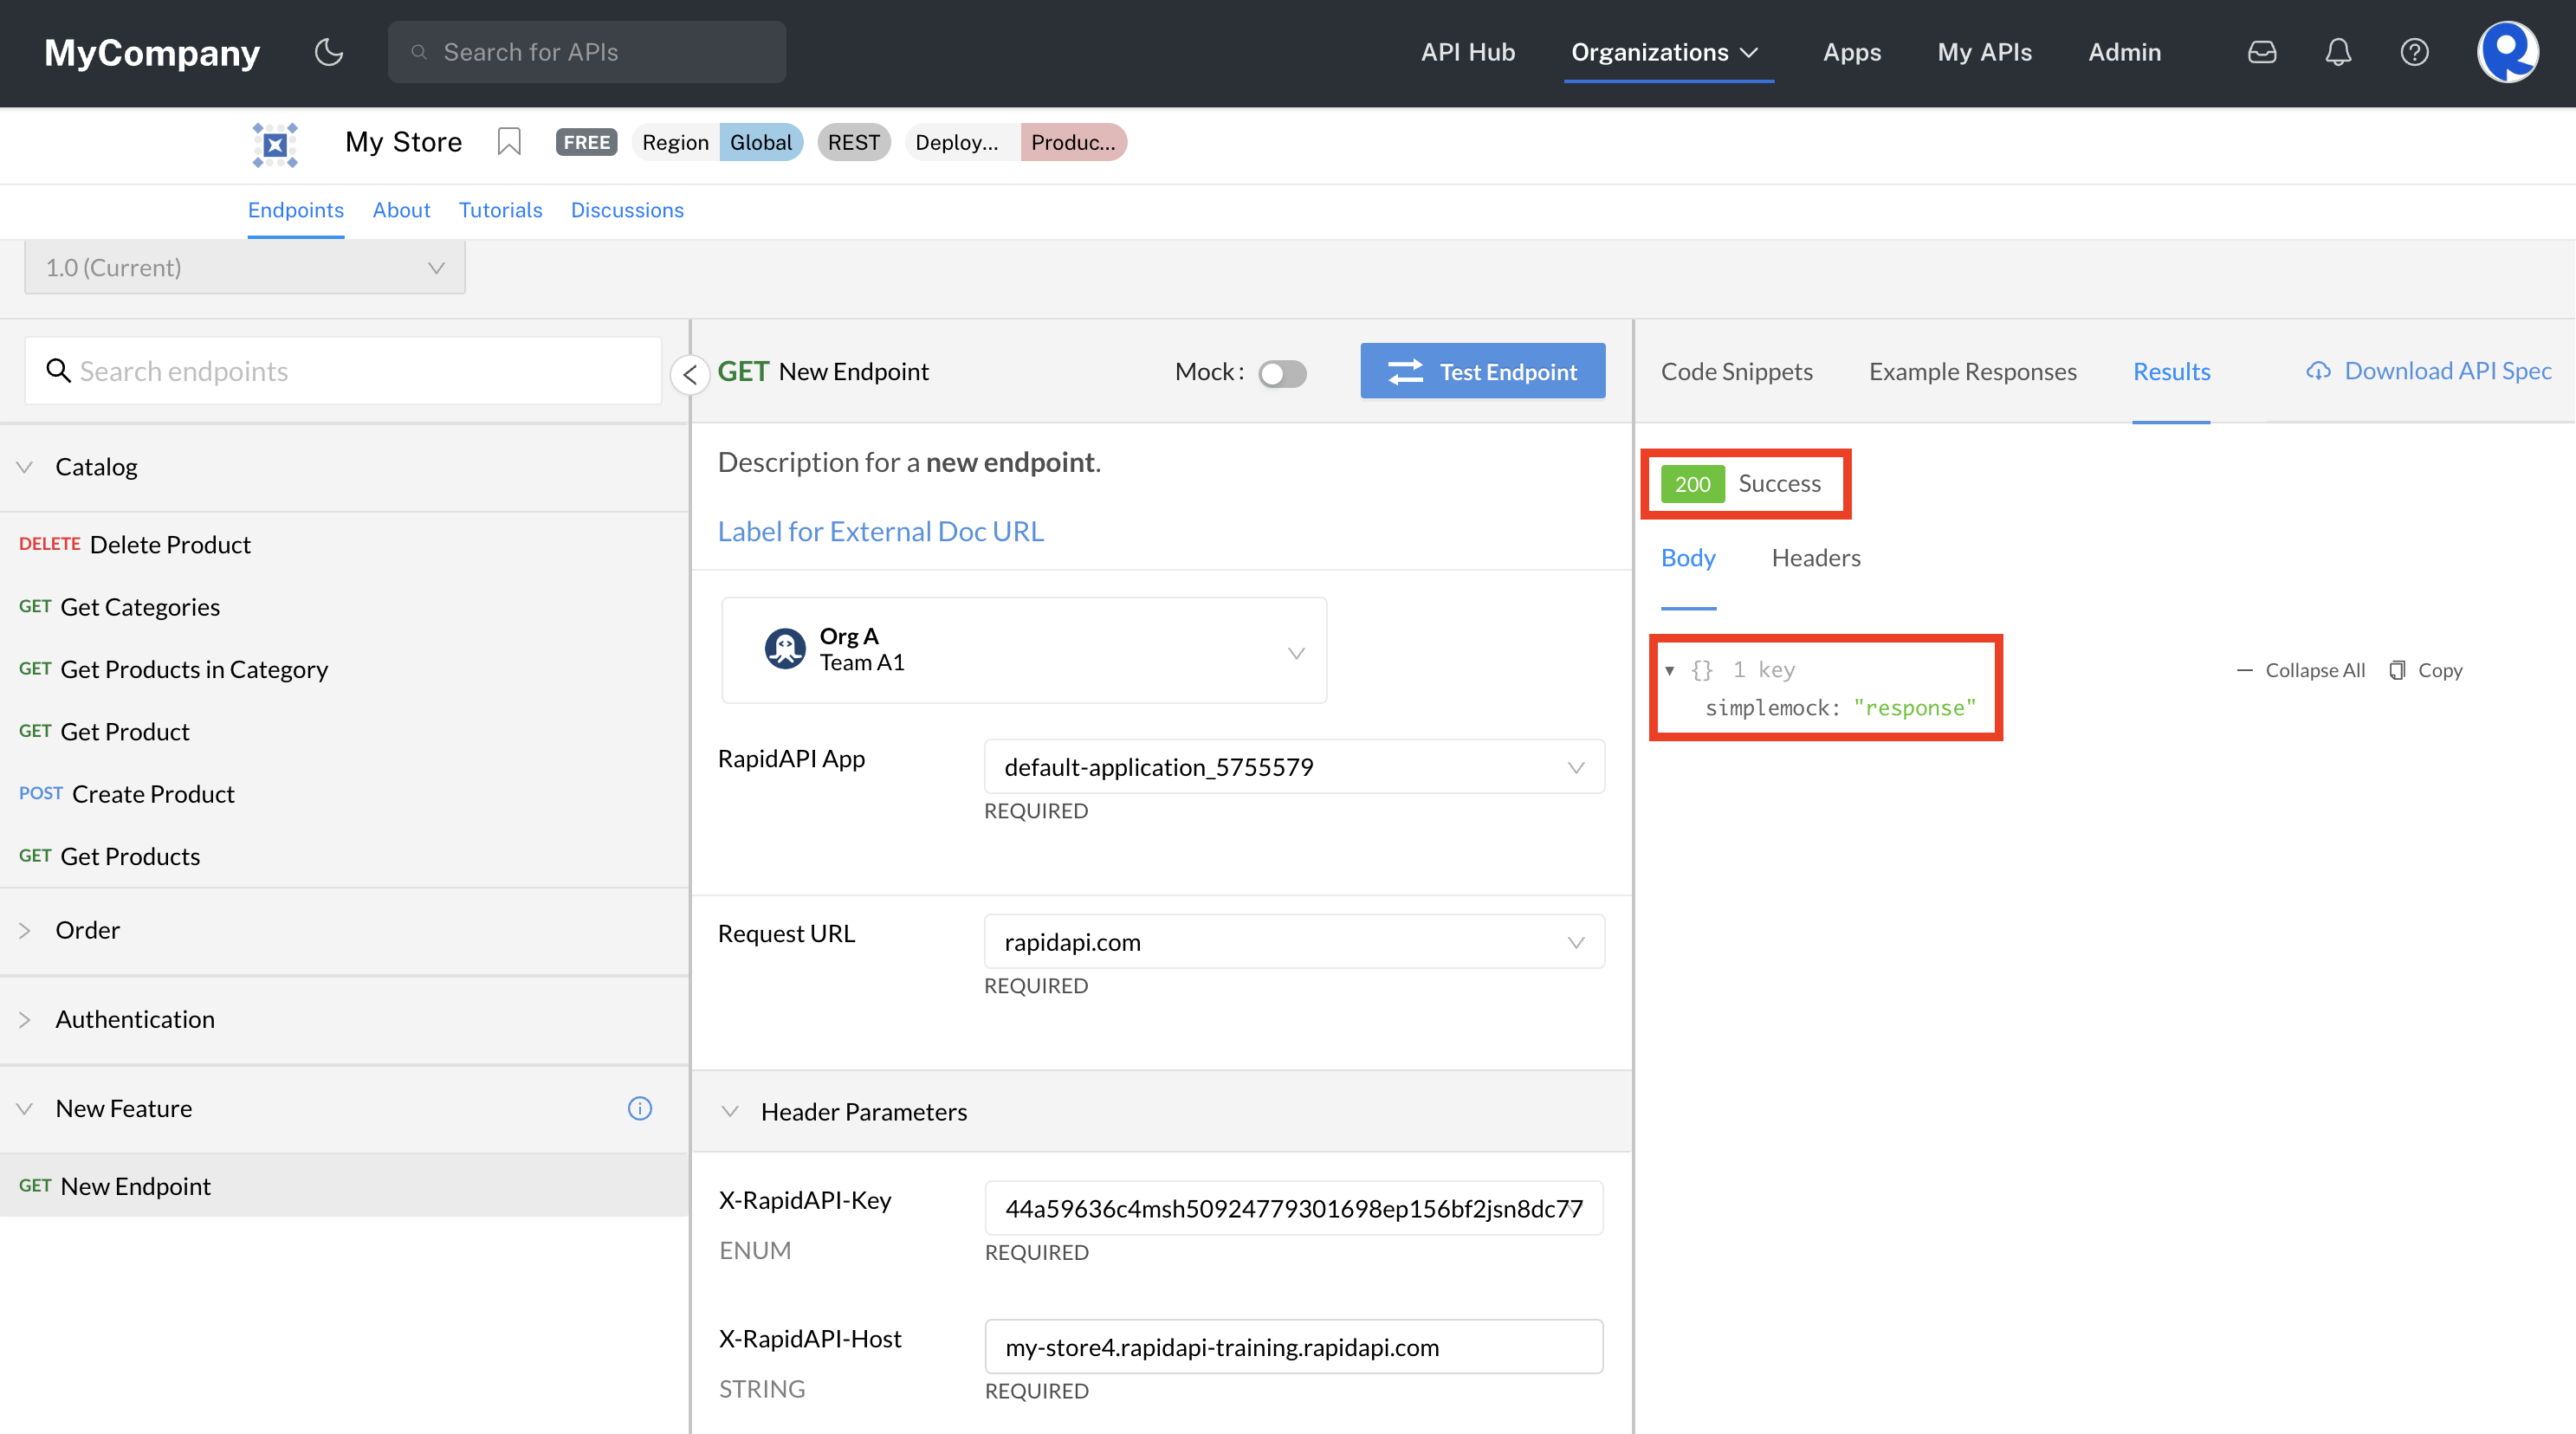
Viewing a simple mock response.
Click the Headers tab in the results to see the value of any mock response headers you added (such as sample-response-header below). Also, for simple mock responses, Rapid automatically includes a x-rapidapi-mock-response header with the value true.
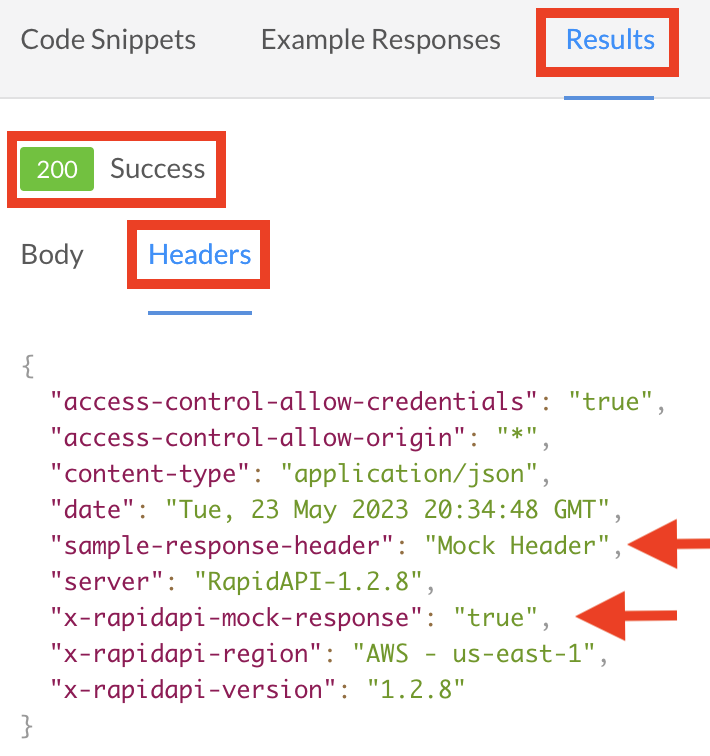
Simple response status and headers.
Enabling multiple status code mocking
Enterprise customers only
Multiple status code mocking is a feature only available to enterprise customers. Please contact your Rapid representative for more information.
Unlike simple mocking (described above), multiple status code mocking is used to mock responses for multiple status codes. Instead of using the Mock Response tab (described above), you set up multiple Example Responses for the API. The API consumer then must enable the Mock slider in the API listing and pass the desired response status code in a required request header. This is described in more detail below.
To enable multiple status code mocking from Studio, navigate to the API's Hub Listing > Definitions tab. Select the Endpoints tab. Click Edit next to the endpoint for which you would like to set up a mock response.
Edit an endpoint to set up mocking.
Scroll to the bottom of the edit endpoint screen and click the Example Responses button. Specify a response Code, optional response Headers, and response Body.
Repeat this process for additional response codes. If you create multiple example responses for a single code, Rapid will use the first example for mocking.
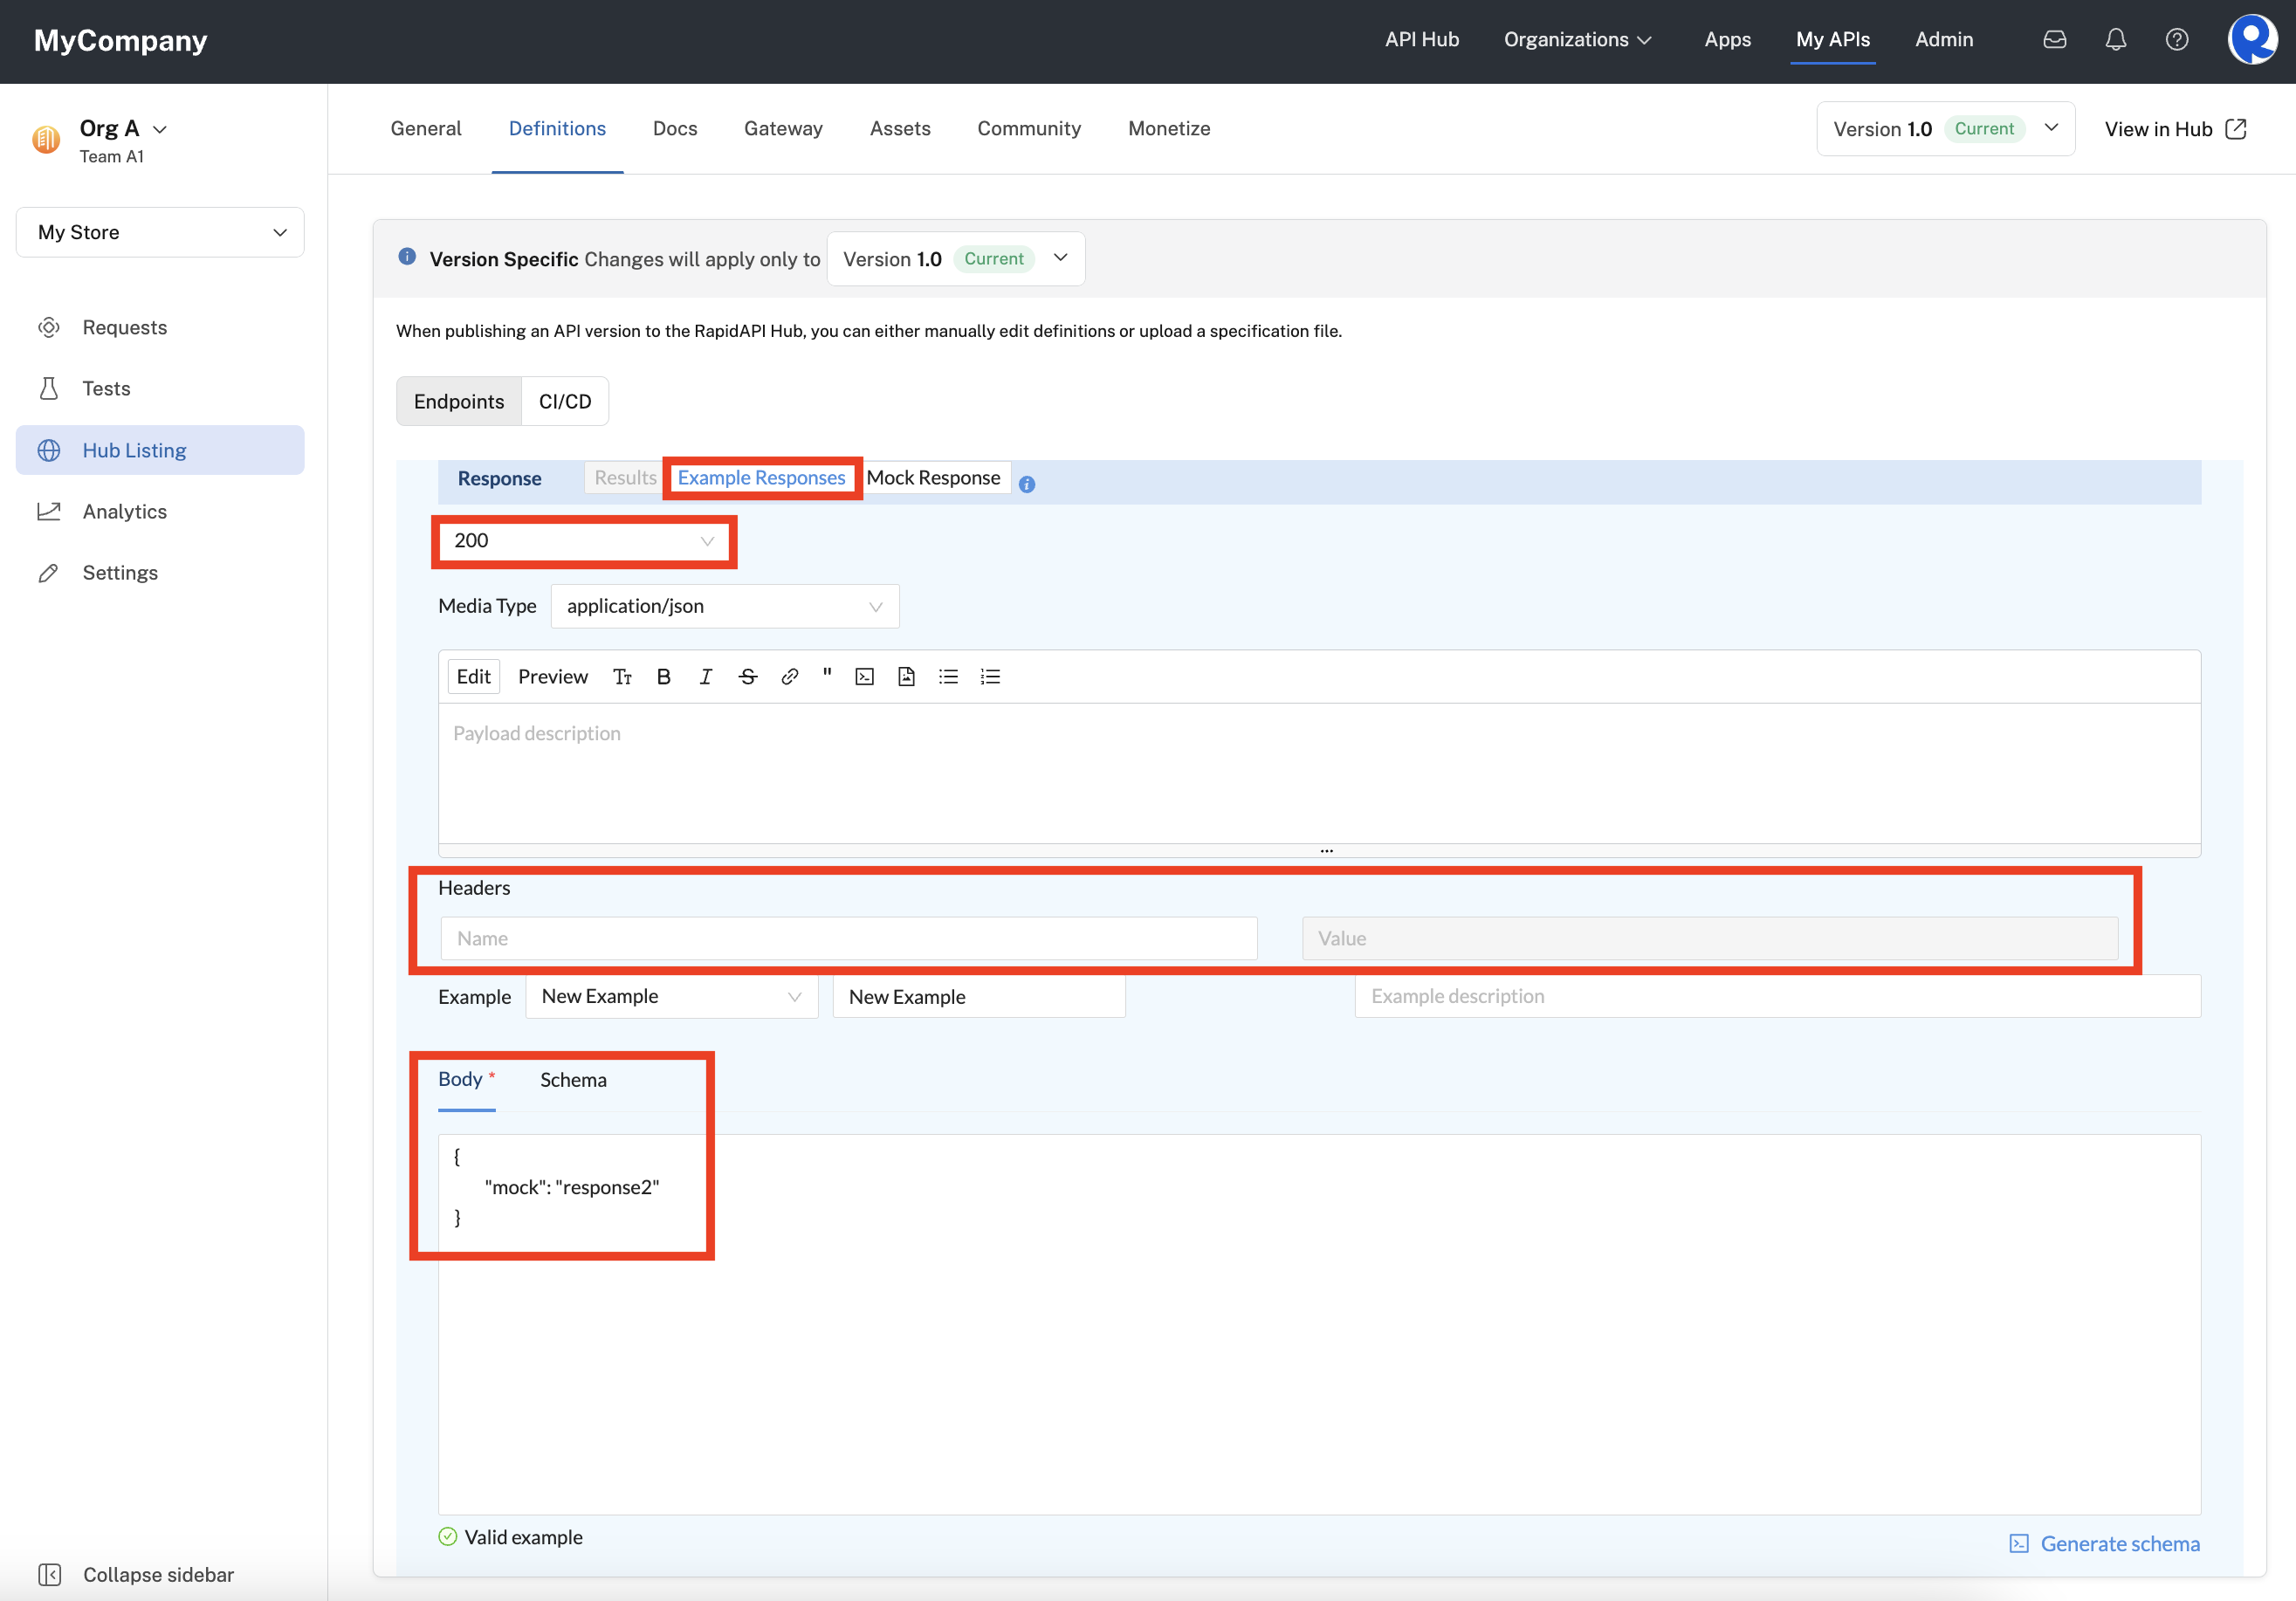
Enabling multiple status code mocking for an endpoint.
An API consumer testing the API on the Hub must enable the Mock slider, which changes the button name from Test Endpoint to Mock Endpoint. Because multiple status codes are mocked, the API consumer must specify the desired mock status code in the required X-RapidAPI-Mock-Response header. Notice that the request url contains an 'm' in the url. This means that the request is sent to Rapid's mock server.
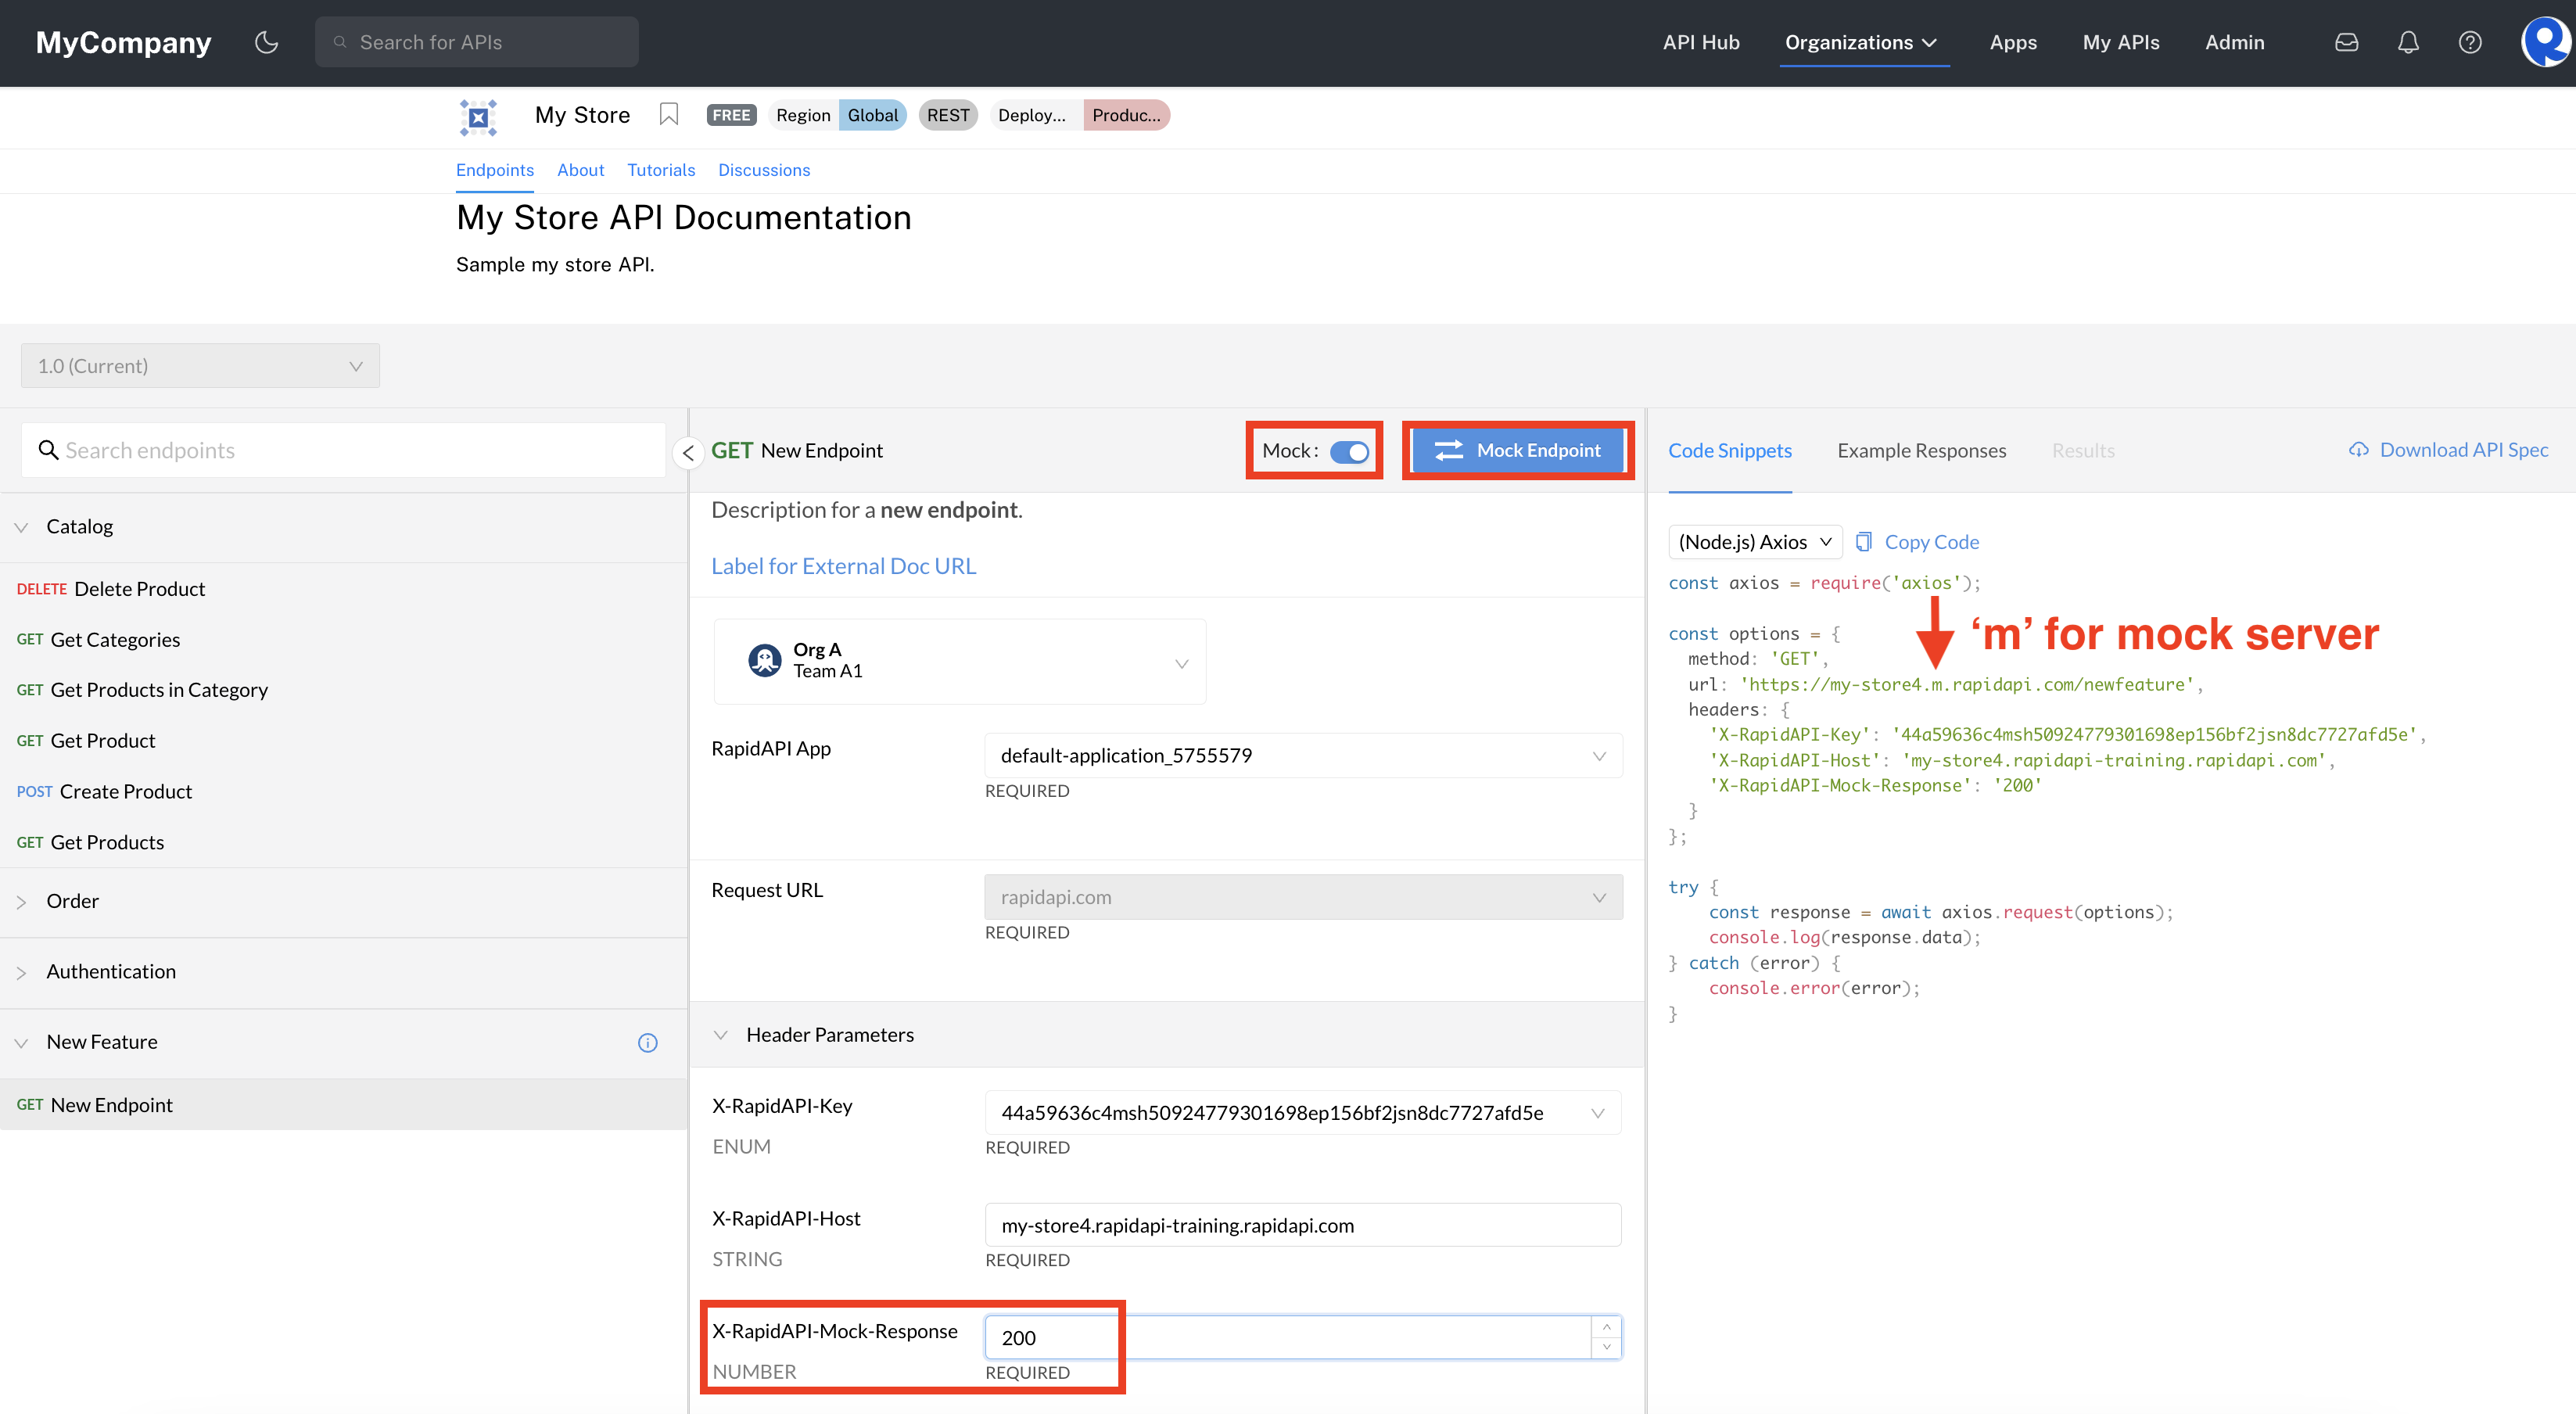
Testing an endpoint with multiple status code mocking.
Clicking Mock Endpoint will display the response as configured for the status code sent:
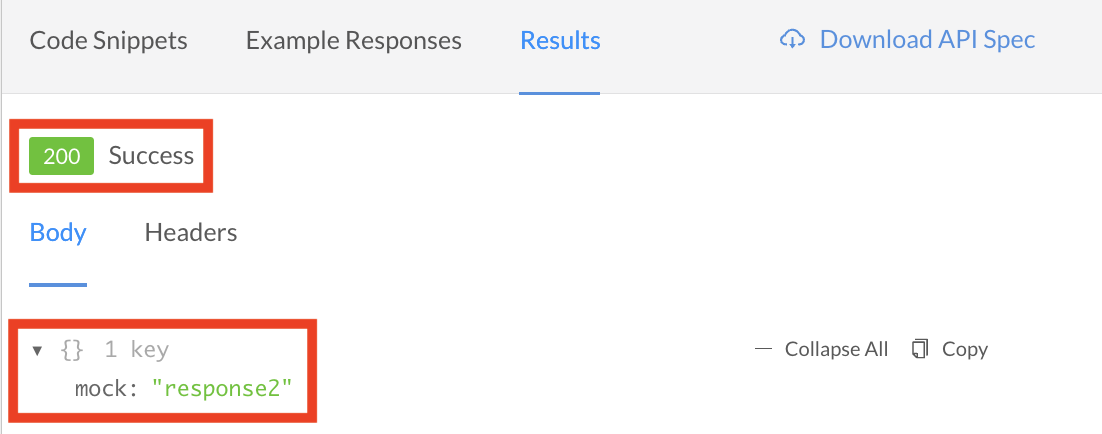
Mock response for '200' status code.
If the API consumer sends a status in the X-RapidAPI-Mock-Response header that has not been configured as an example for the API, they will see a response like this: "Hello from Rapid mock server, you don't have any mocking data example configured for this endpoint and status code. Try updating your spec with the relevant example or use rapidapi.com/studio to apply an example response."
Upload an updated OpenAPI document or Postman Collection
To upload an updated OpenAPI document or Postman Collection for the API, click Hub Listing > Definitions > CI/CD. Select Import OpenAPI or Import Postman Collection, then click the Upload File button and navigate to your local API definition, or simply drag and drop the file to upload it.
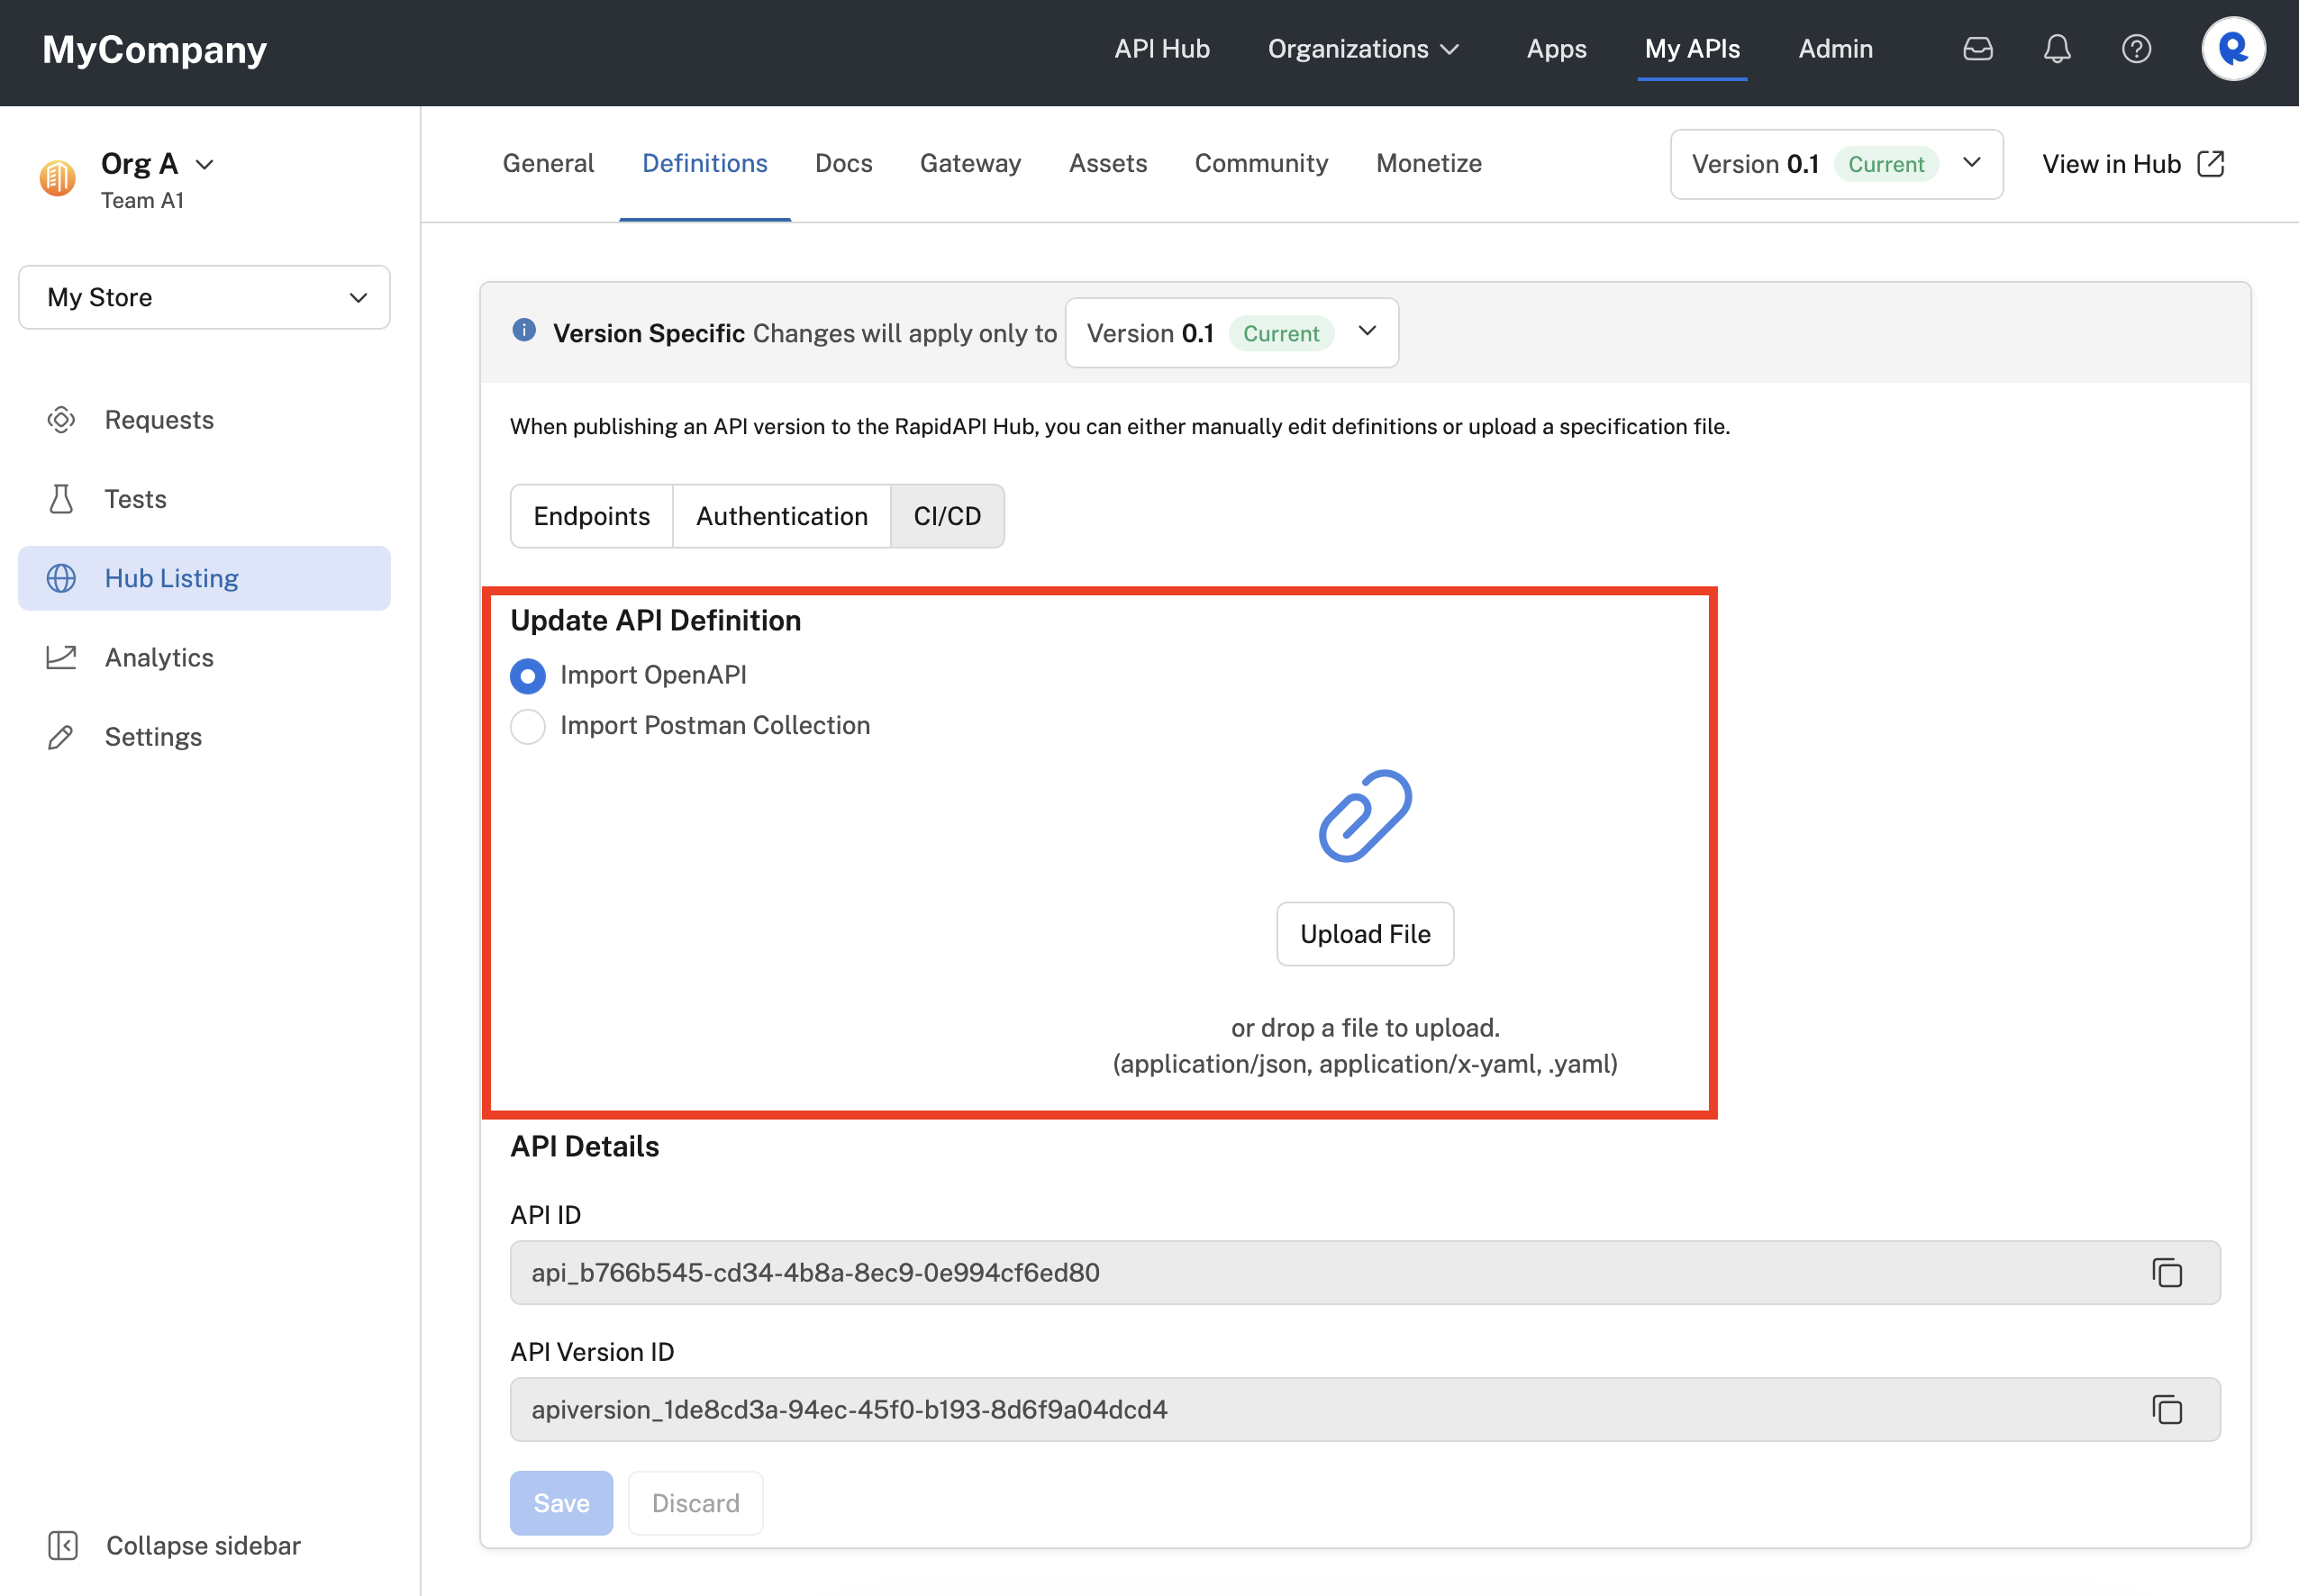
Updating the API by uploading an OpenAPI document or Postman Collection.
View the API's IDs
To view and copy the API ID and API Version ID for the API, click Hub Listing > Definitions > CI/CD. If you want to copy the API Version ID, make sure that the correct version is selected in the Version dropdown in the upper right. To copy an ID, click the copy icon to the right. The ID will be copied to your clipboard.
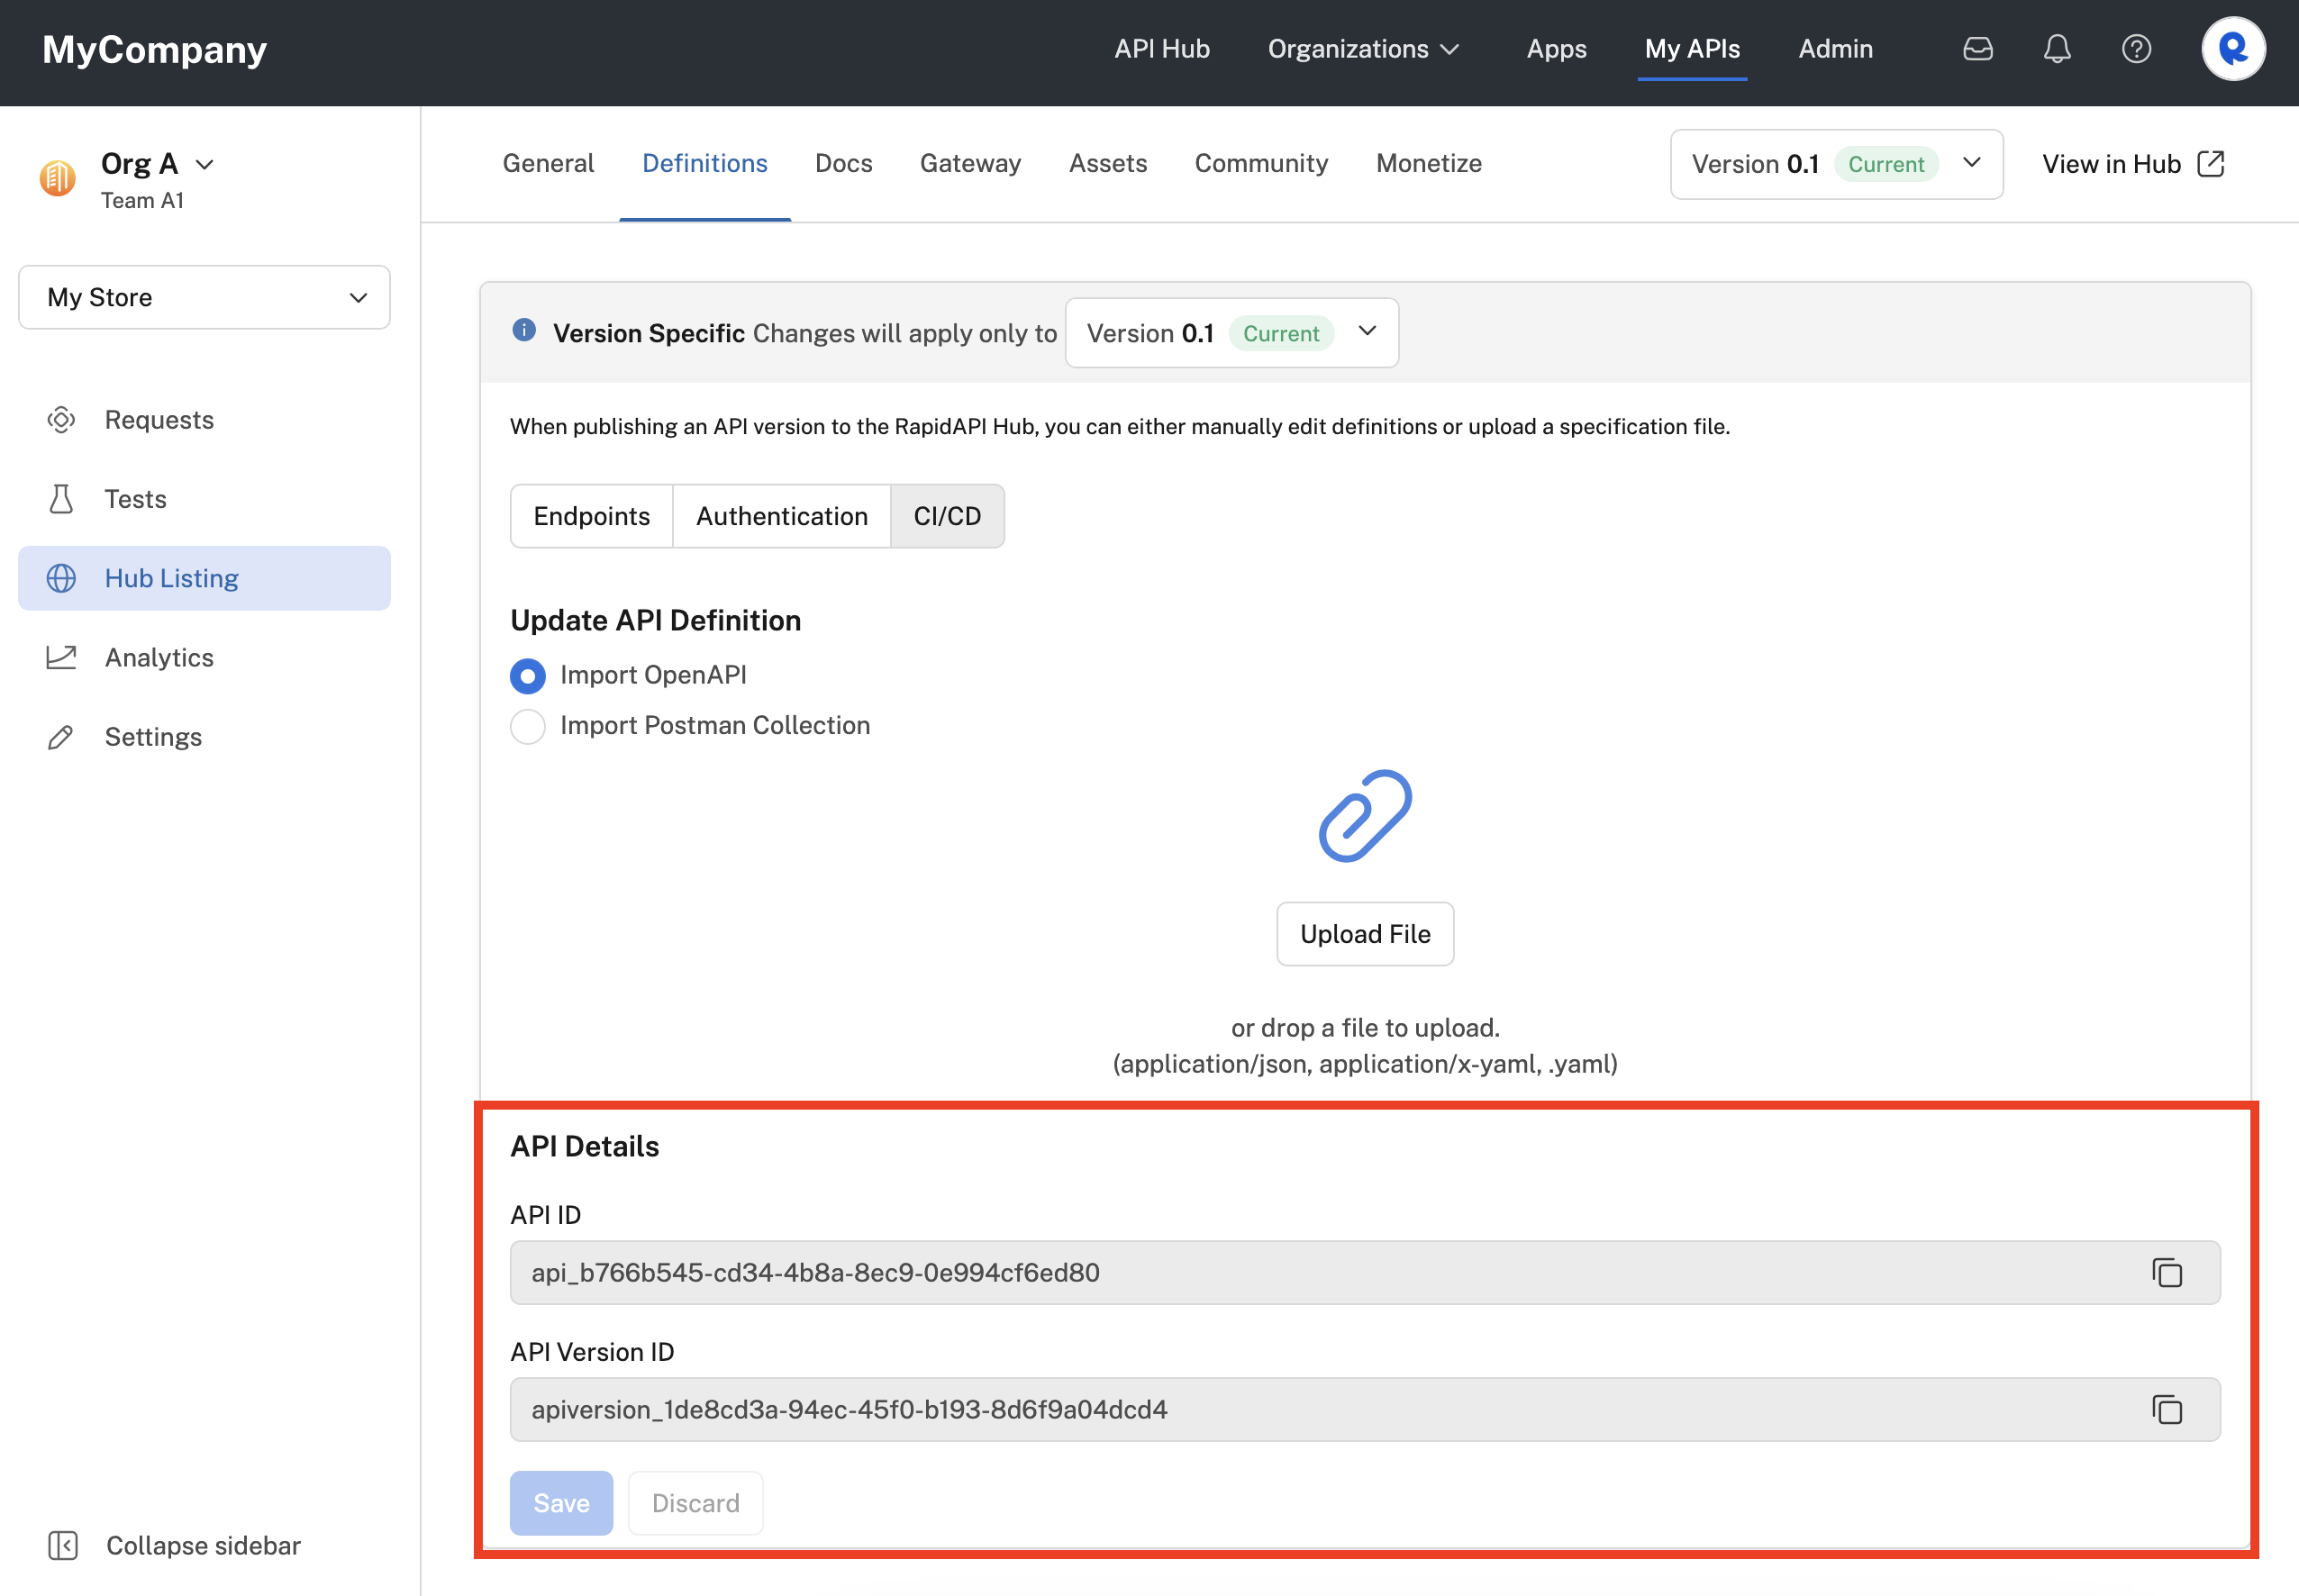
Copying the API ID and/or API Version ID for the API.
Updated 30 days ago