Hub Listing - Monetize Tab
Rapid Runtime feature
For enterprise customers: If your API is configured to not use the Rapid Runtime, plans are usually not used for the API. However, some enterprises may choose to programmatically use some features of plans using the Platform API.
Overview
The Hub Listing > Monetize tab in Studio allows API providers to configure plans for an API. Plans are used with every API on the Hub, and API subscribers must subscribe (manually or automatically) to a plan before the API can be used.
A default plan is automatically created for every API. This plan is named BASIC and if no changes are made related to plans, API consumers will automatically be subscribed to this plan when they test the API using the Test Endpoint button in the API listing. API consumers can either be users using their Personal Account, or teams. The default BASIC plan is free to use. For free plans, API consumers can make the following number of requests per month:
- For Enterprise Hub, unlimited requests per month.
- For rapidapi.com, one million requests per month. API consumers will receive emails when they have reached 85% and 100% of quota for the month. API providers can view API consumer usage in the Requests in last 60 days column on Studio's Hub Listing - Community tab.
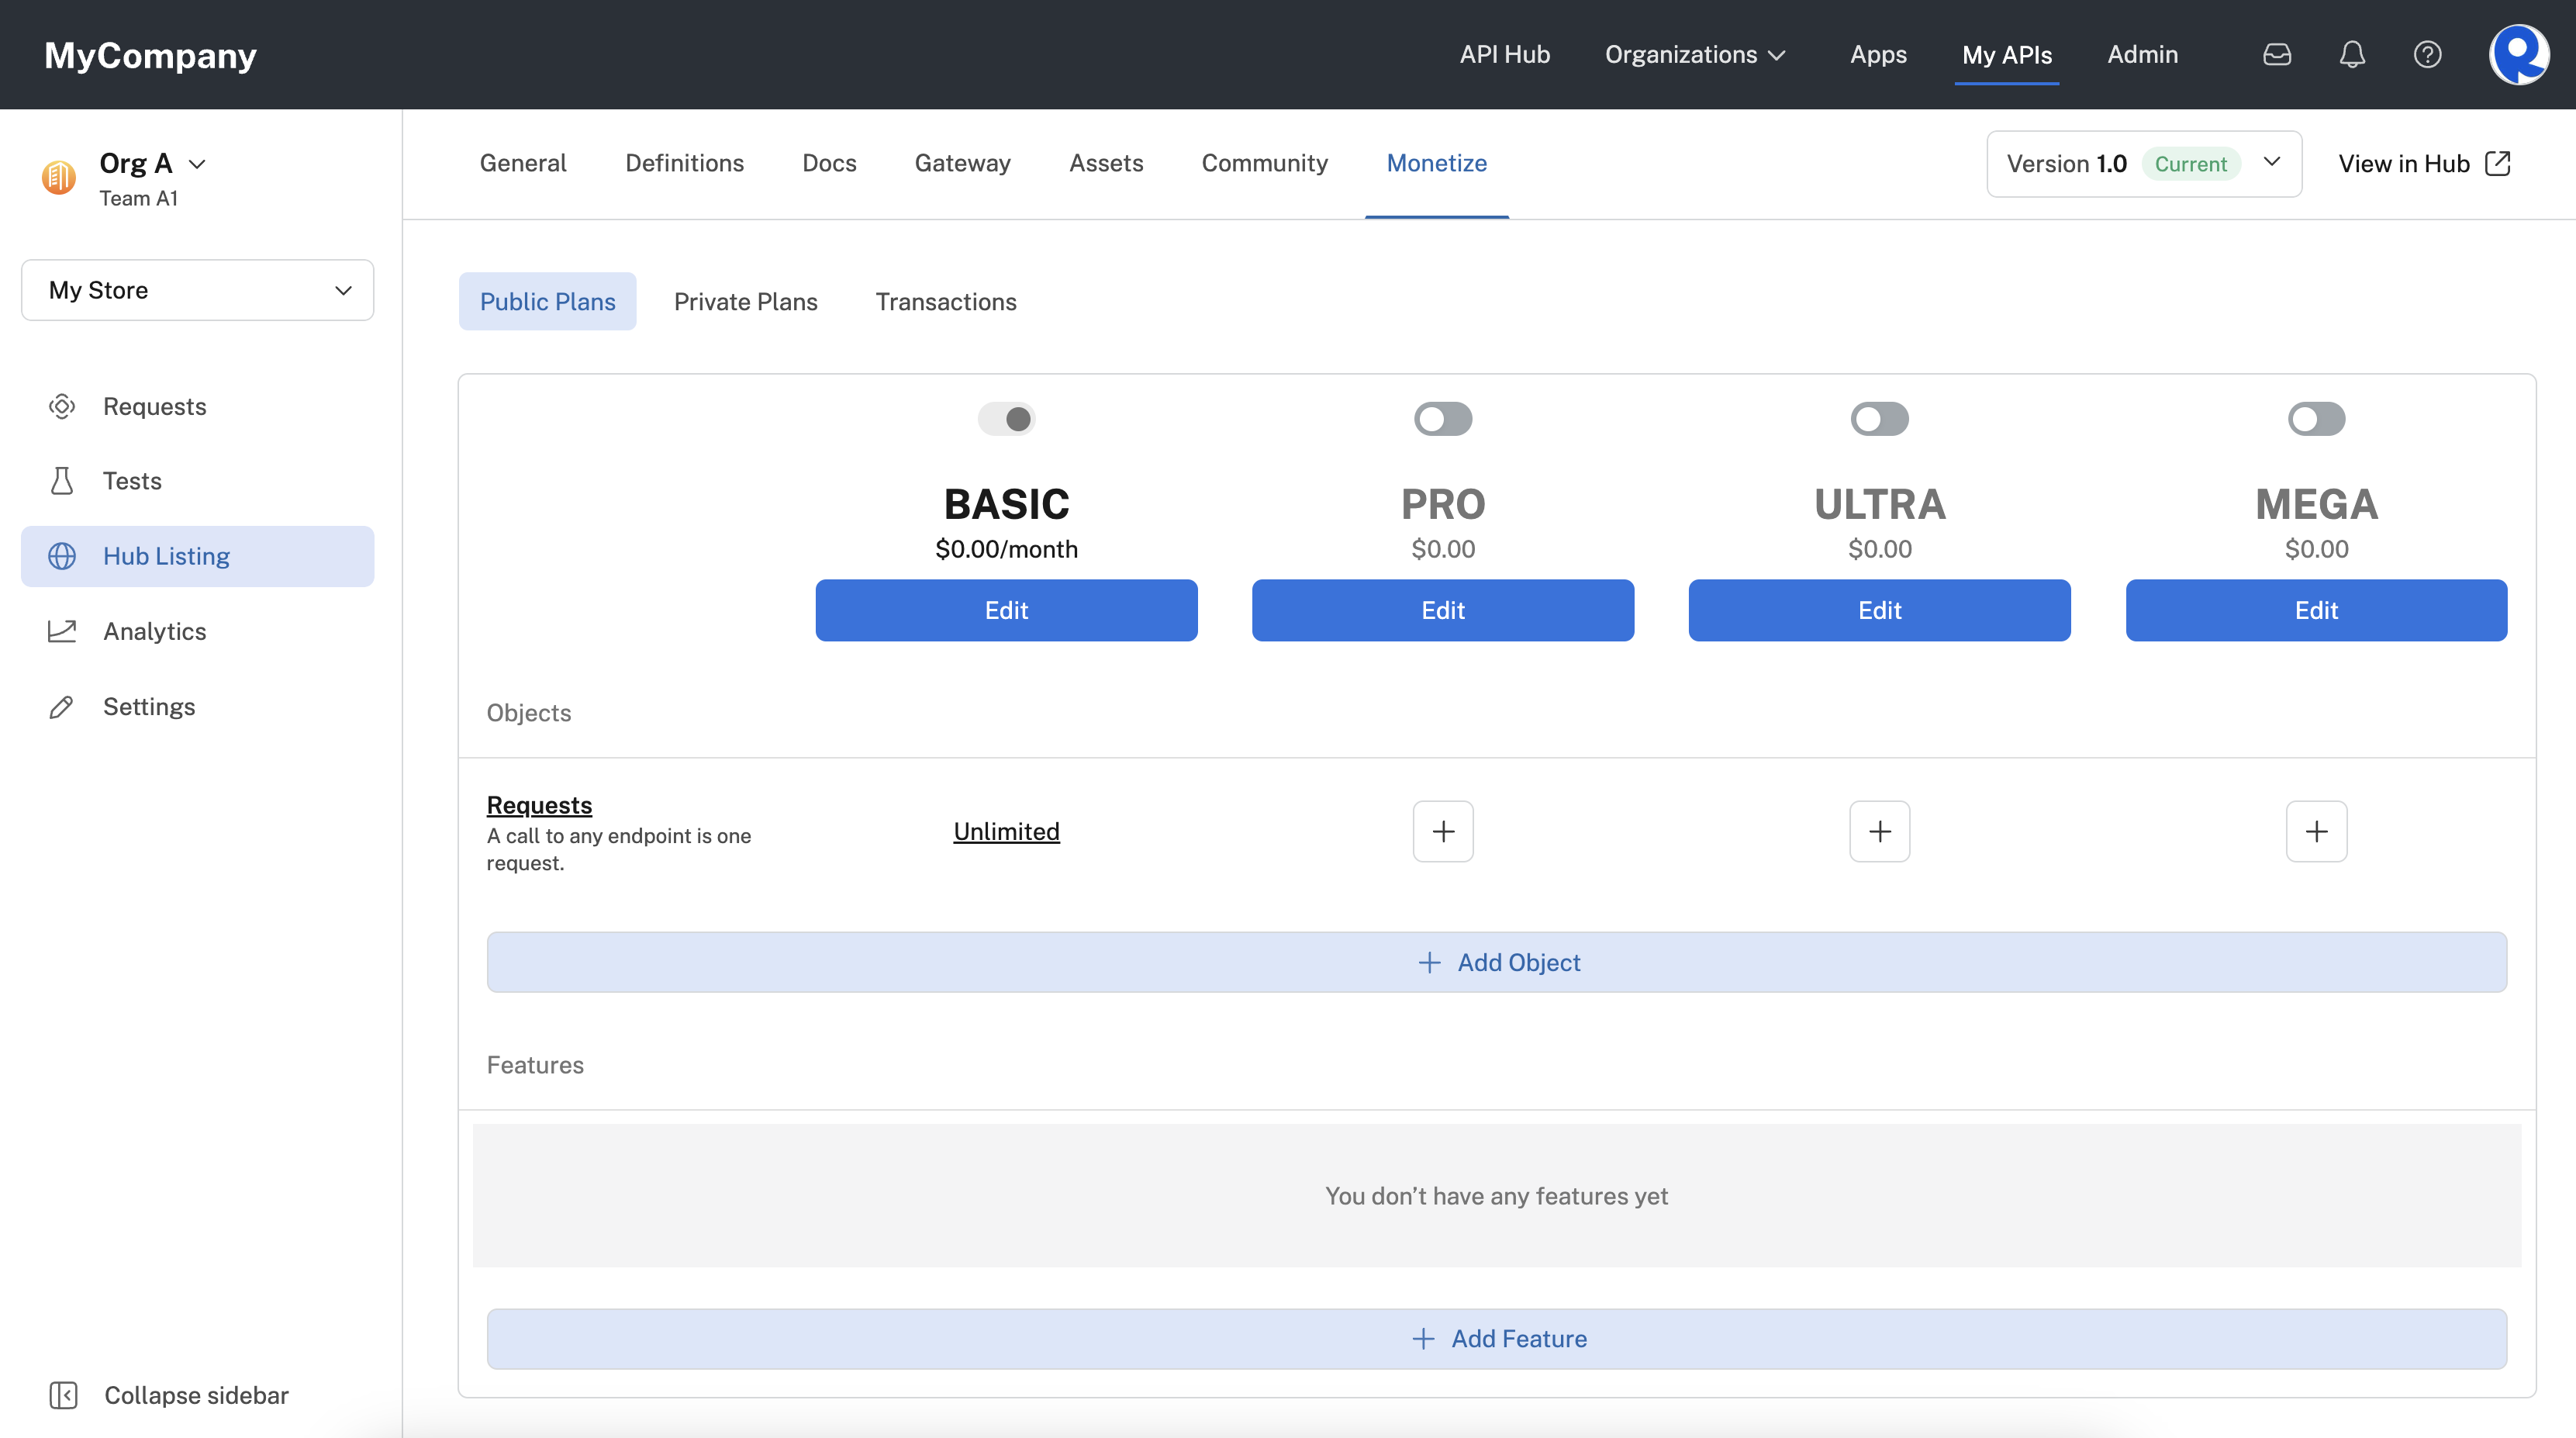
The default BASIC plan for an API.
Plans are usually created or modified for the following reasons:
- To offer a graduated set of capabilities for an API. For example, the BASIC plan could allow a specific number of API calls per month, and the PRO plan could allow more calls per month, access to some additional API endpoints, and better support from the API provider.
- To restrict certain API endpoints to specific users. For more information, see Private plans.
- To monetize the API. For example, the BASIC plan can offer limited capabilities for free, enabling API consumers to determine if they would like to pay to use the PRO (or other) plan. For information on monetizing APIs on rapidapi.com, see Monetizing Your API on rapidapi.com.
Plans can have the following characteristics:
- Plan visibility: public or private. For more information, see Plan visibility.
- Plan type: monthly subscription or pay per use. Monthly subscriptions can have a Subscription price. For more information, see Plan types.
- Rate limit: None or x requests per second, minute, or hour. For more information, see Rate limiting.
- Require approval: If checked, API builders must approve an API consumer's request to use the plan. For more information, see Require approval.
- One of the API's plans can be labeled as Recommended. For more information, see Recommended plan.
- Can contain a limit by Objects. Objects are a characteristic of the API, such as as API request. Plans can limit the number of objects used by API consumers. For more information, see Objects.
- Can contain Features. Features allow a plan to access API endpoints that other plans can not access. For more information, see Features.
- (Enterprise customers only) DocuSign integration. A plan can be set up so that API consumers must sign an API provider-provided contract related to the plan before the plan can be subscribed to. For more information, see DocuSign integration.
API providers can create up to four public plans (named BASIC, PRO, ULTRA, and MEGA) per API and many private plans per API.
Plans can be enabled or disabled using the slide shown in the screenshot above.
Once an API consumer subscribes to a plan, they continue to use that plan until they change plans. If an API provider makes a change to a plan, any existing API consumers still use the original plan, and the plan is labeled as "Deprecated Plan" for those consumers.
The Monetize > Transactions tab can be used by API providers to view the payout status of monetized APIs. For more information, see Viewing transactions.
Plan approval
Currently, the Provider Dashboard (append
/providerto your API Hub's URL) must be used to configure approval workflows for plans. If you would like to use this feature, see API Plan Access Request and Approval.
Plan visibility
Plans can be public or private. Public plans are available to all users that have access to the API. Private plans are used by API providers that want to invite select clients to access a more customized pricing plan. Example reasons to use private plans:
| Discount | Provide discounted access to your API to a subset of API consumers. |
| Test-Driving | Allow API consumers to use your API for a very small price, with a limited subset of functionalities or allow them to test the responsiveness of your API at no cost. |
| Heavy Usage | Heavy usage cases are often priced higher than the usual high tier of your public plans. |
Public plans are edited and enabled on the Hub Listing > Monetize > Public Plans tab. Private plans are created and managed on the Hub Listing > Monetize > Private Plans tab.
Plan types
There are two plan types:
- Monthly Subscription: This is the plan type for the default BASIC plan. When this option is selected, you can set a Subscription Price. The default BASIC plan has a Subscription Price of zero dollars. If the Subscription Price is set to a value other than zero, API consumers must pay the monthly fee (if any).
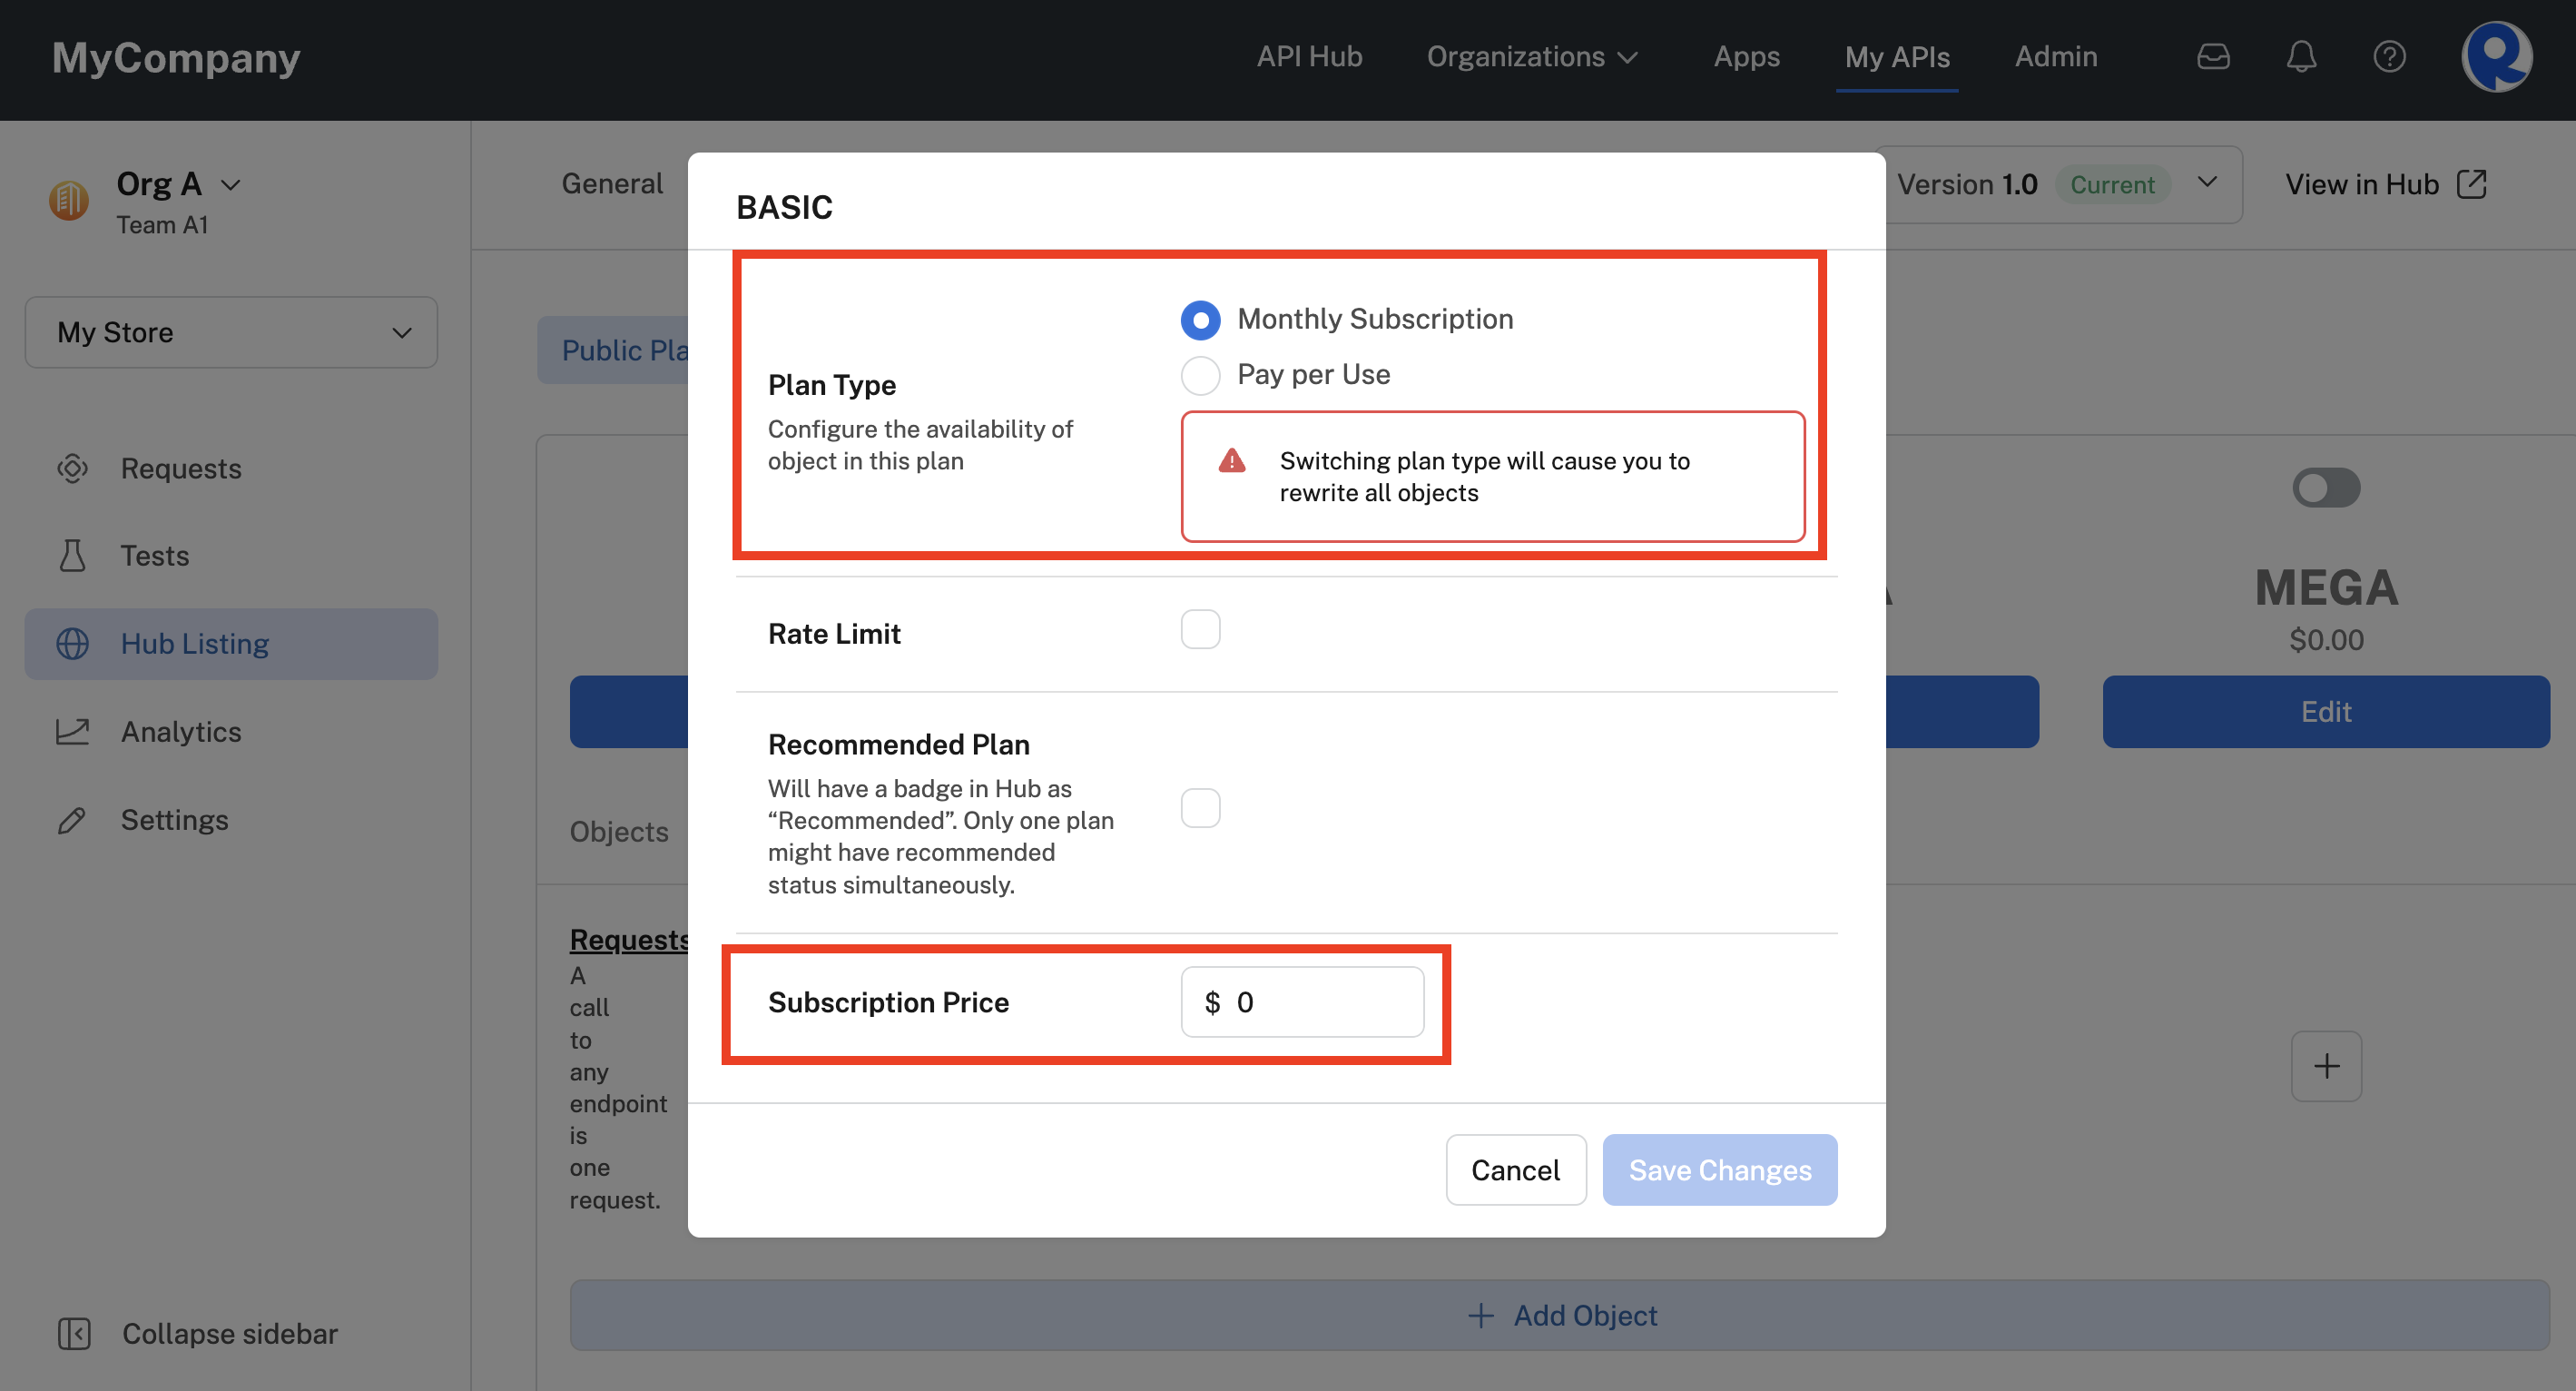
An plan with a Monthly Subscription type.
- Pay per Use: API consumers will pay for this API only if they use it (if applicable). This plan type does not include a monthly subscription fee.
Rate limiting
If the Rate Limit checkbox is selected for a plan, API consumers will be restricted in the number of calls to the API that can be made per unit of time. The API provider specifies the number and units (second, minute, hour) for the rate limit.
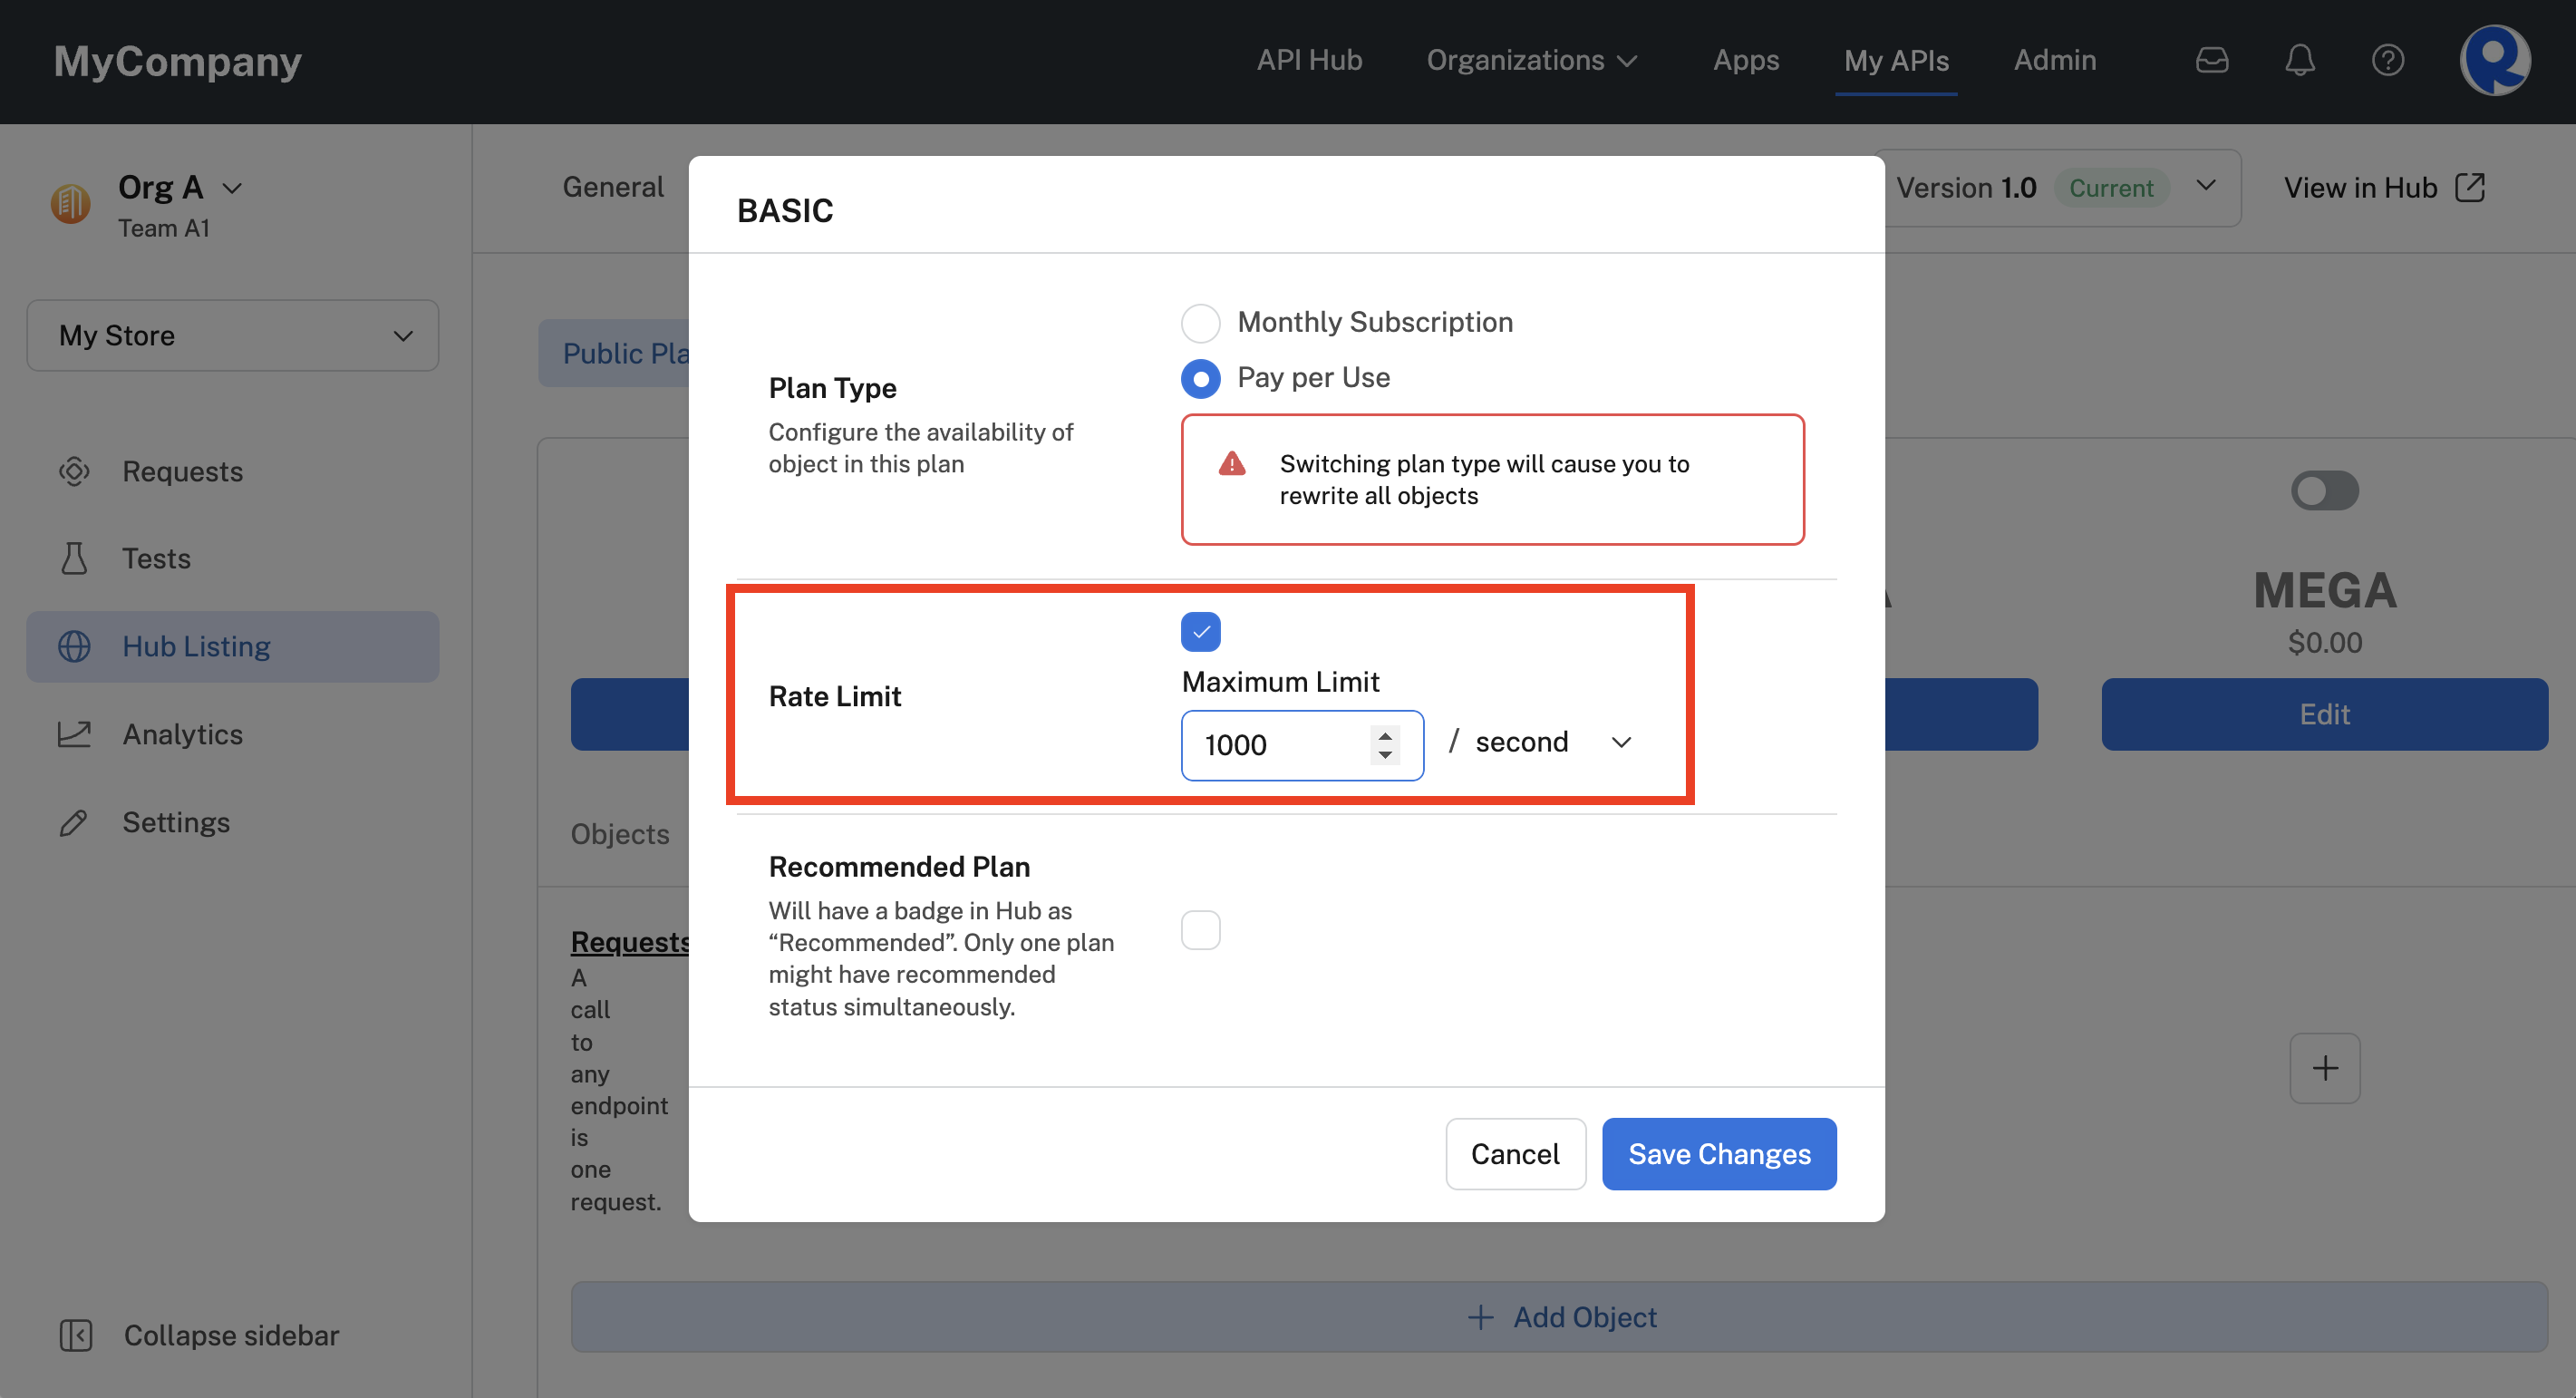
Specifying a rate limit for a plan.
If API consumers exceed the rate limit, they will receive a 429 Too Many Requests error. They can then upgrade to a better plan or contact the API provider to discuss other options.
The screenshot below shows the API listing's Pricing tab when a rate limit is set on one or more plans. Notice that the rate limit is clearly visible when API consumers are selecting plans. Also, because we modified the BASIC plan, any API consumers that subscribed to the API before the plan change will keep the old plan and it will show with a "Deprecated Plan" label.
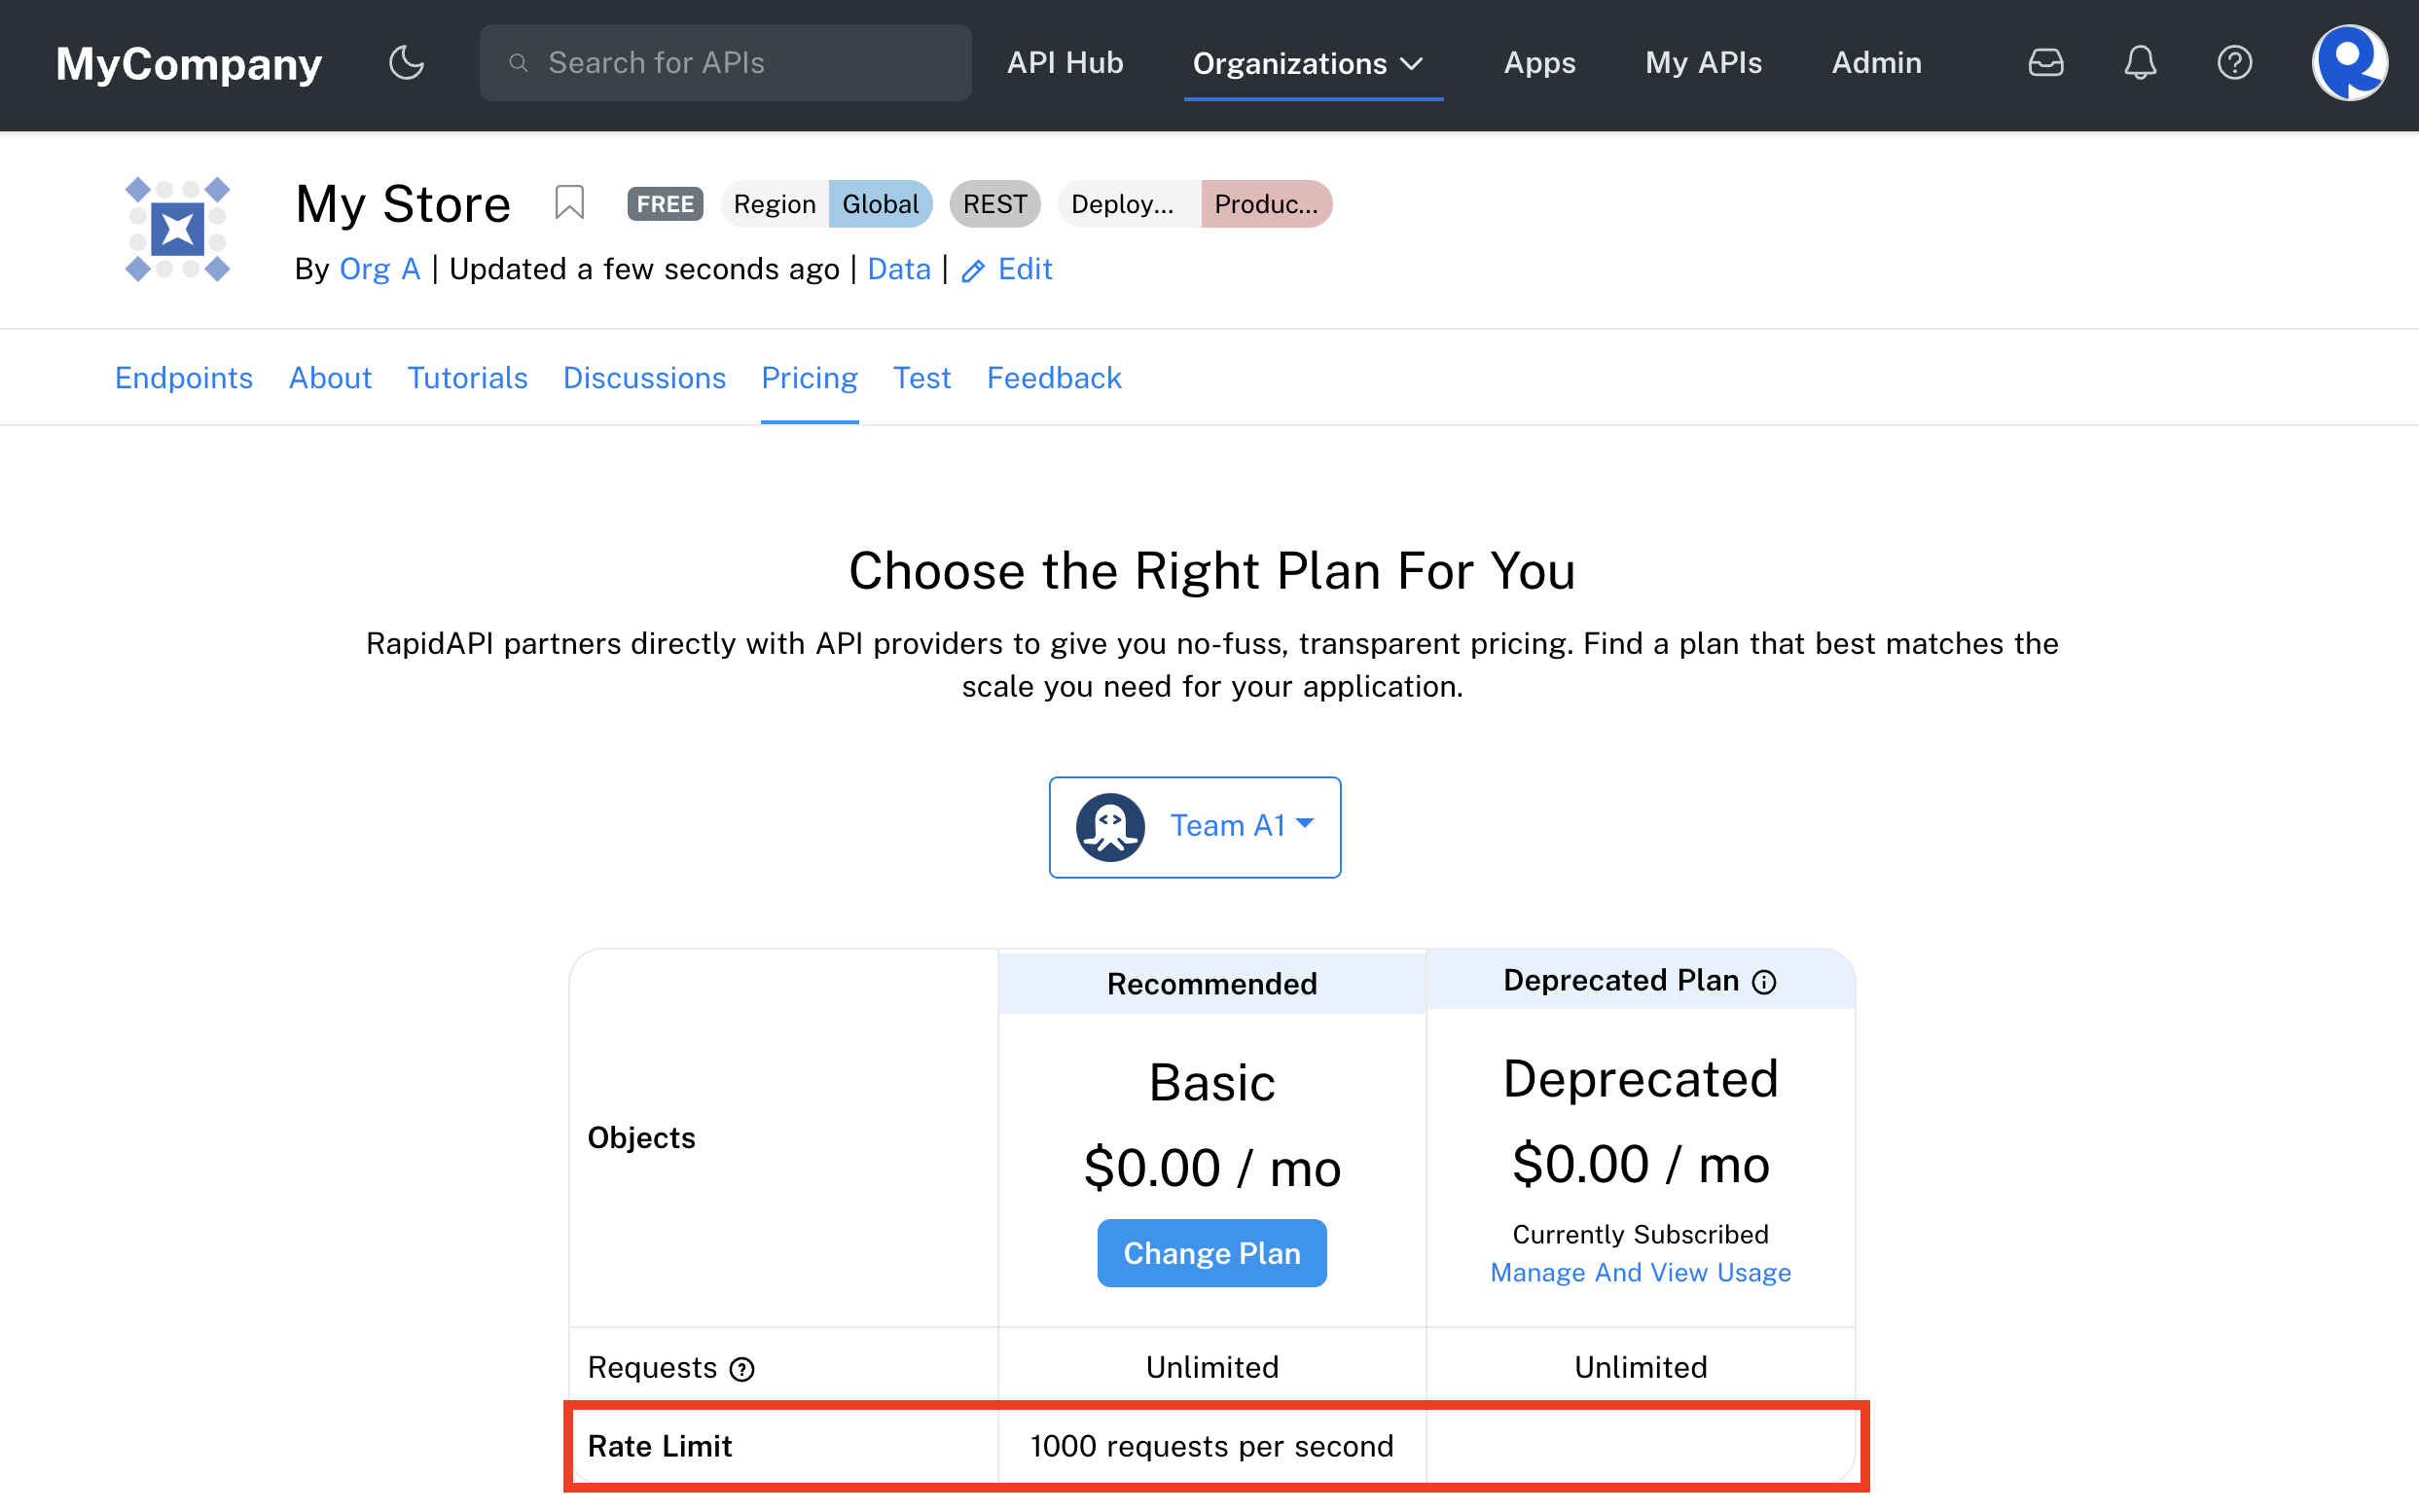
An API listing's Pricing tab if a plan has a rate limit set.
Note: You will have to add the rate limit individually to each plan. The plans can all have different rate limits if desired.
As the API provider, you are automatically subscribed to a free unlimited plan for the API. To test the rate limit, you can first unsubscribe to this plan by navigating to Developer Dashboard (Apps) > Billing > Subscriptions & Usage and clicking Unsubscribe for the API.
Require approval
If the Require approval checkbox is checked, API builders must approve an API consumer's request to use the plan. The builder specifies an Approval question the the API consumer answers when requesting access to the plan. In the screenshot below, the approval question is "Why do you want access to this plan?".
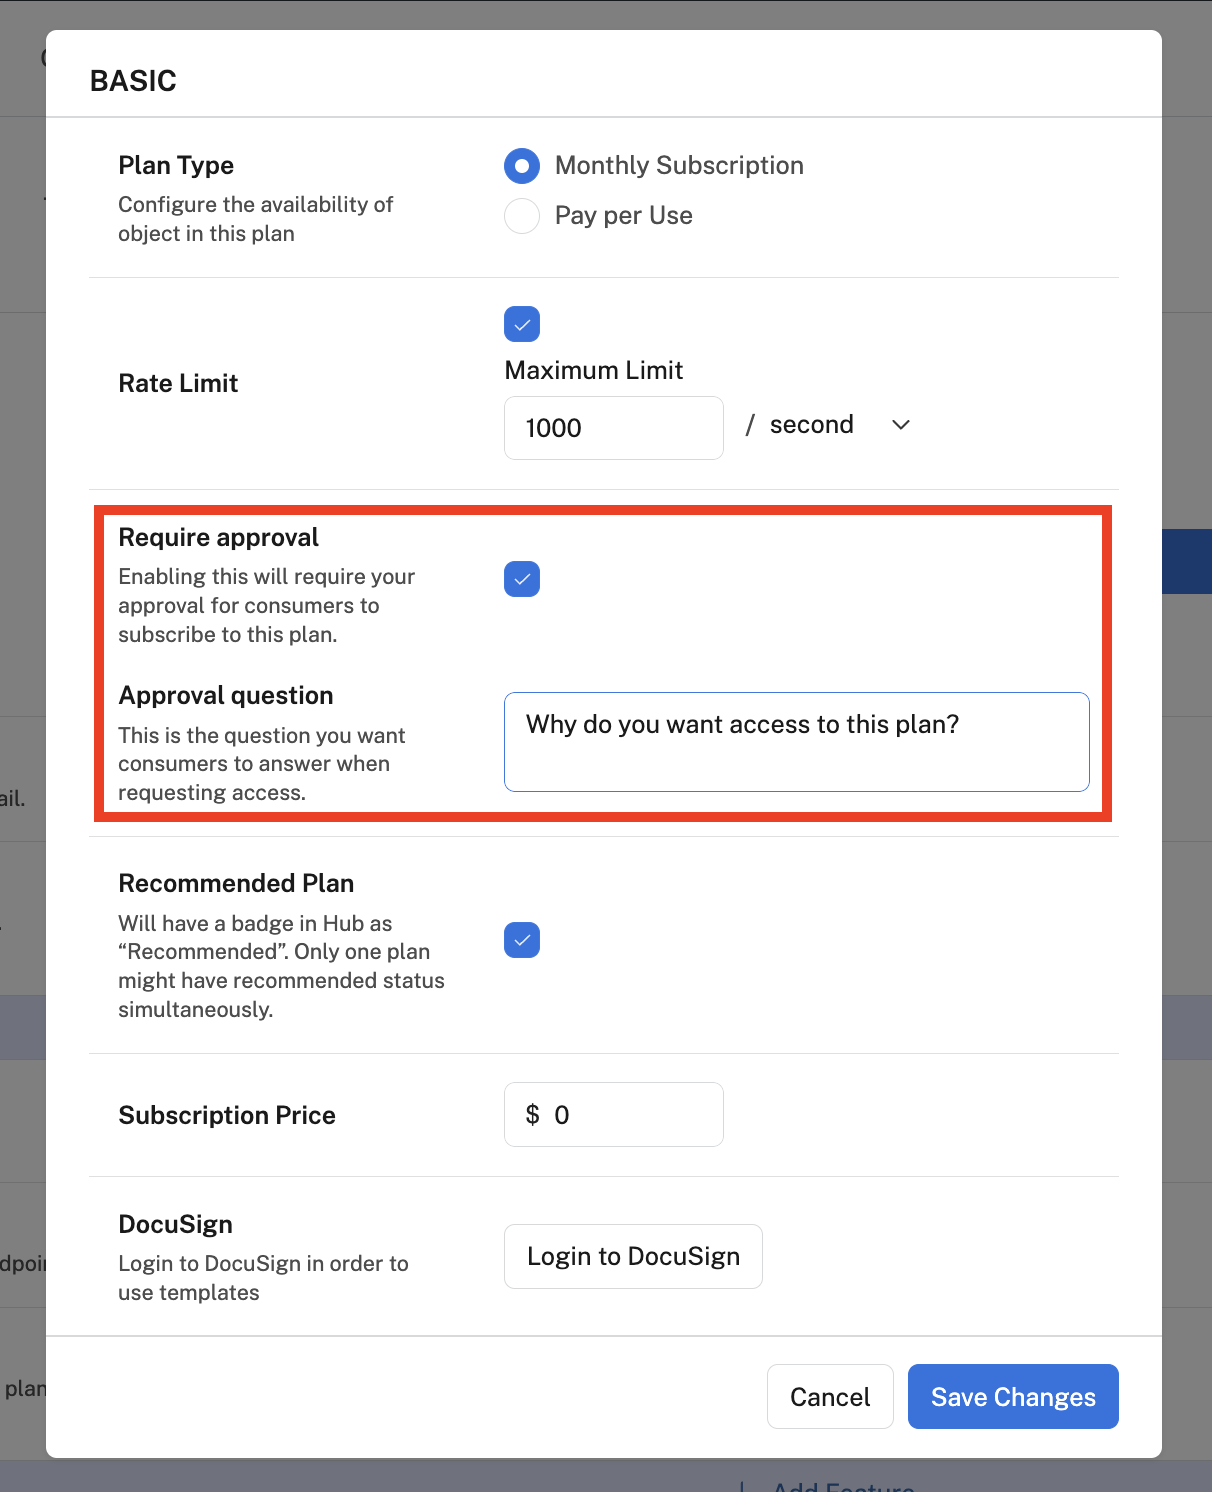
Creating a plan that requires approval from the API builder before an API consumer can use it.
If an API consumer wants to use this plan, they must request access to the plan as described in Connecting to an API.
When an API consumer requests access to use the API's plan, the API builder will receive an email notifying them of the request. The API builder can then approve or reject the request in Studio - My APIs Approvals.
Recommended plan
One of the plans for an API can have the Recommended Plan checkbox selected. This means that API consumers will see a "Recommended" label associated with the plan.
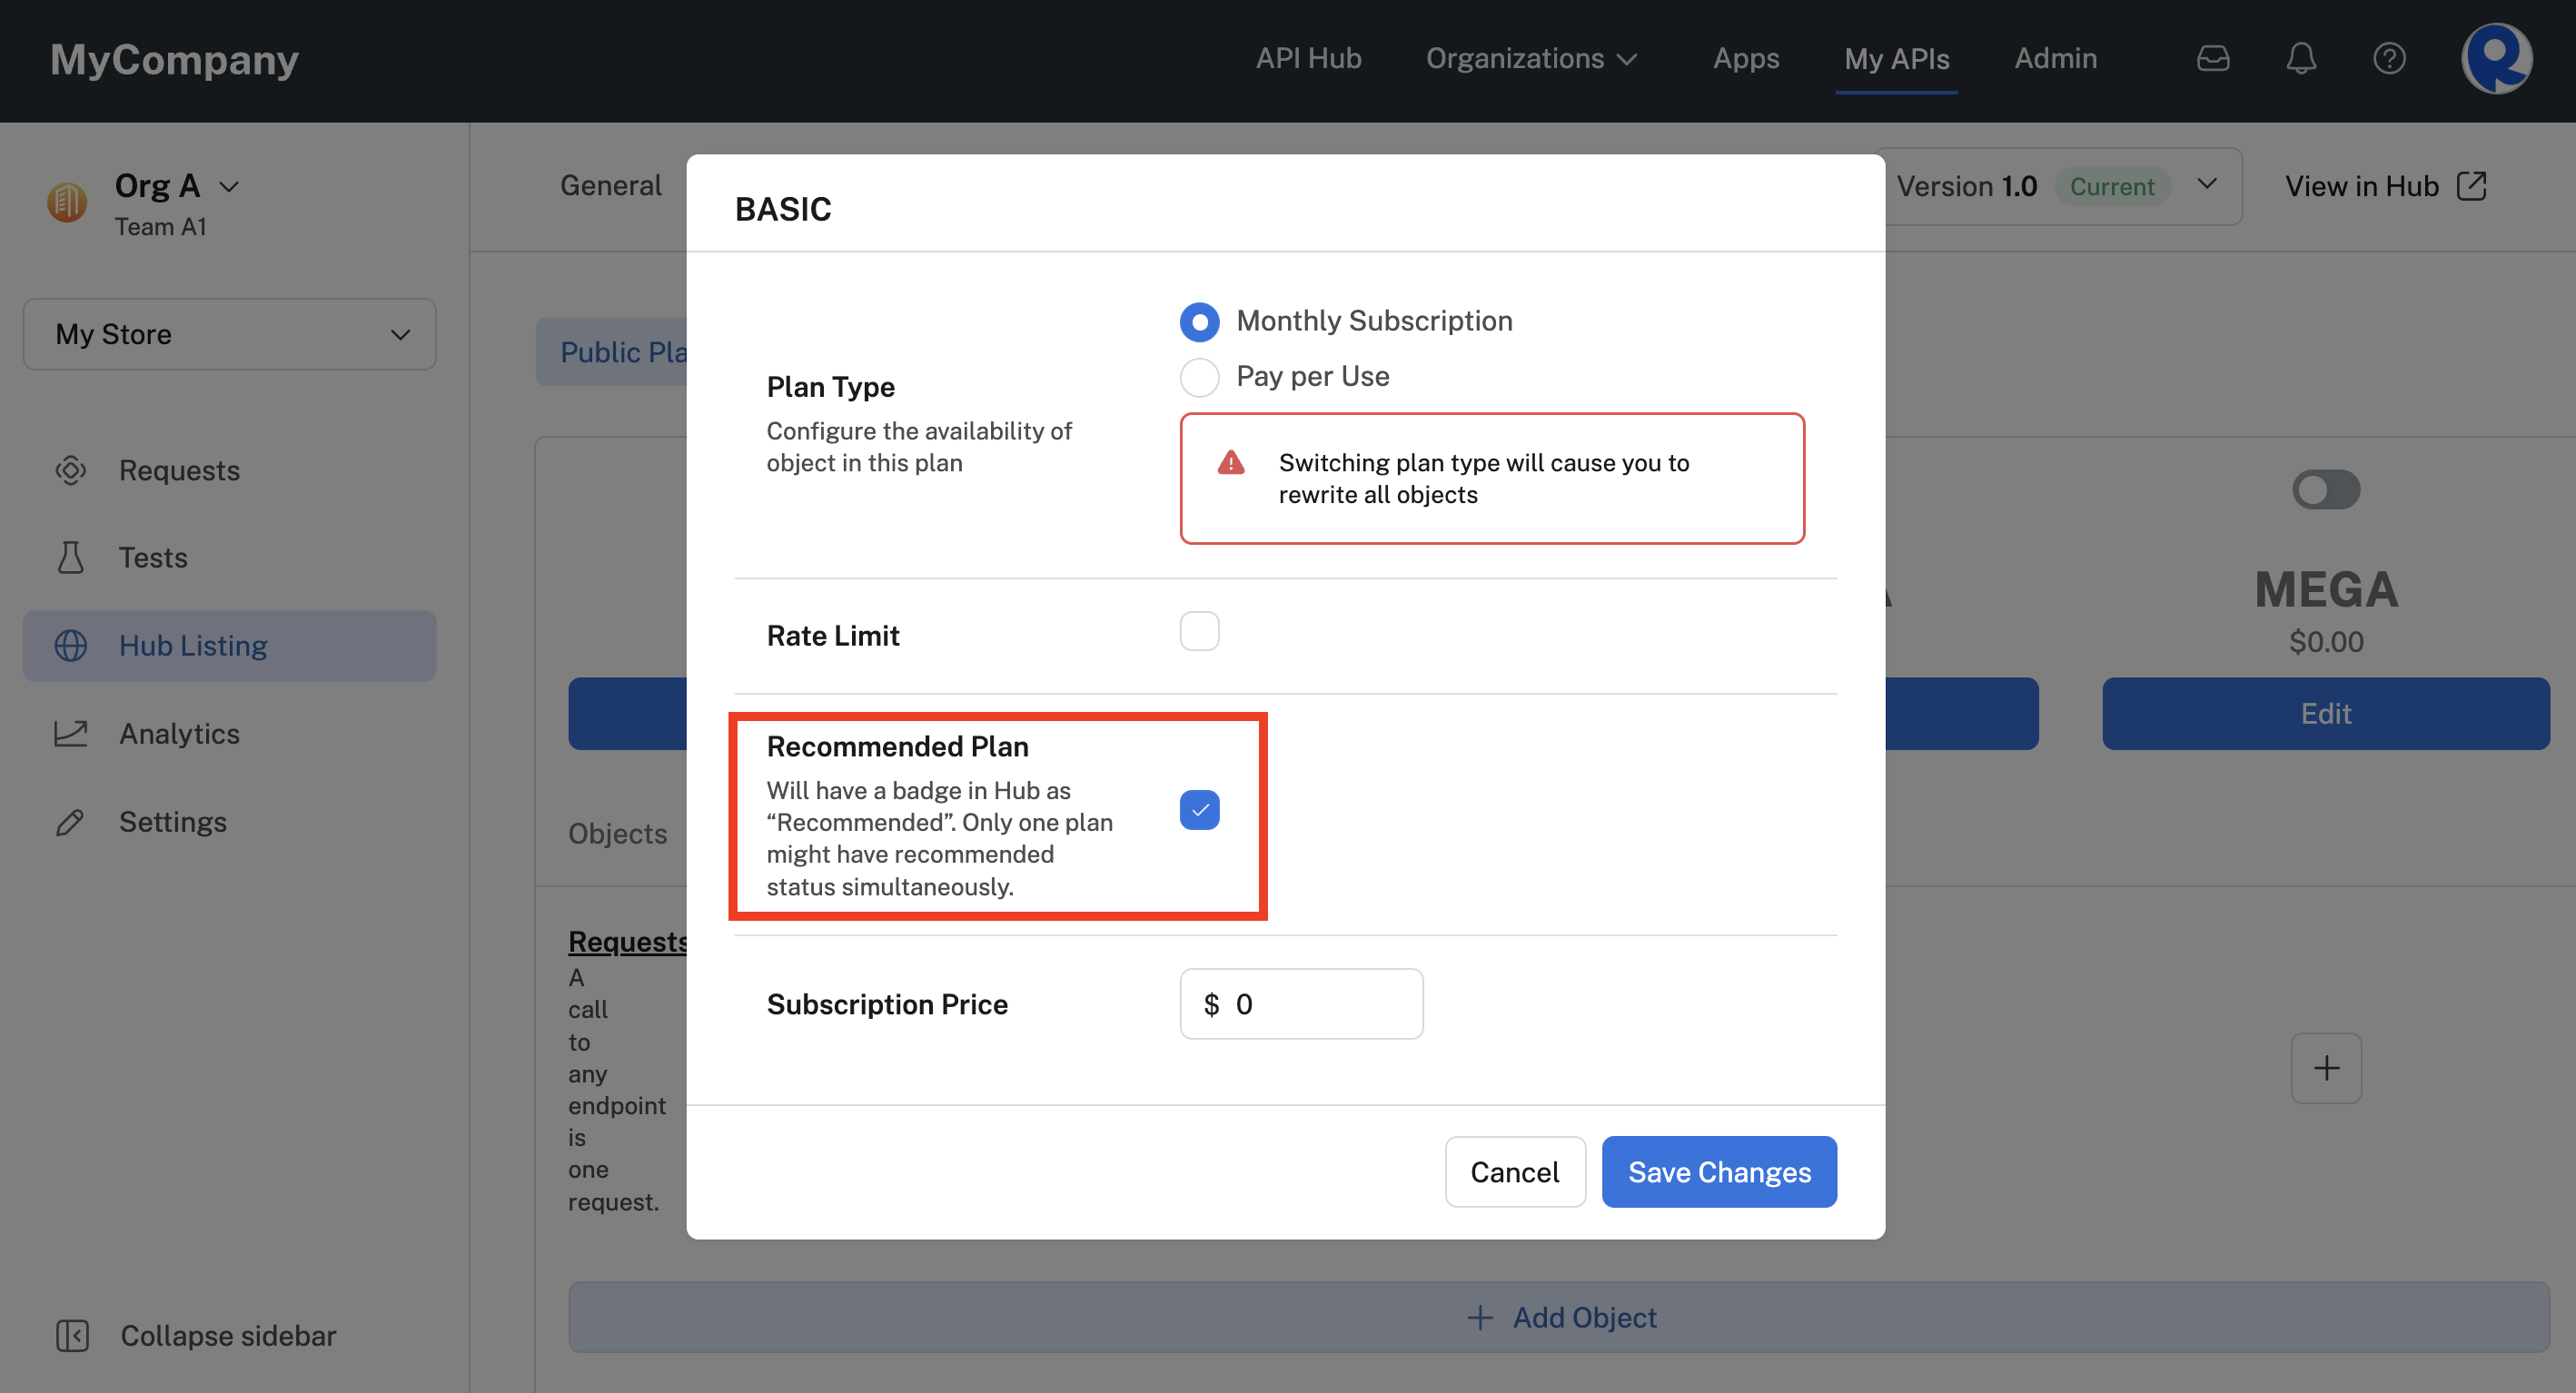
Specifying the "Recommended" label for an API's plan.
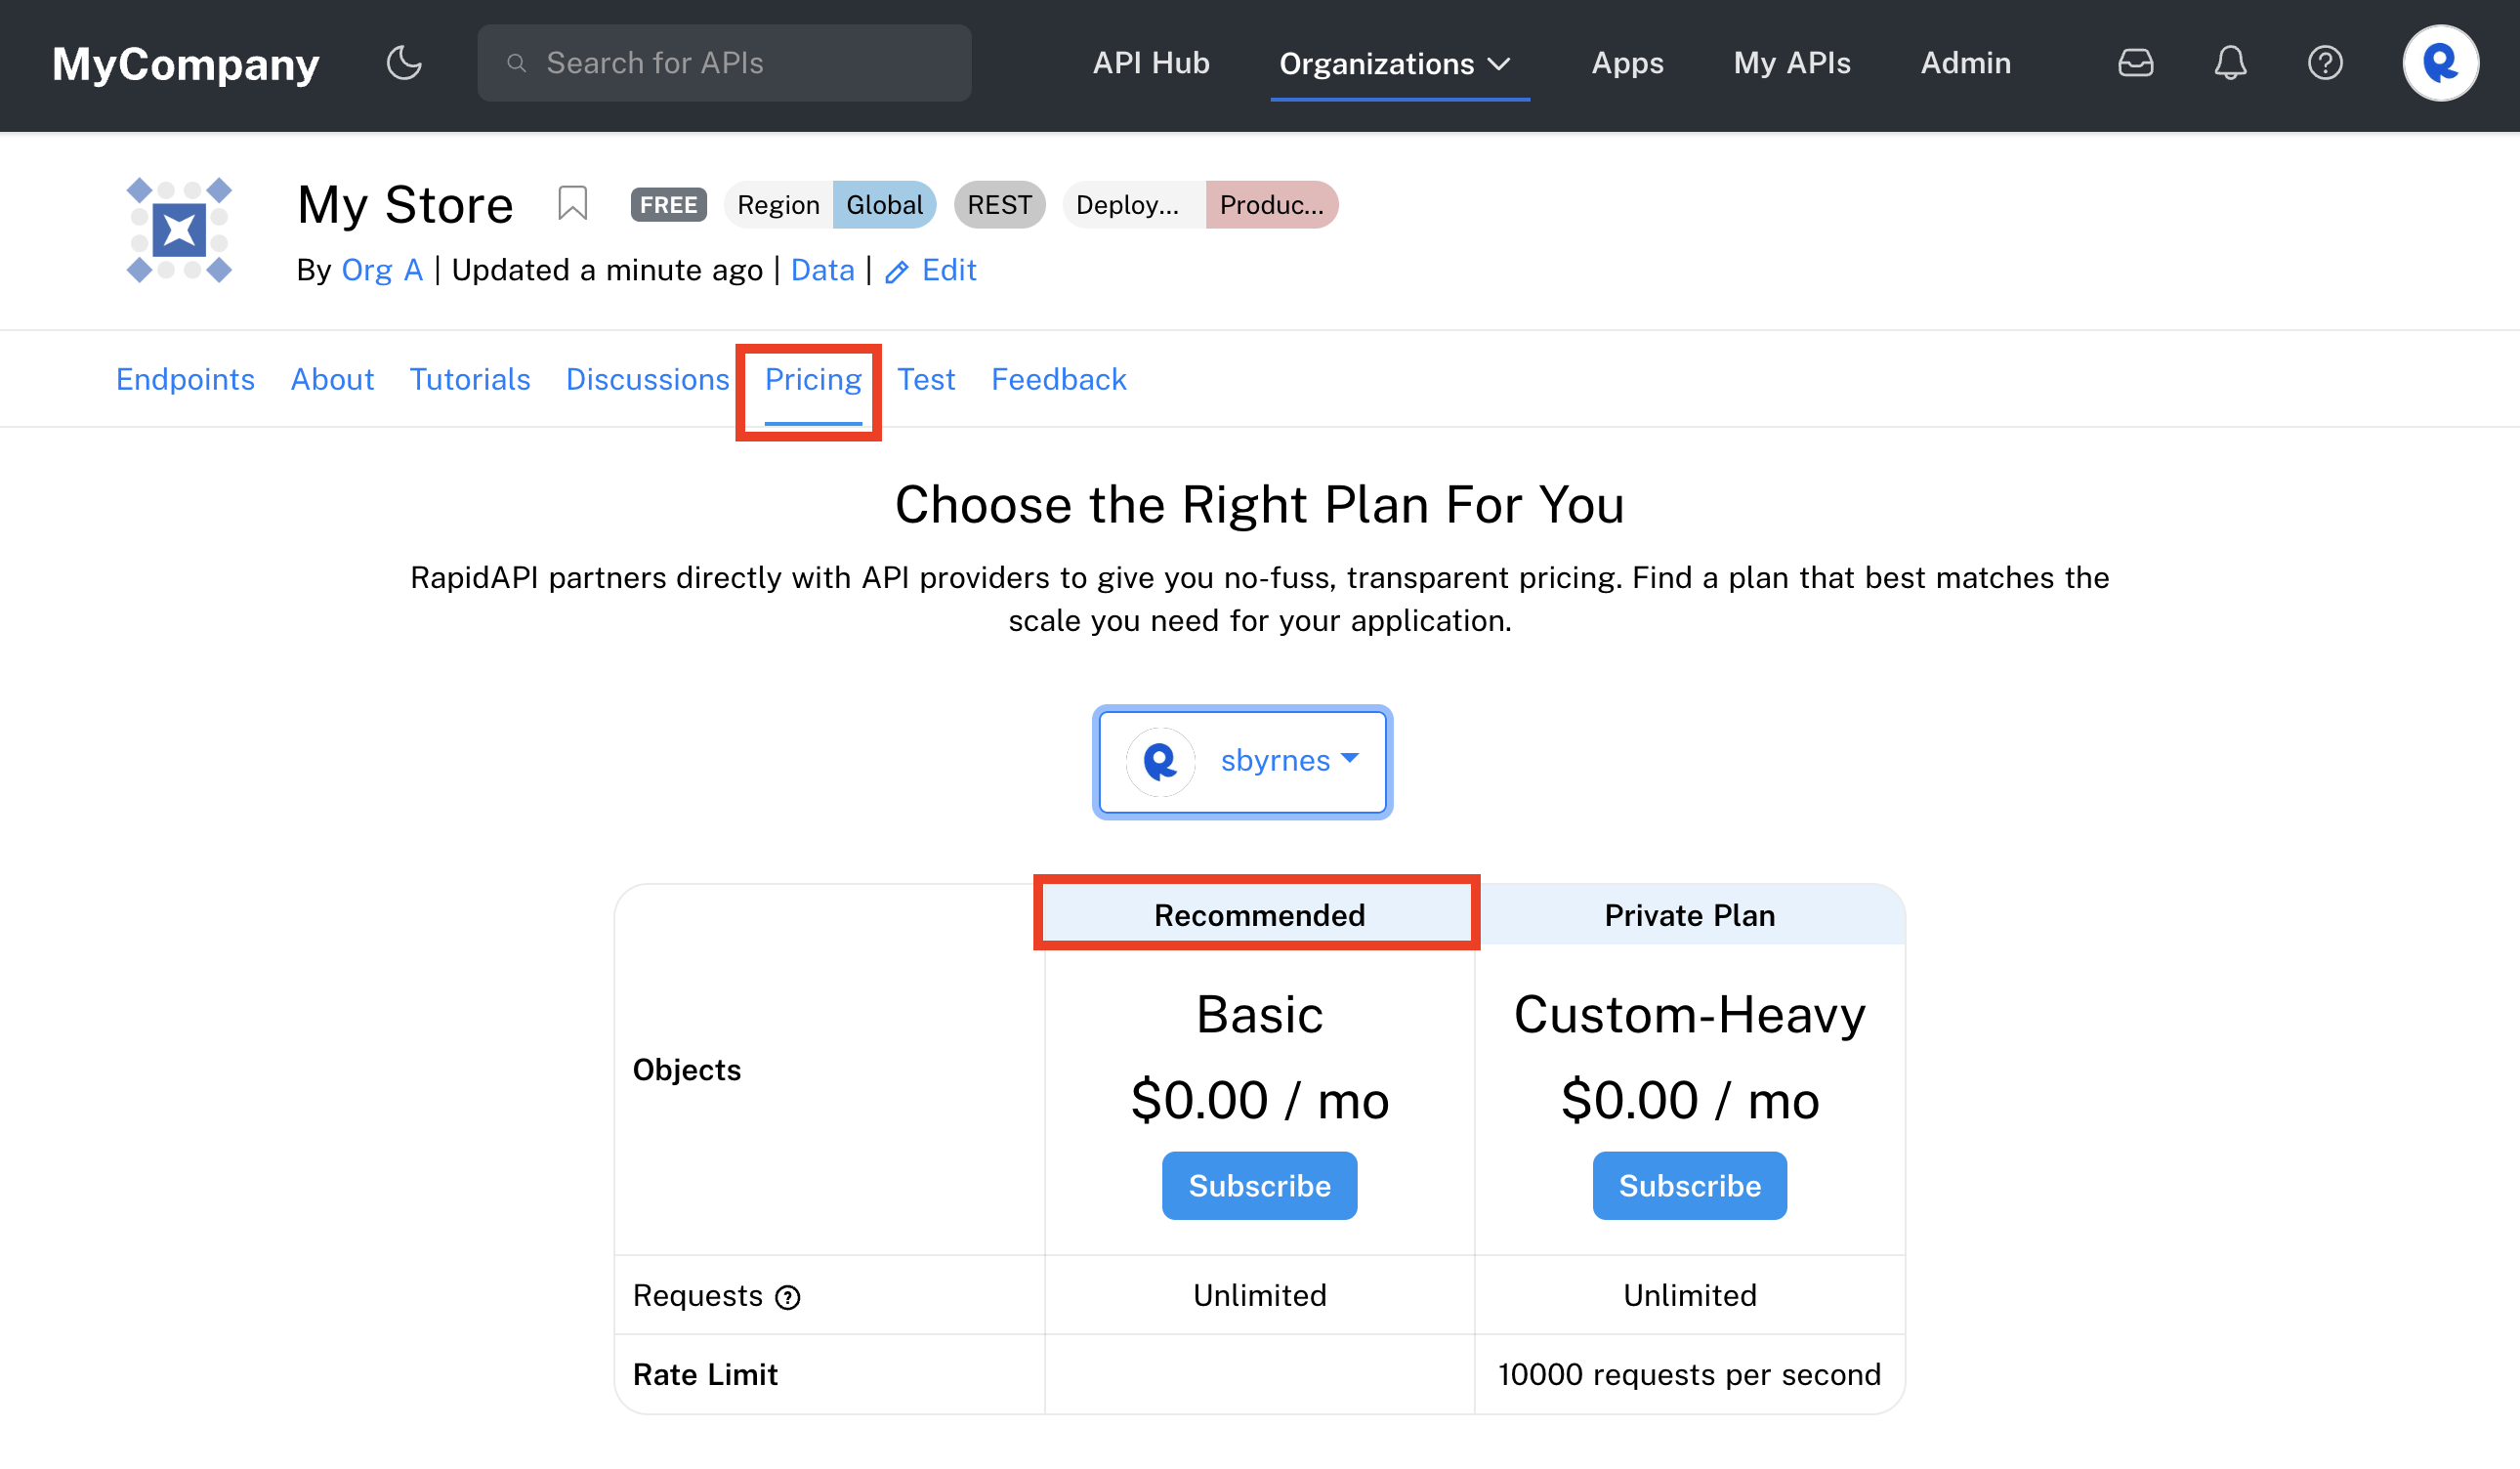
The Recommended label for an API listing's plan.
Objects
An Object is an entity associated with an API's plans that is used to differentiate plans or limit some aspect of the plans. The default Object that is created for an API is a "Requests" Object. This identifies the limit for the number of requests that can be made per day or month. The default BASIC plan contains a "Requests" object that allows an unlimited number of requests.
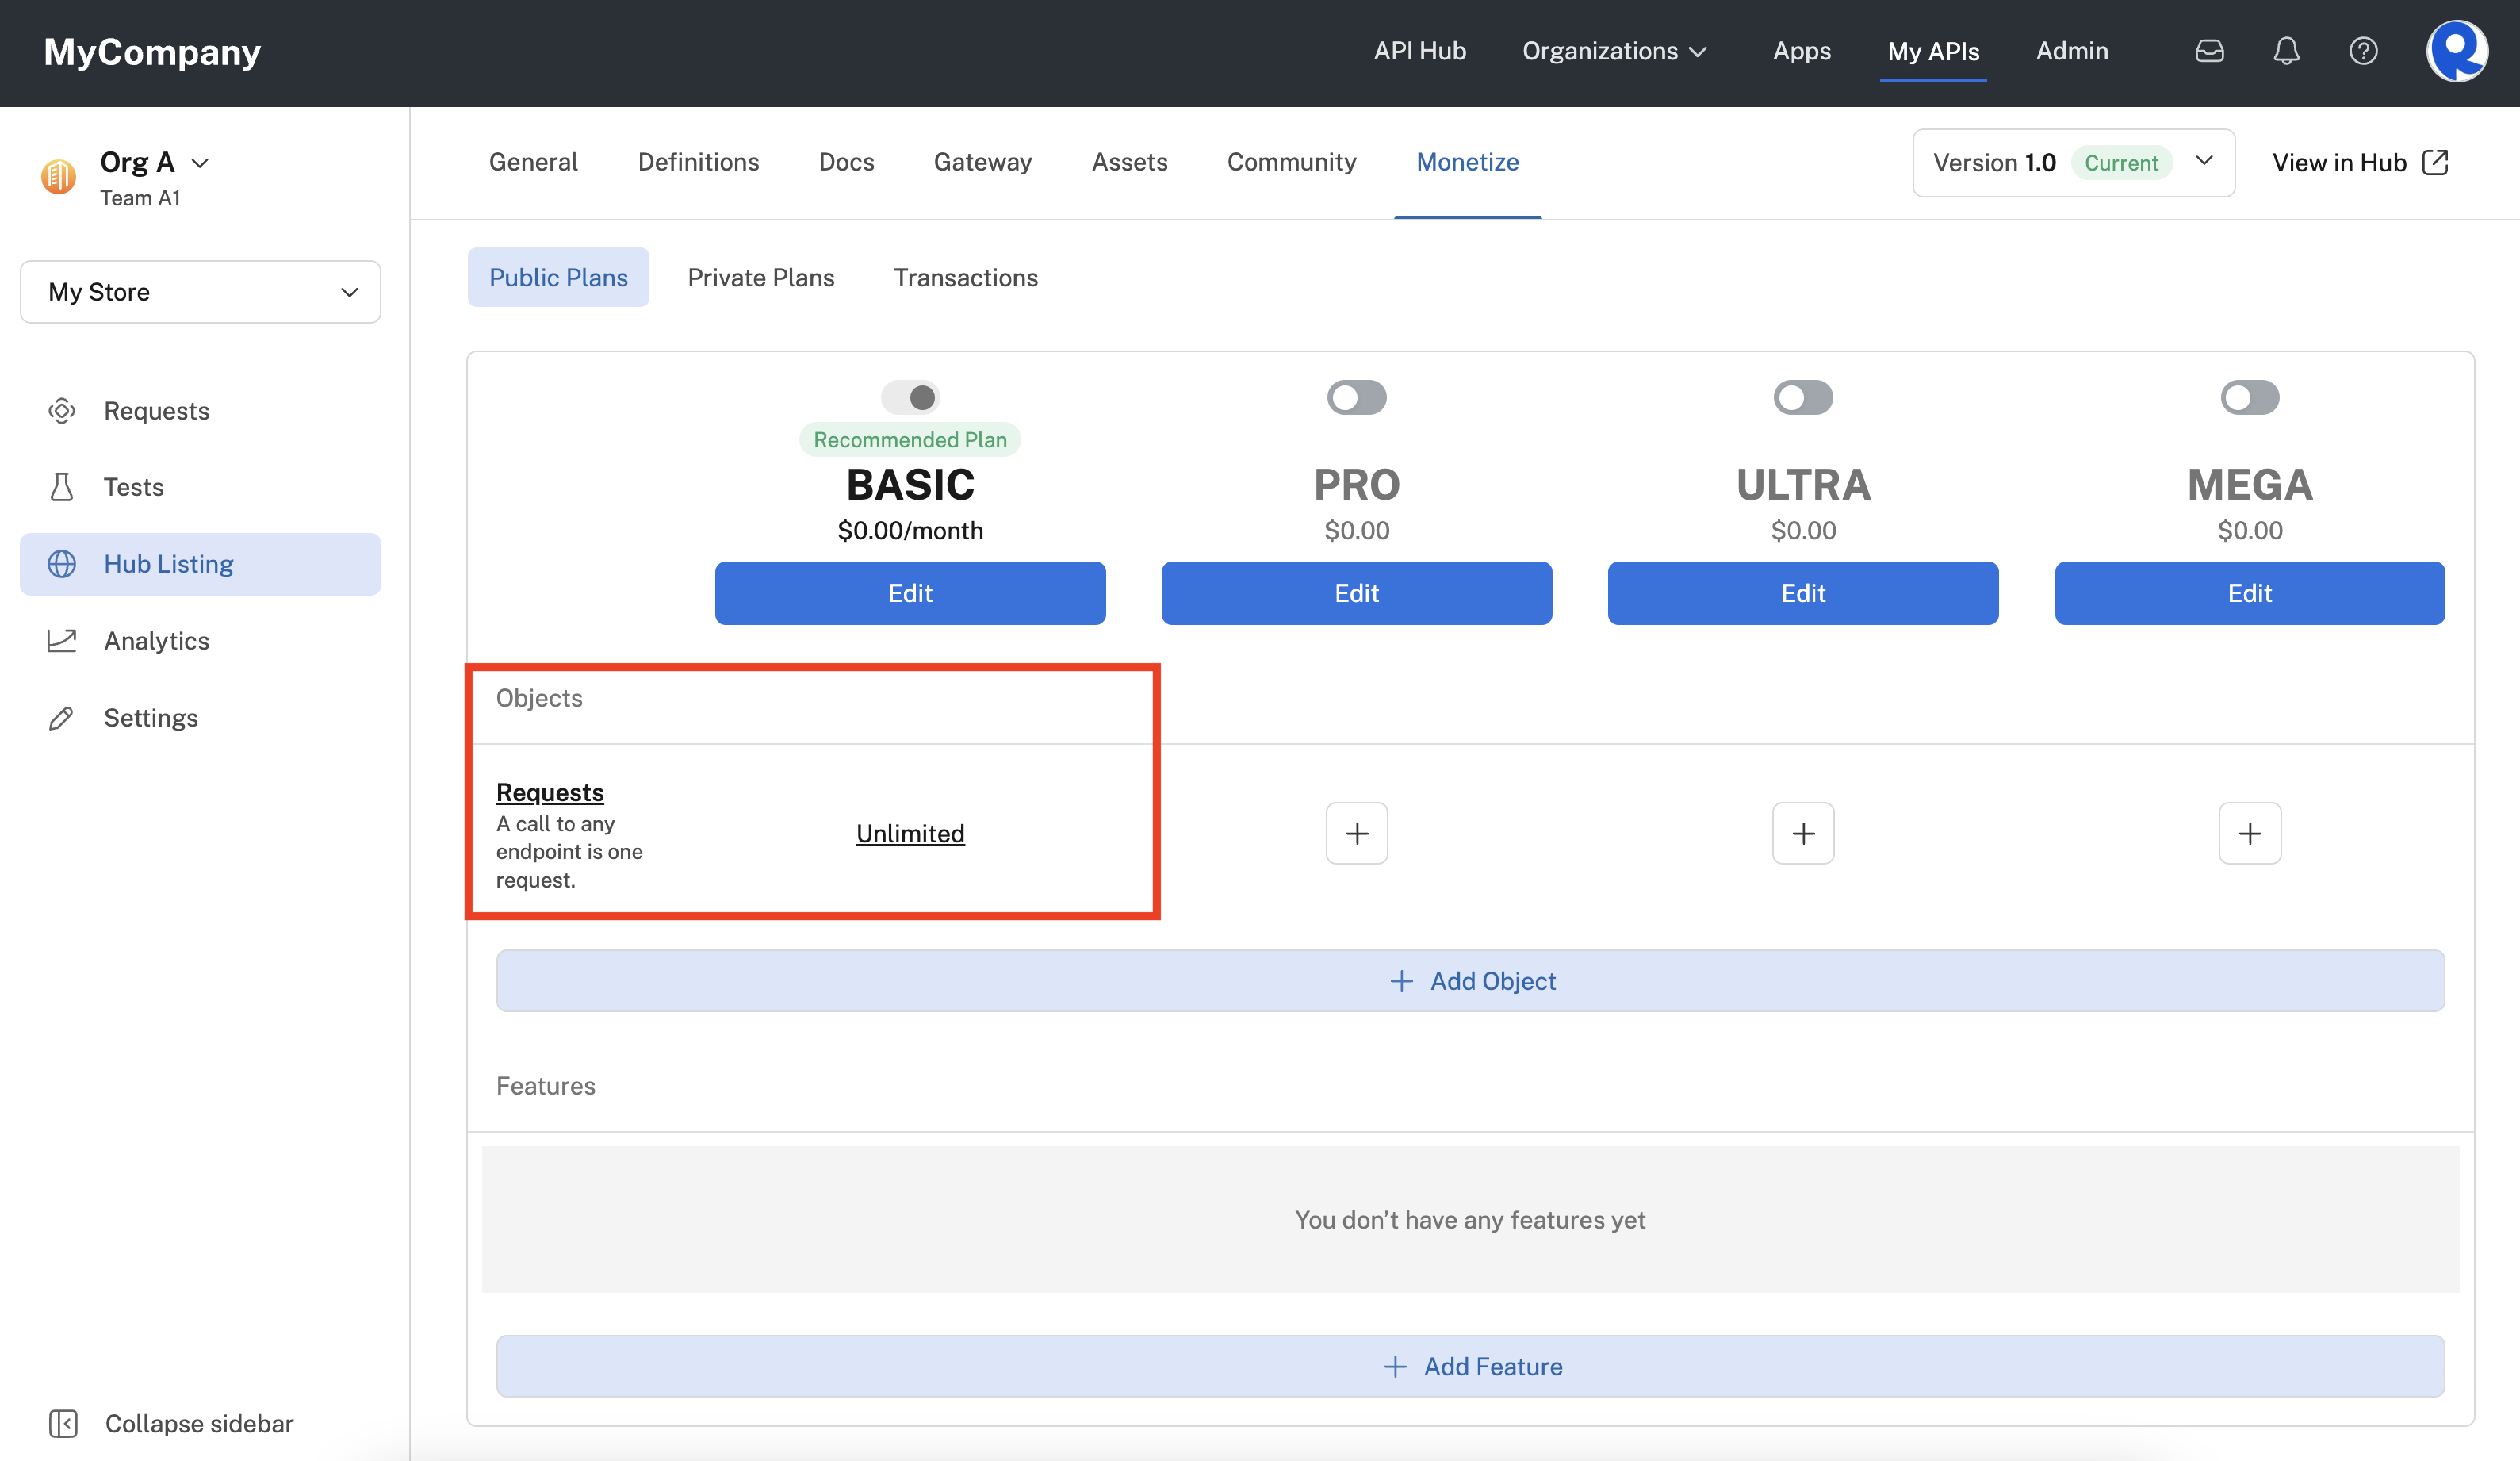
The default BASIC plan's Requests Object.
To edit a plan's existing object, click the link associated with the Object and plan. For example, to change the BASIC plan's default "Requests" Object, click the Unlimited link associated with the plan (see screenshot above). To add an existing object to a new plan, click the plus associated with the object and plan (see screenshot above).
For example, lets say we want to limit the BASIC plan's requests to 1000 per month. Clicking the Unlimited link for the Object brings up the dialog show below. We have changed the Unlimited radio button to Monthly and set a Quota Limit of 1000 per month. We can choose to select a Soft Limit or a Hard Limit if the Quota Limit is exceeded. Soft Limits allow the API consumer to continue to use the API, but they will be charged an Overage fee (Soft Limits must include a non-zero overage fee). A Hard Limit means that the API consumer will not be able to make additional calls during the Quota Limit period.
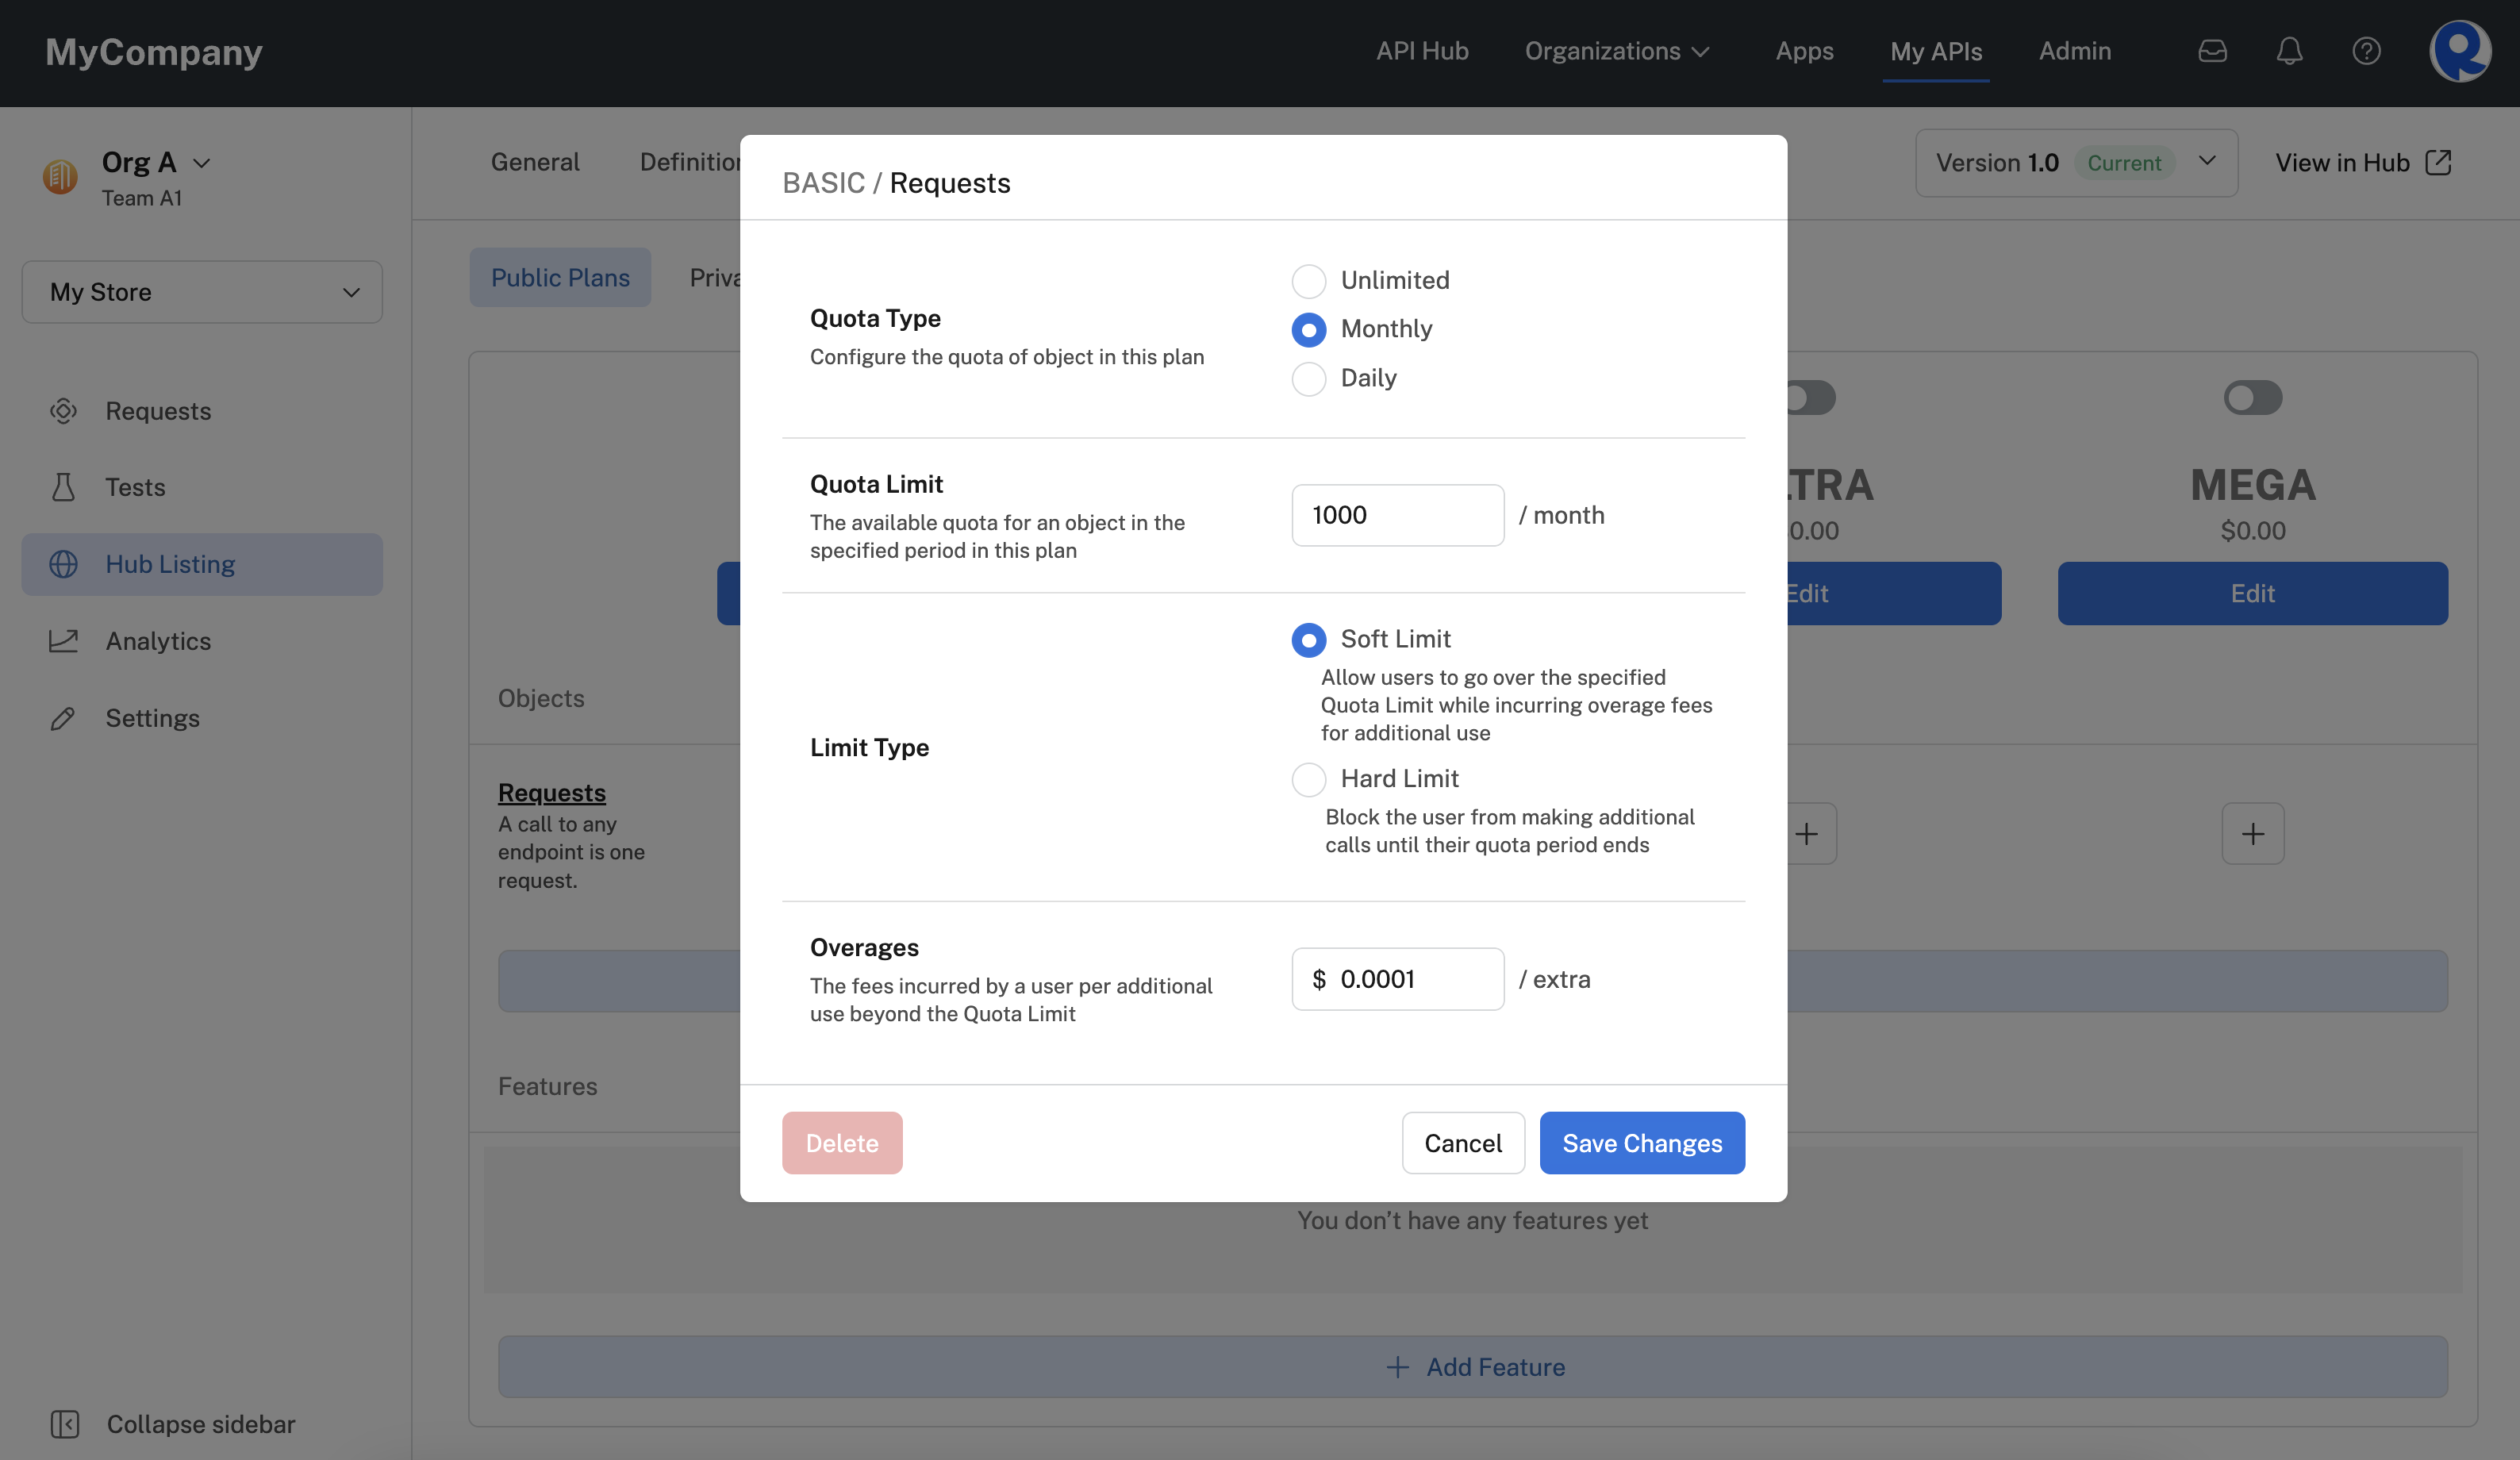
Editing a plan's Requests Object.
The screenshot below shows the API listing's Pricing tab once we have modified the BASIC plan's Requests Object.
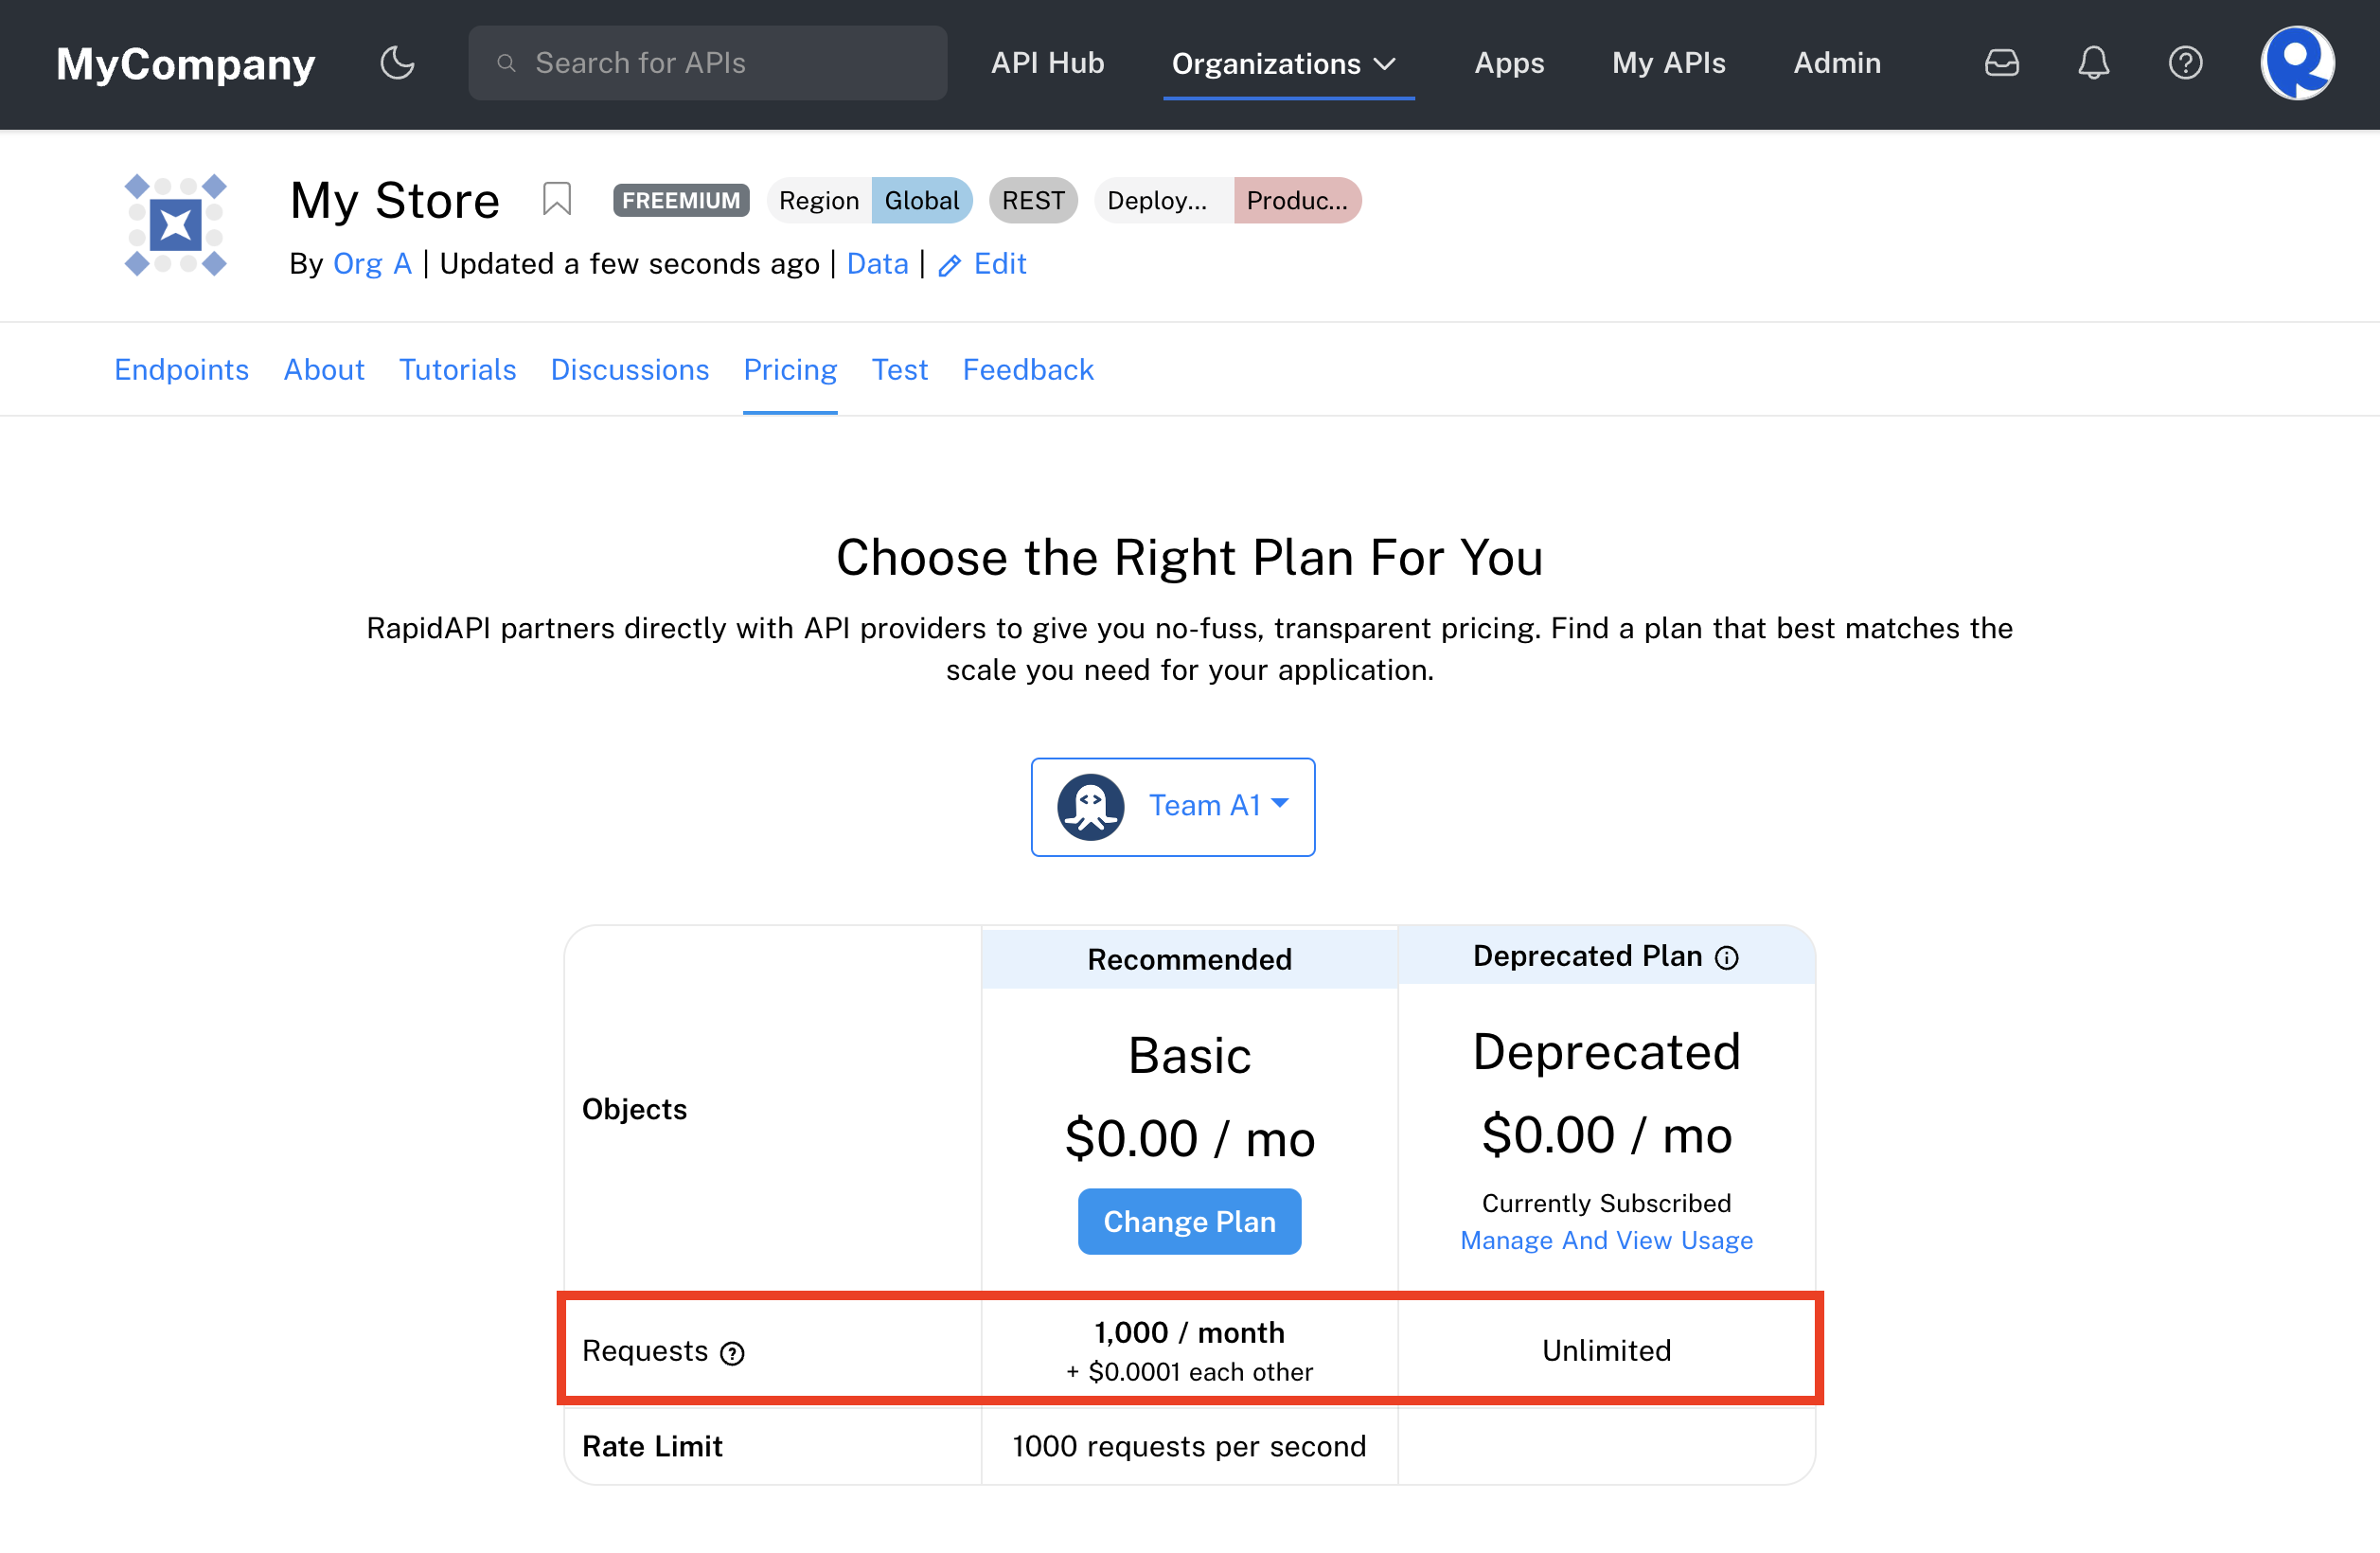
The API listing's Pricing tab showing the modified Requests Object.
Besides the default "Requests" object, you can create other Objects that can be associated with plans. For example, let's say that your API includes an endpoint that sends emails, and you want to limit the number of emails that can be sent for a given plan. To achieve this, you could create an "Emails" Object.
To begin, click Add Object.
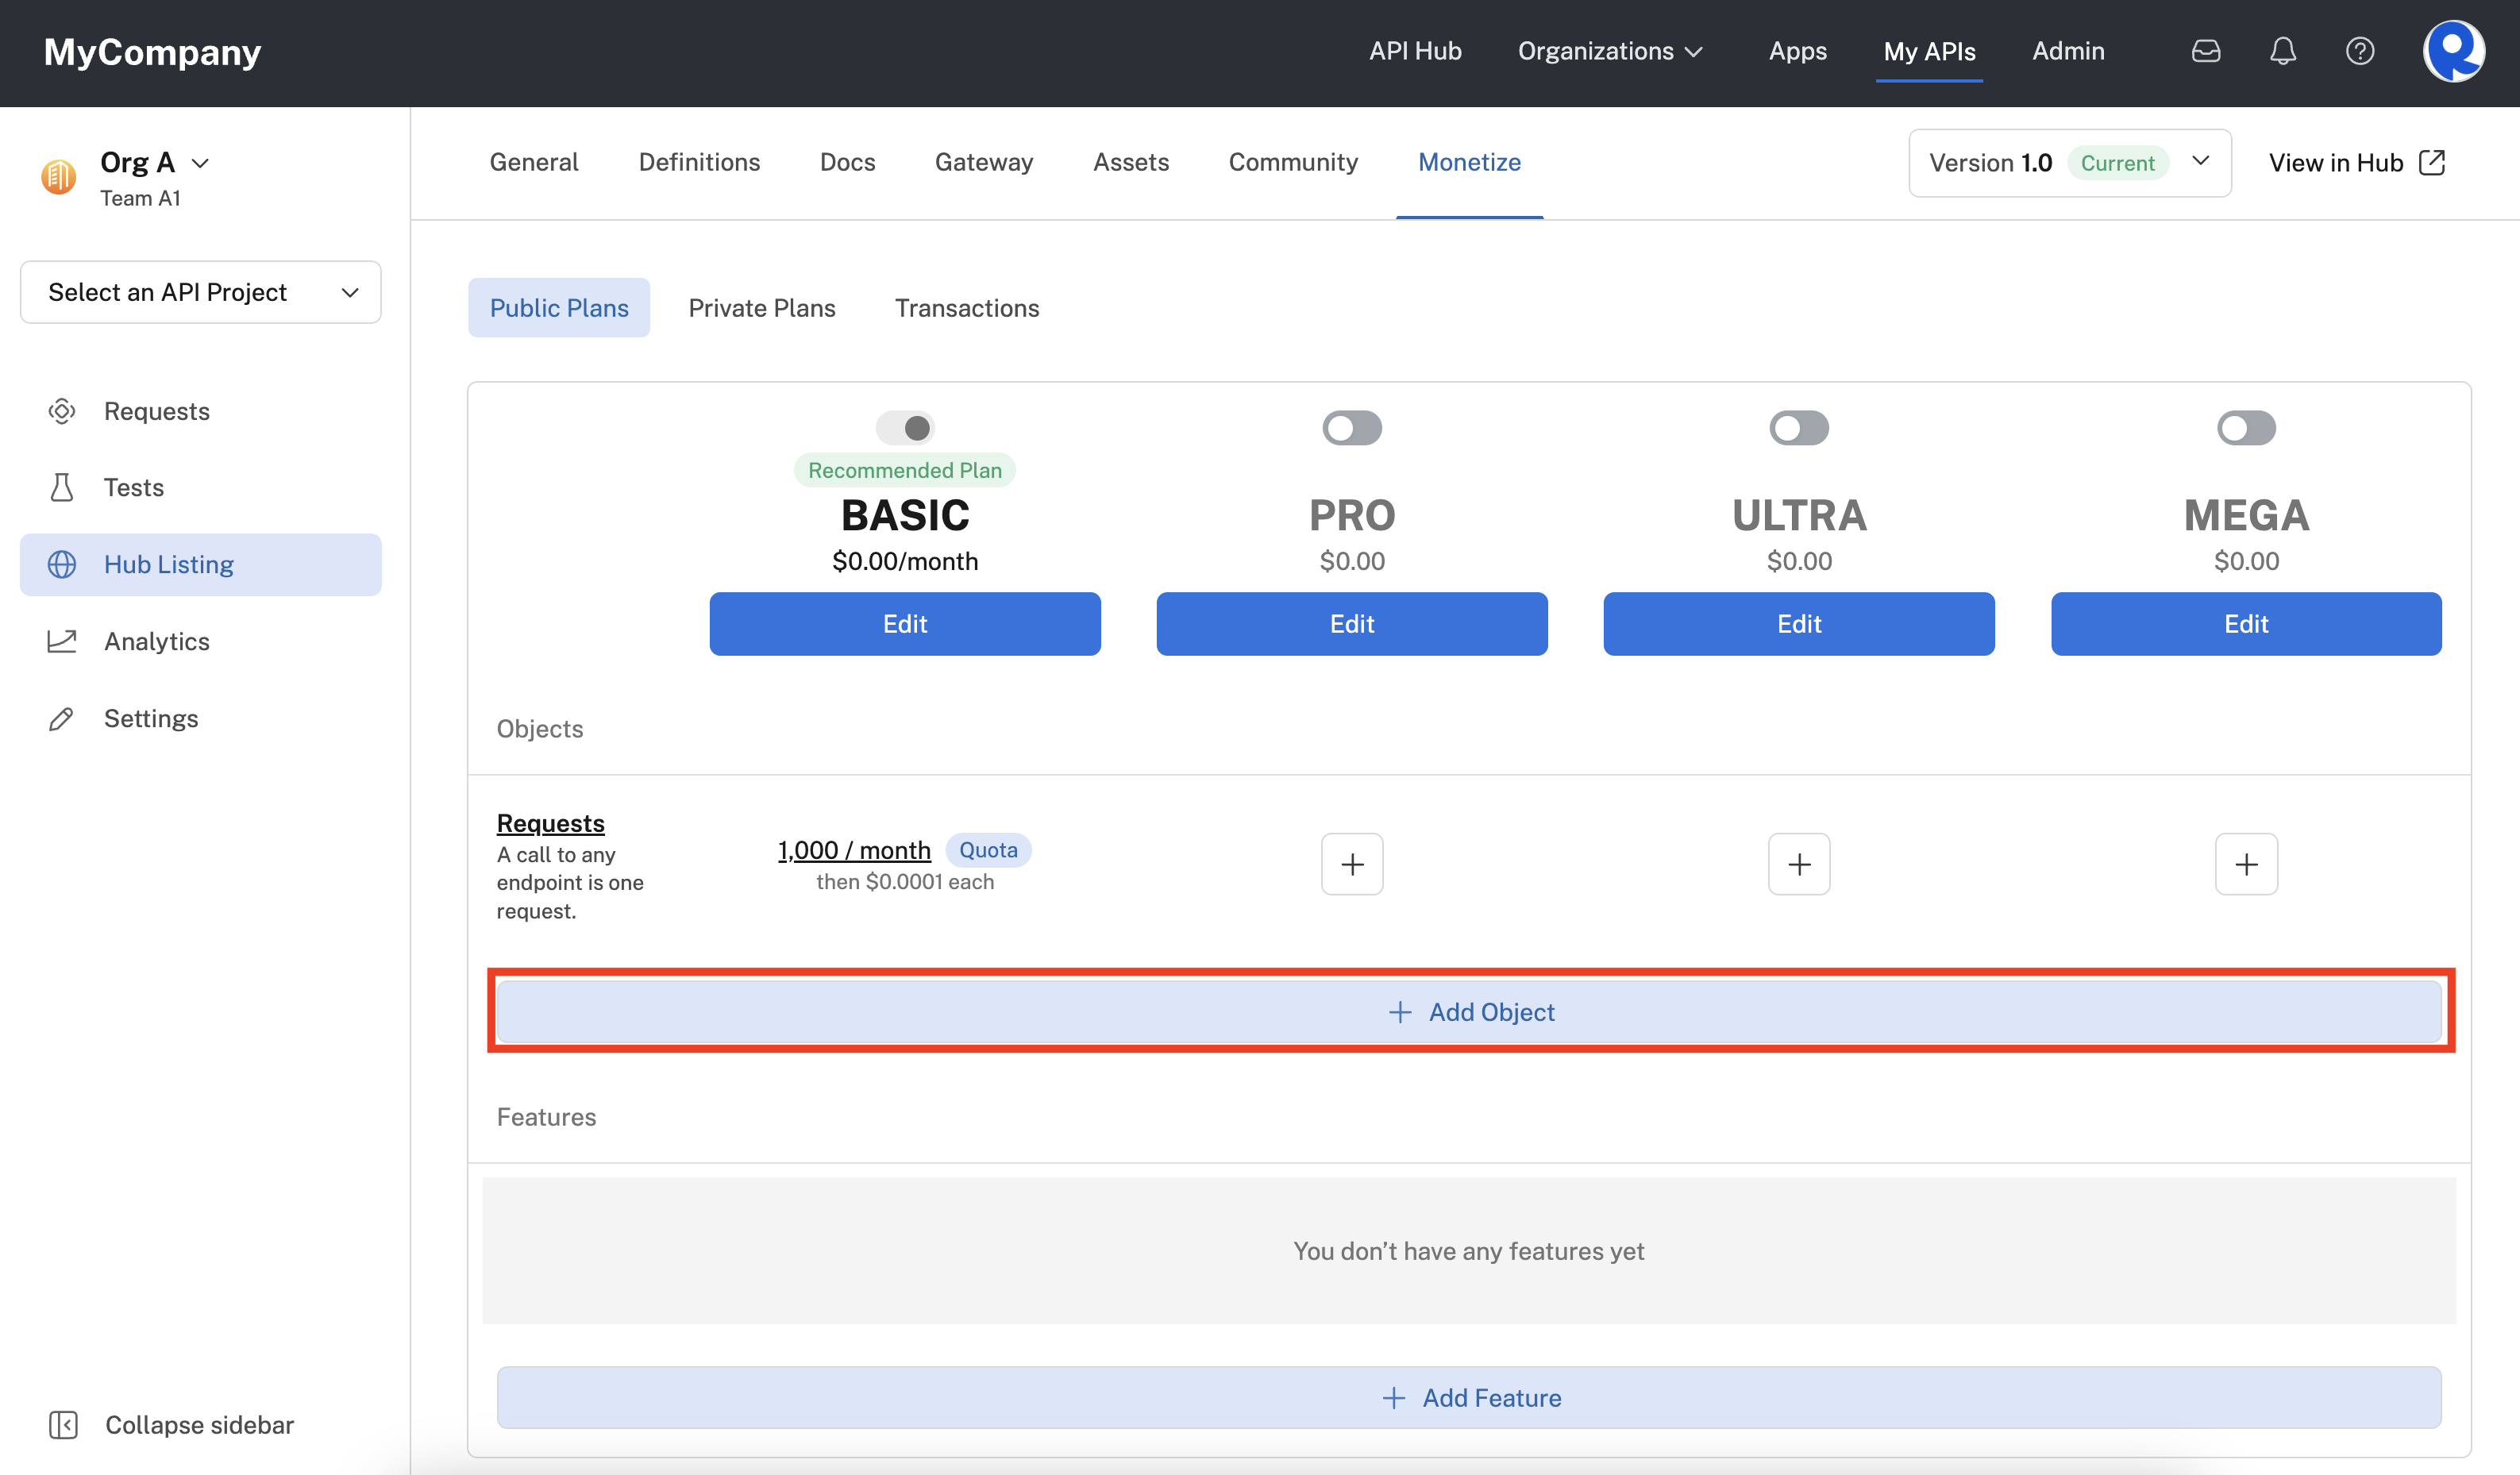
Click Add Object to add an Object that can be associated with your API's plans.
In the Add Object dialog, enter the following:
- Name - The name of the the new Object. Below we are entering "Email".
- Description - The description provides the API consumer with more information about the object. This is shown on the API listing's Pricing page.
- Associated Endpoints - You can select one or more of the API's endpoints, or select All endpoints. The Object will only apply to these endpoints, usually limiting the number of calls to the endpoints.
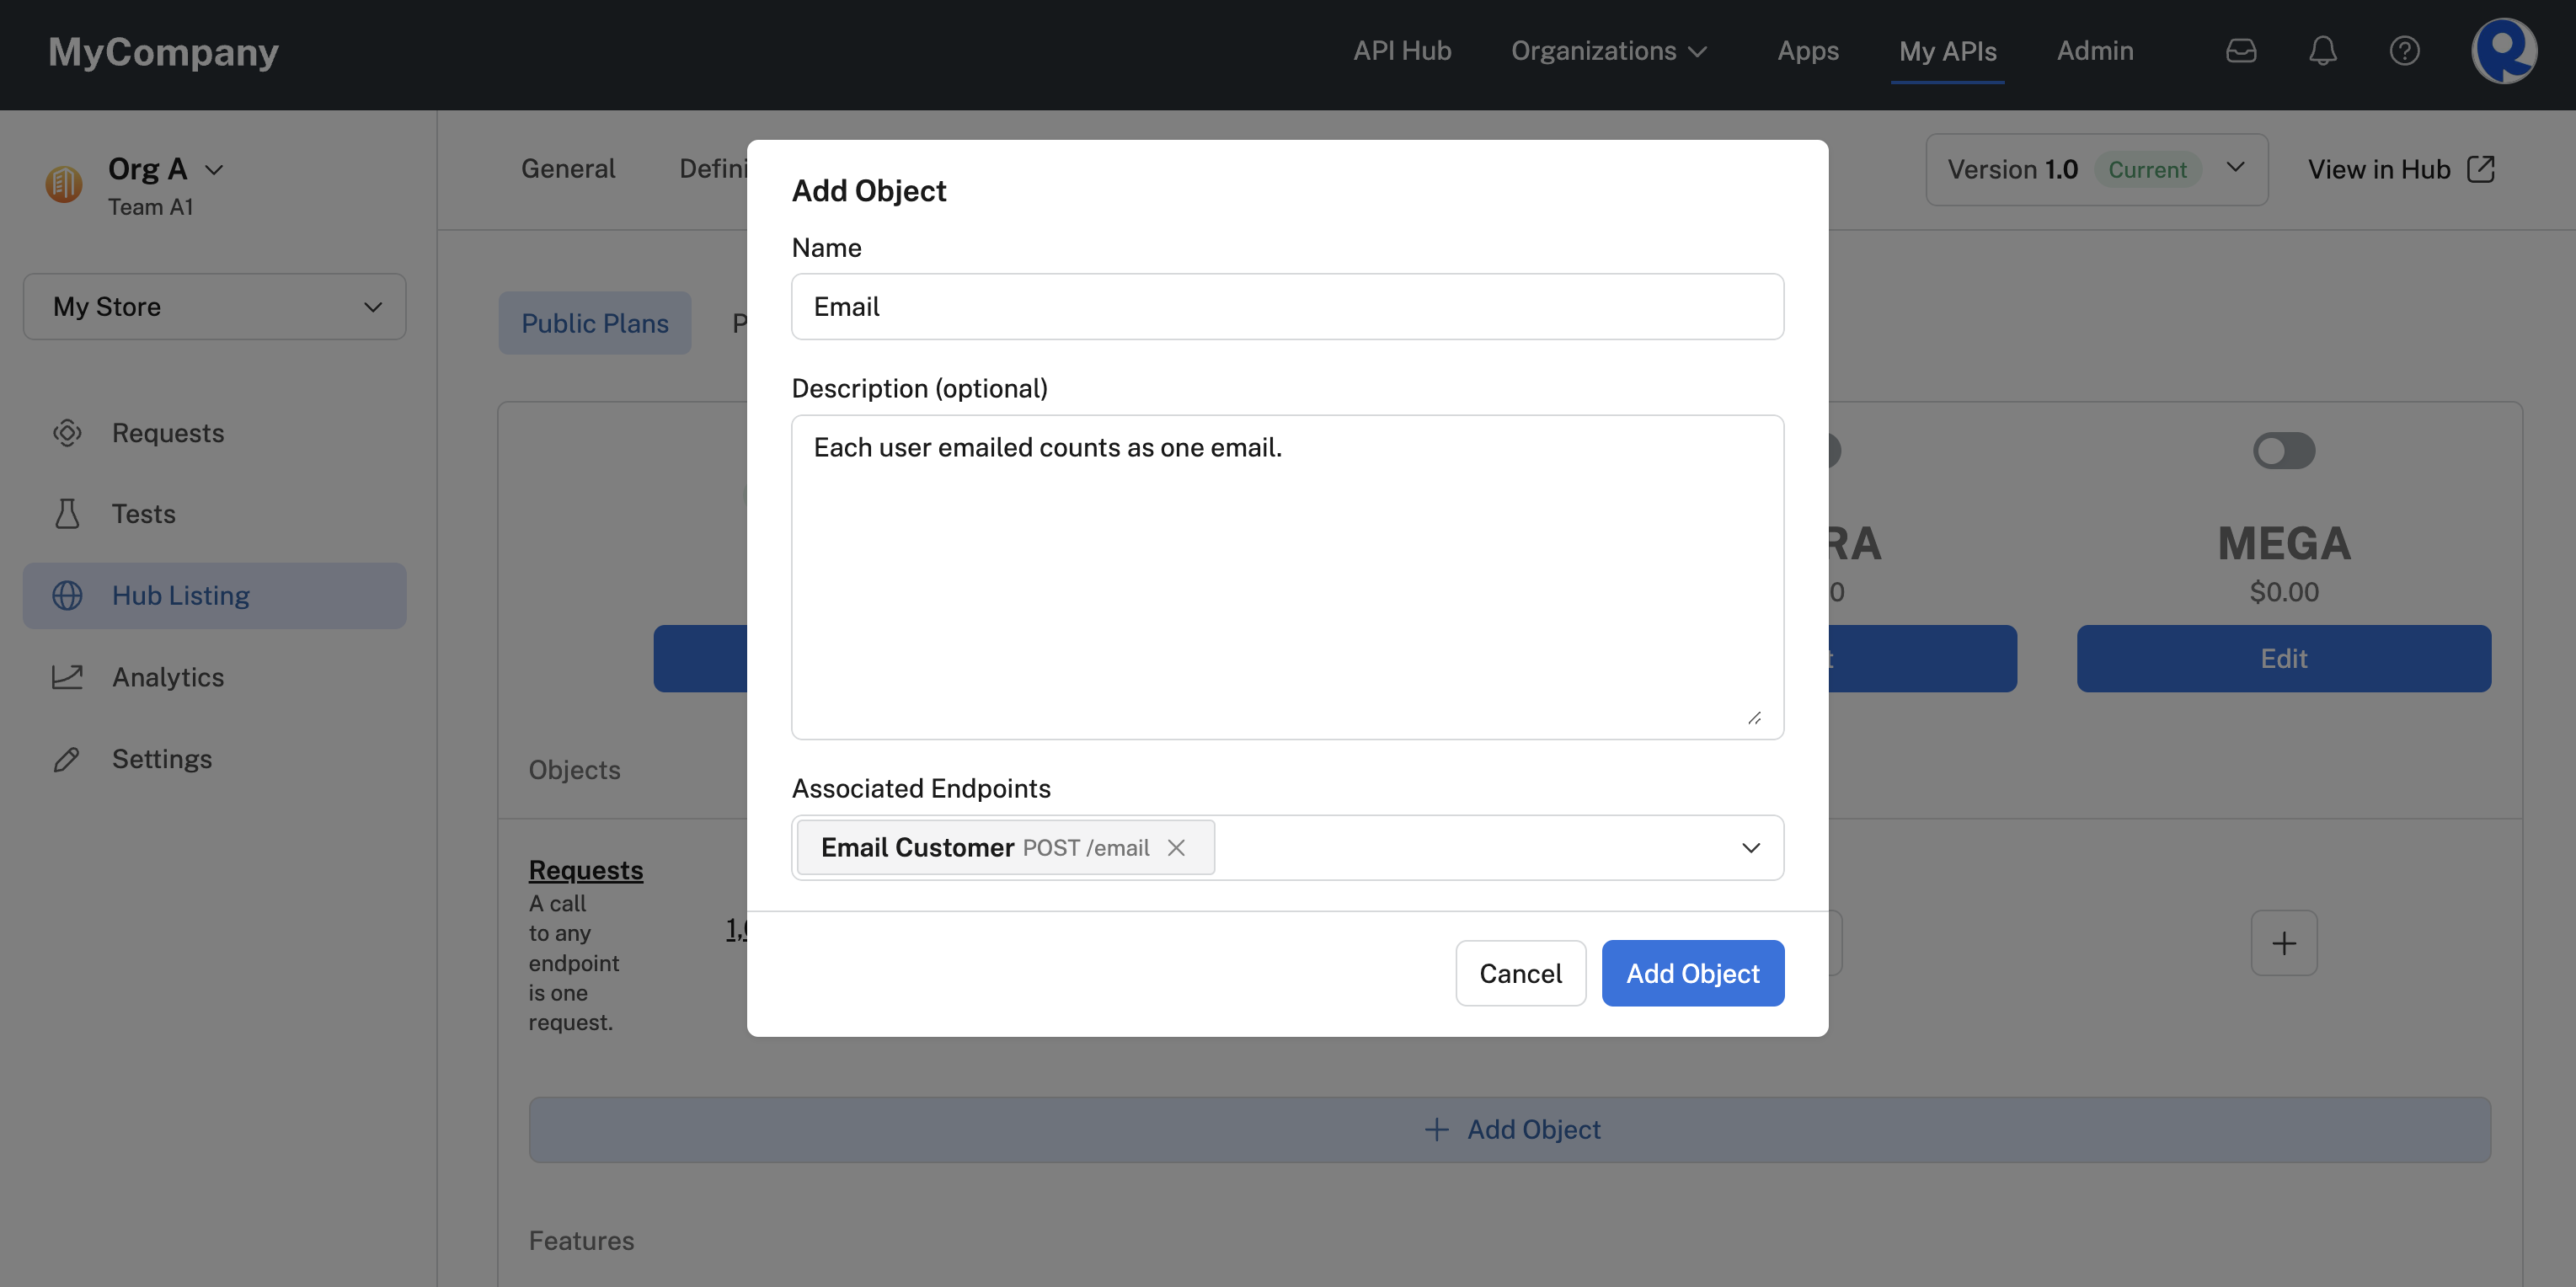
Adding an "email" object that can limit email usage of the Email Customer endpoint per plan.
After adding an Object, it can be added to one or more plans by clicking the plus sign associated with the Object and plan (see screenshot below).
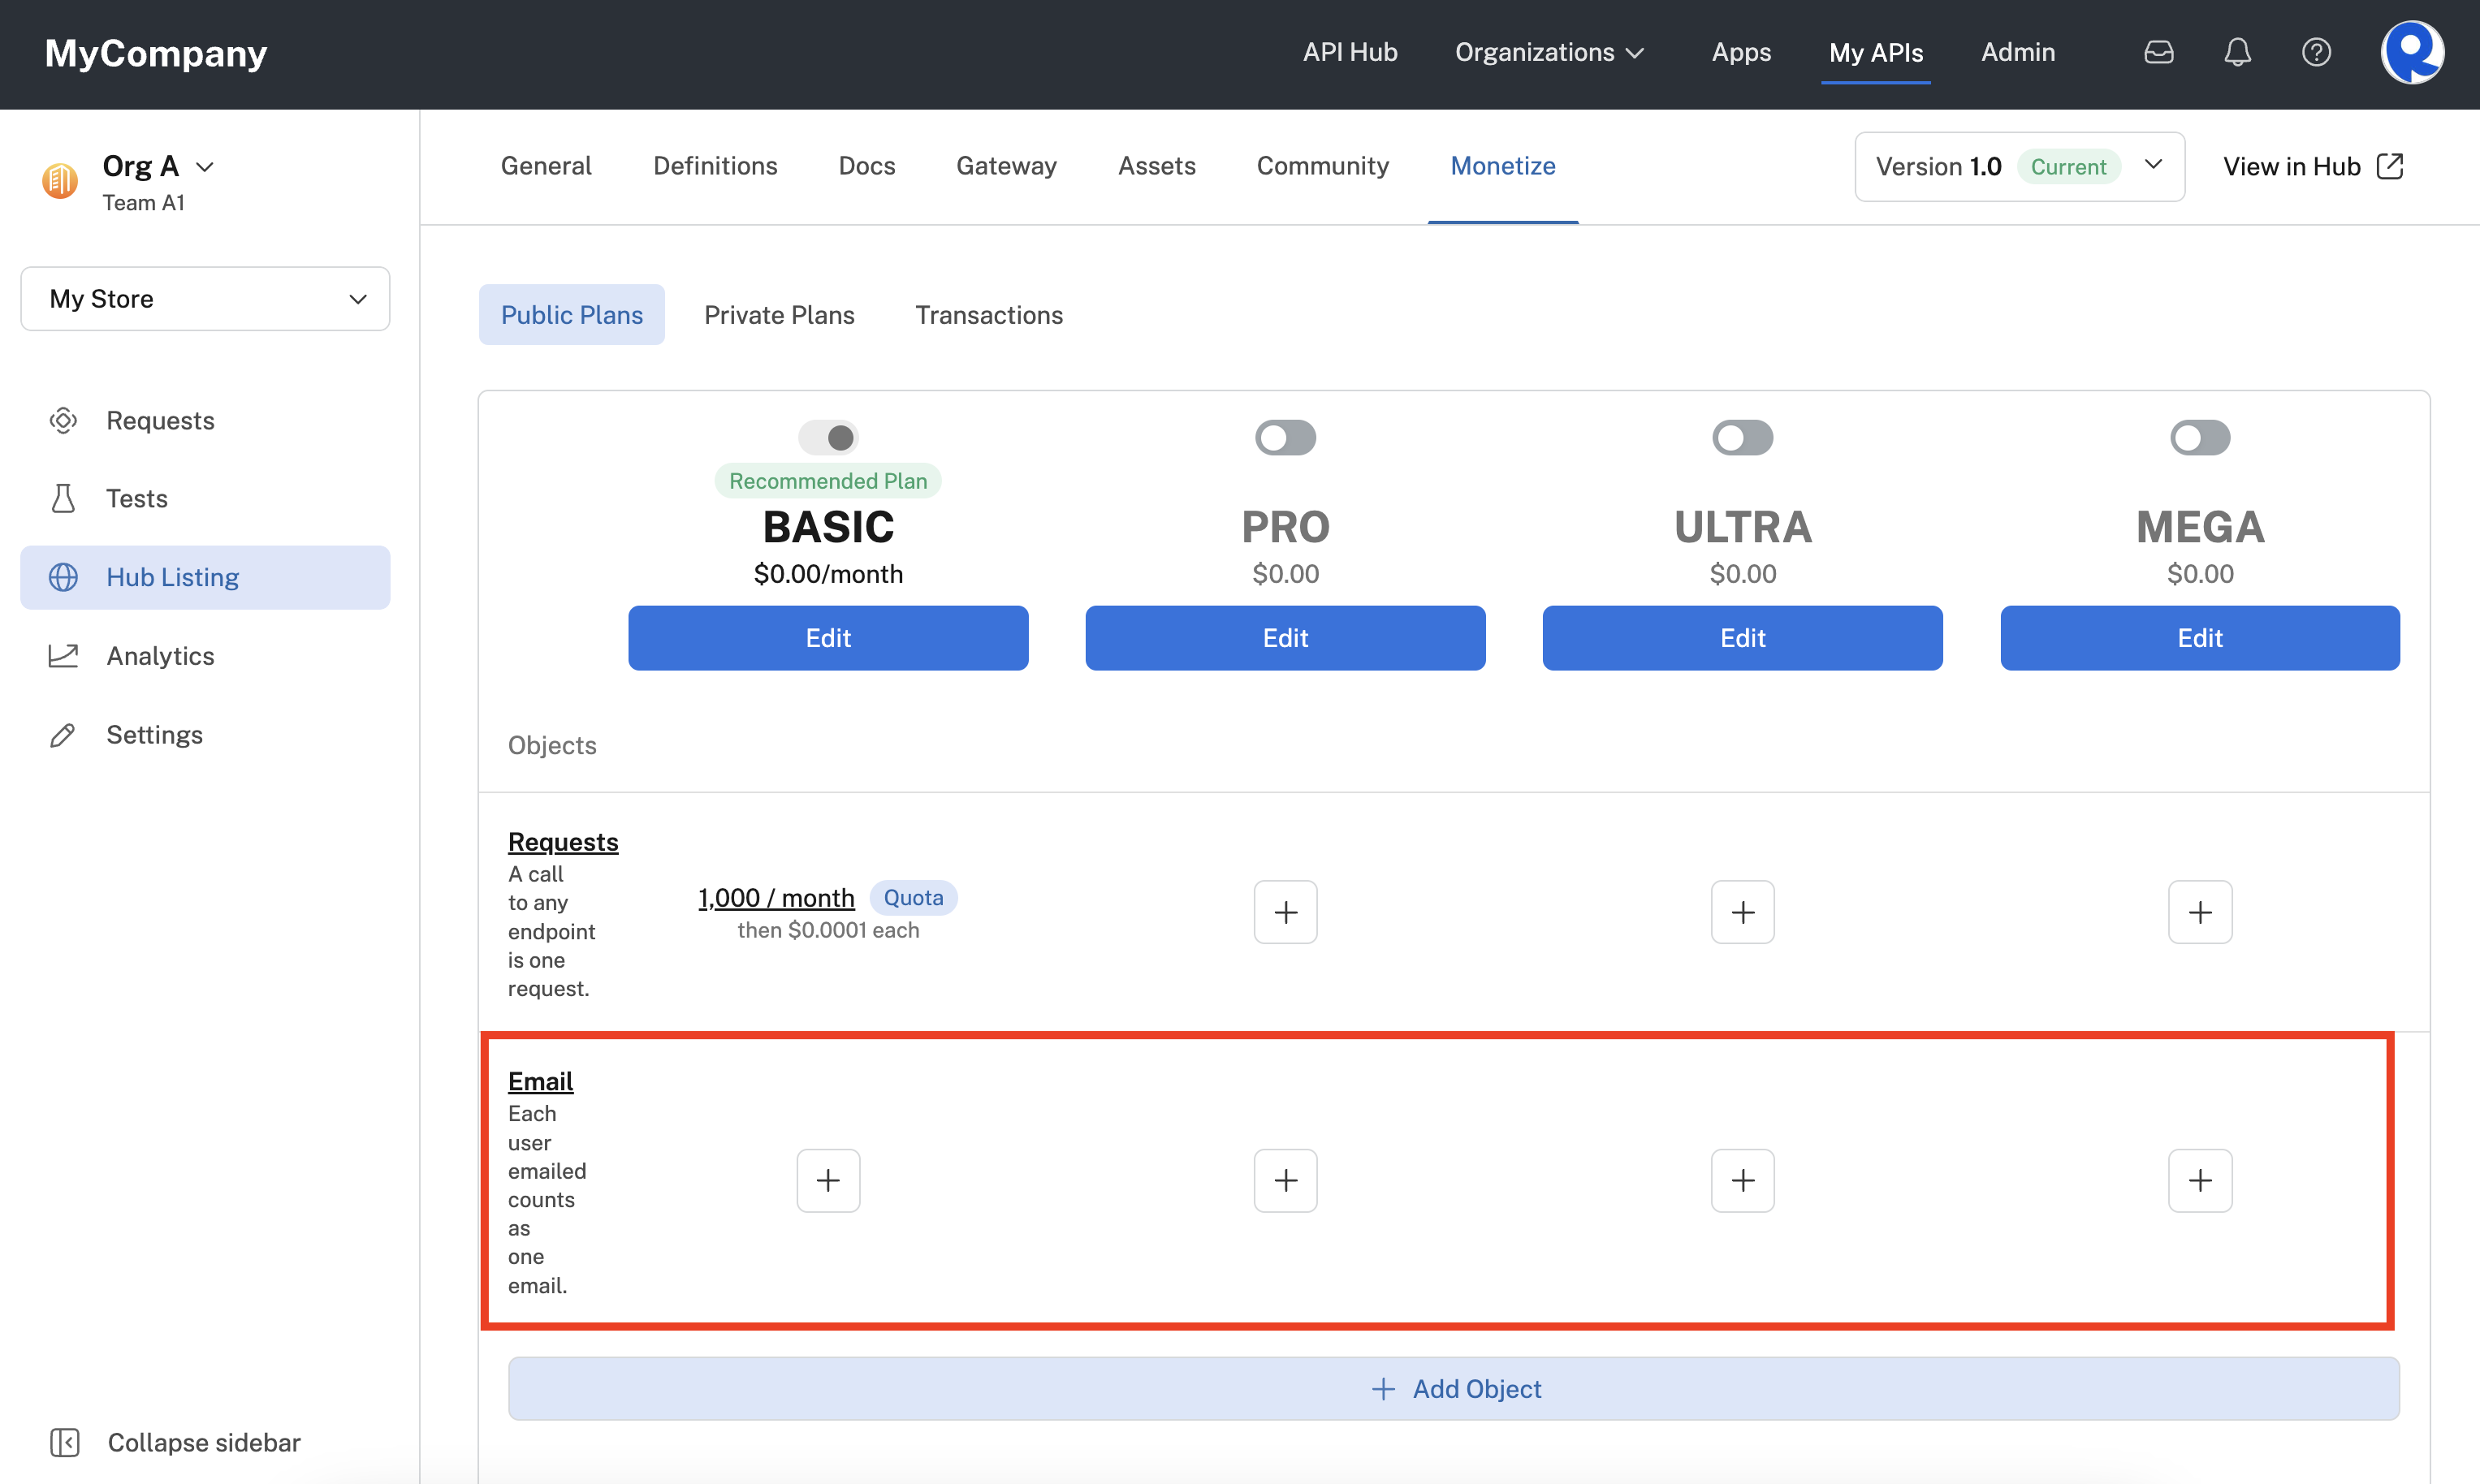
A new Object that is now available for plans.
Clicking the plus sign for an Object and plan brings up a dialog similar to the one shown below. We have configured the "Email" Object for the BASIC plan to have a daily quote of 10 calls to the email endpoint per day. A Soft Limit was configured that charges $0.01 per extra call over the quota.
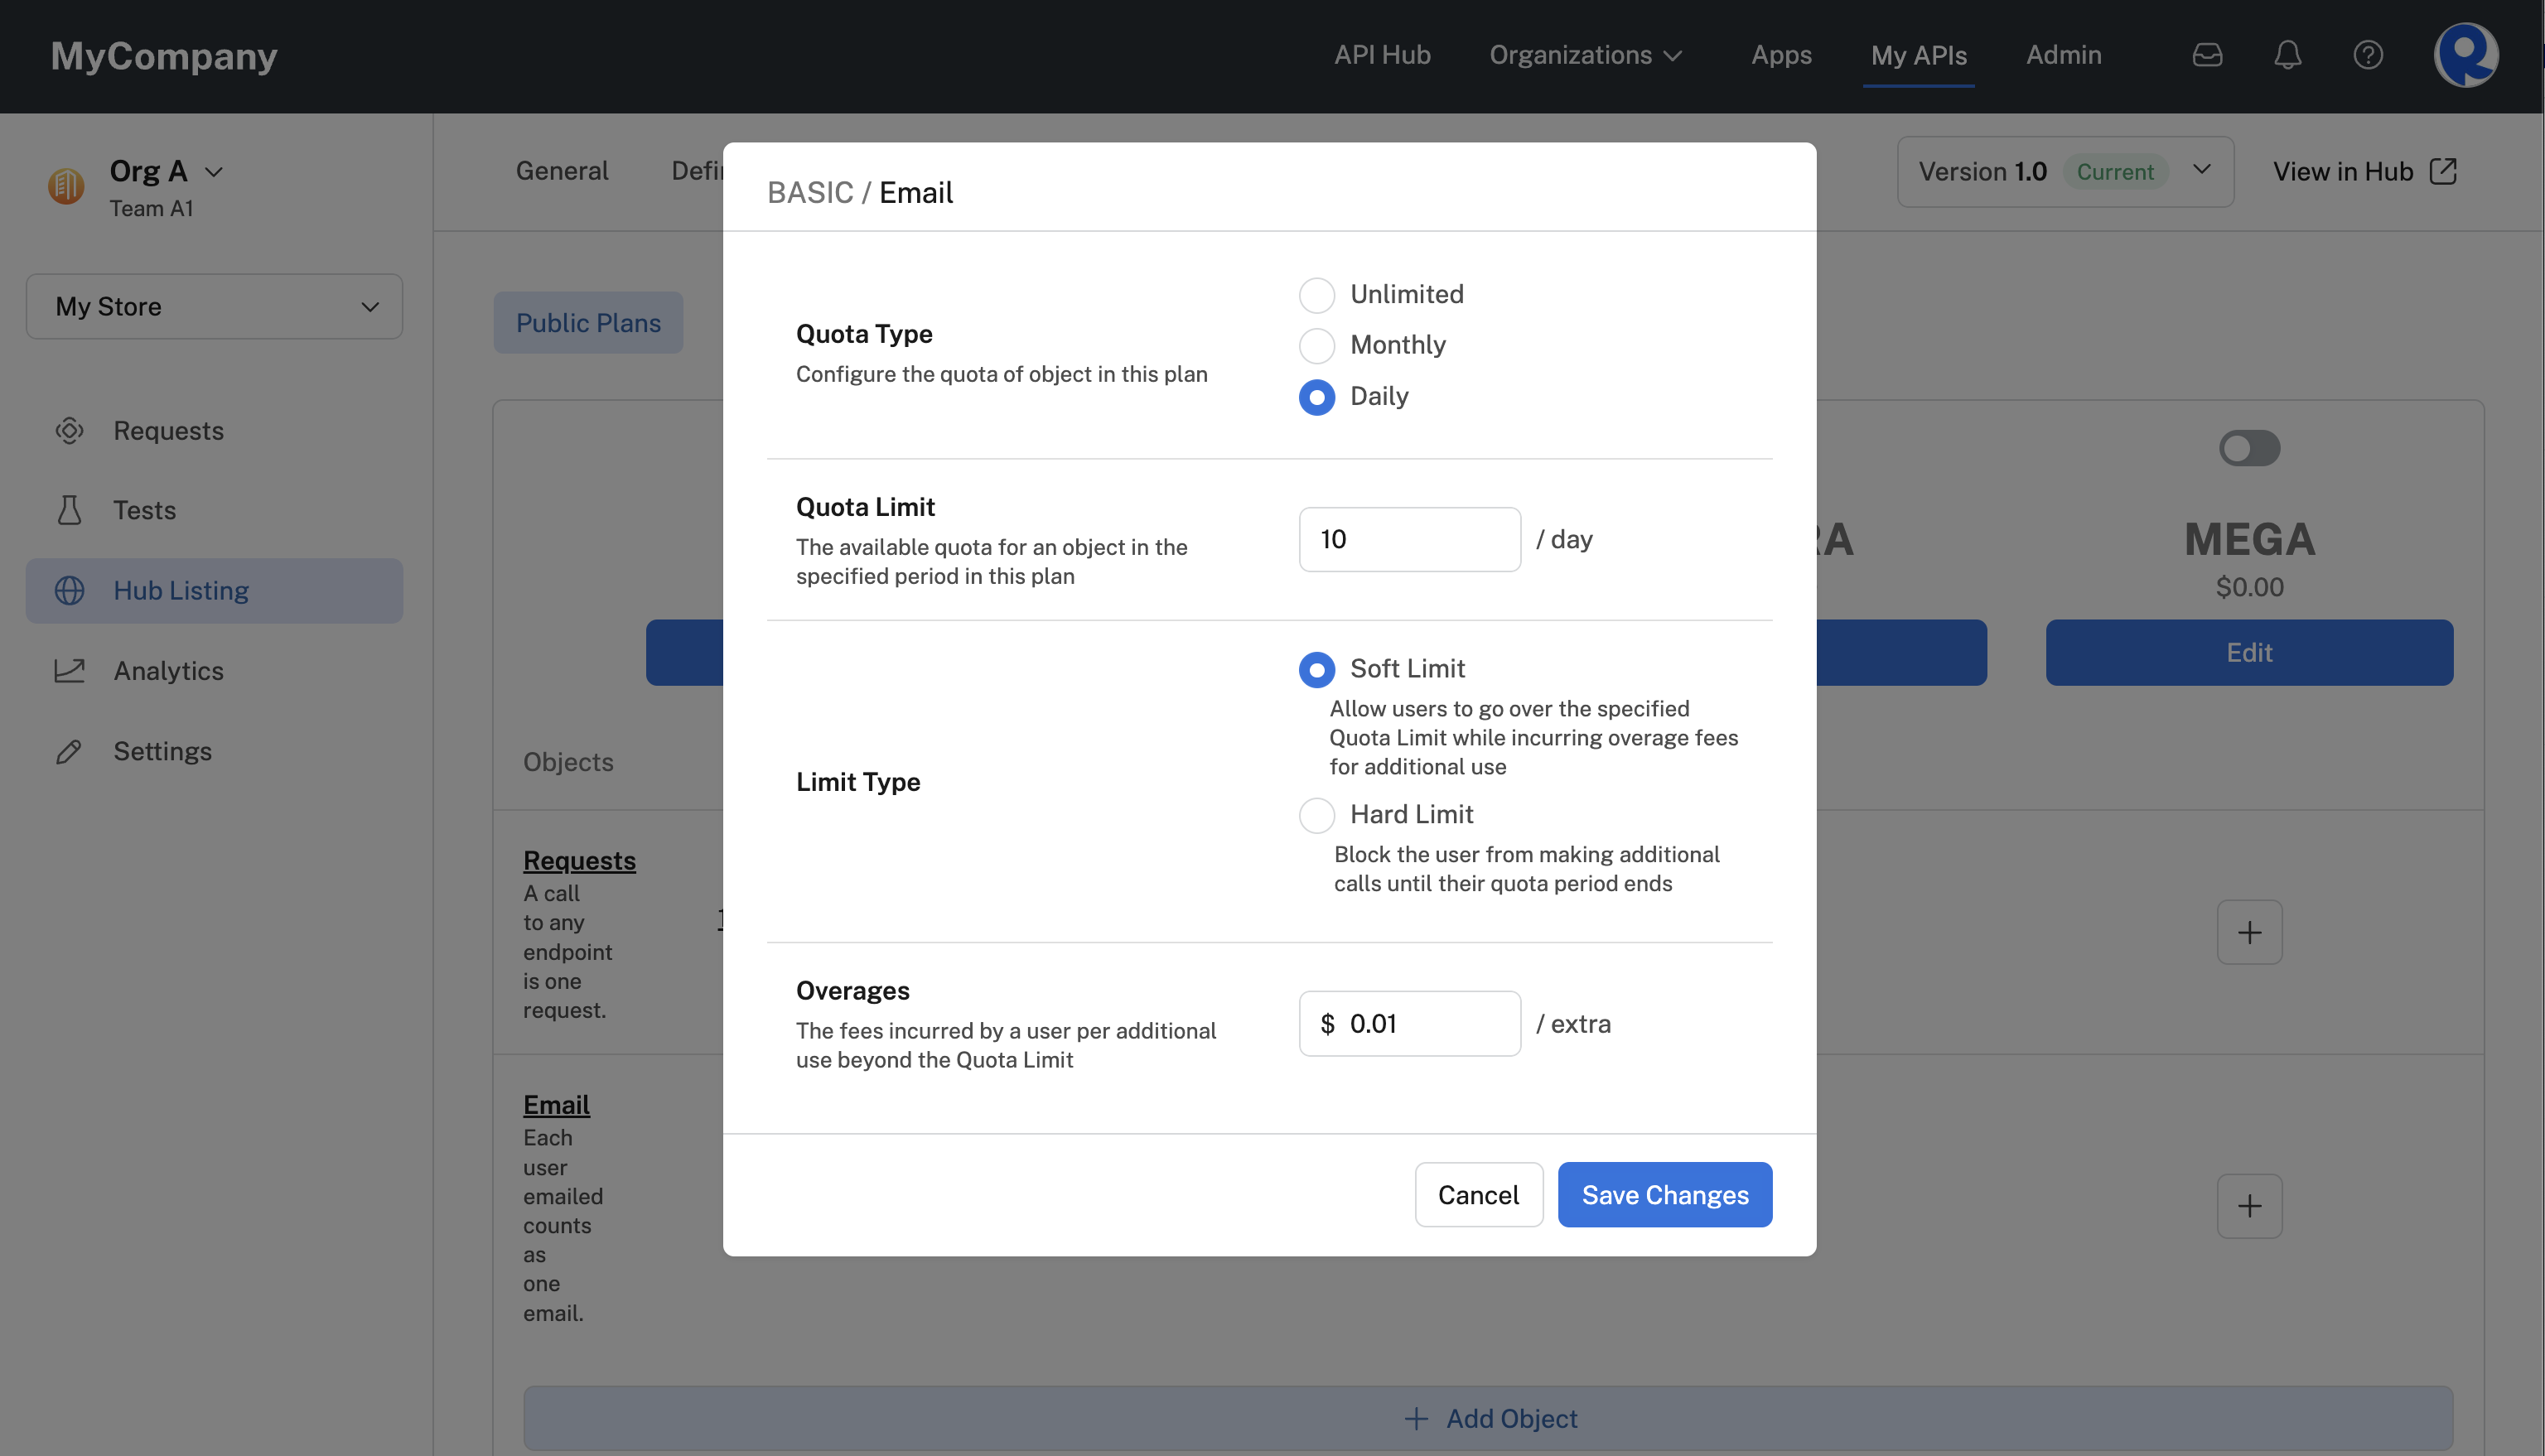
Configuring an "Email" Object on the BASIC plan.
Once the new Object is added to a plan, API consumers will see the Object on the API listing's Pricing tab. API consumers can hover over the Related Endpoints link to see which endpoints are quota limited by the Object.
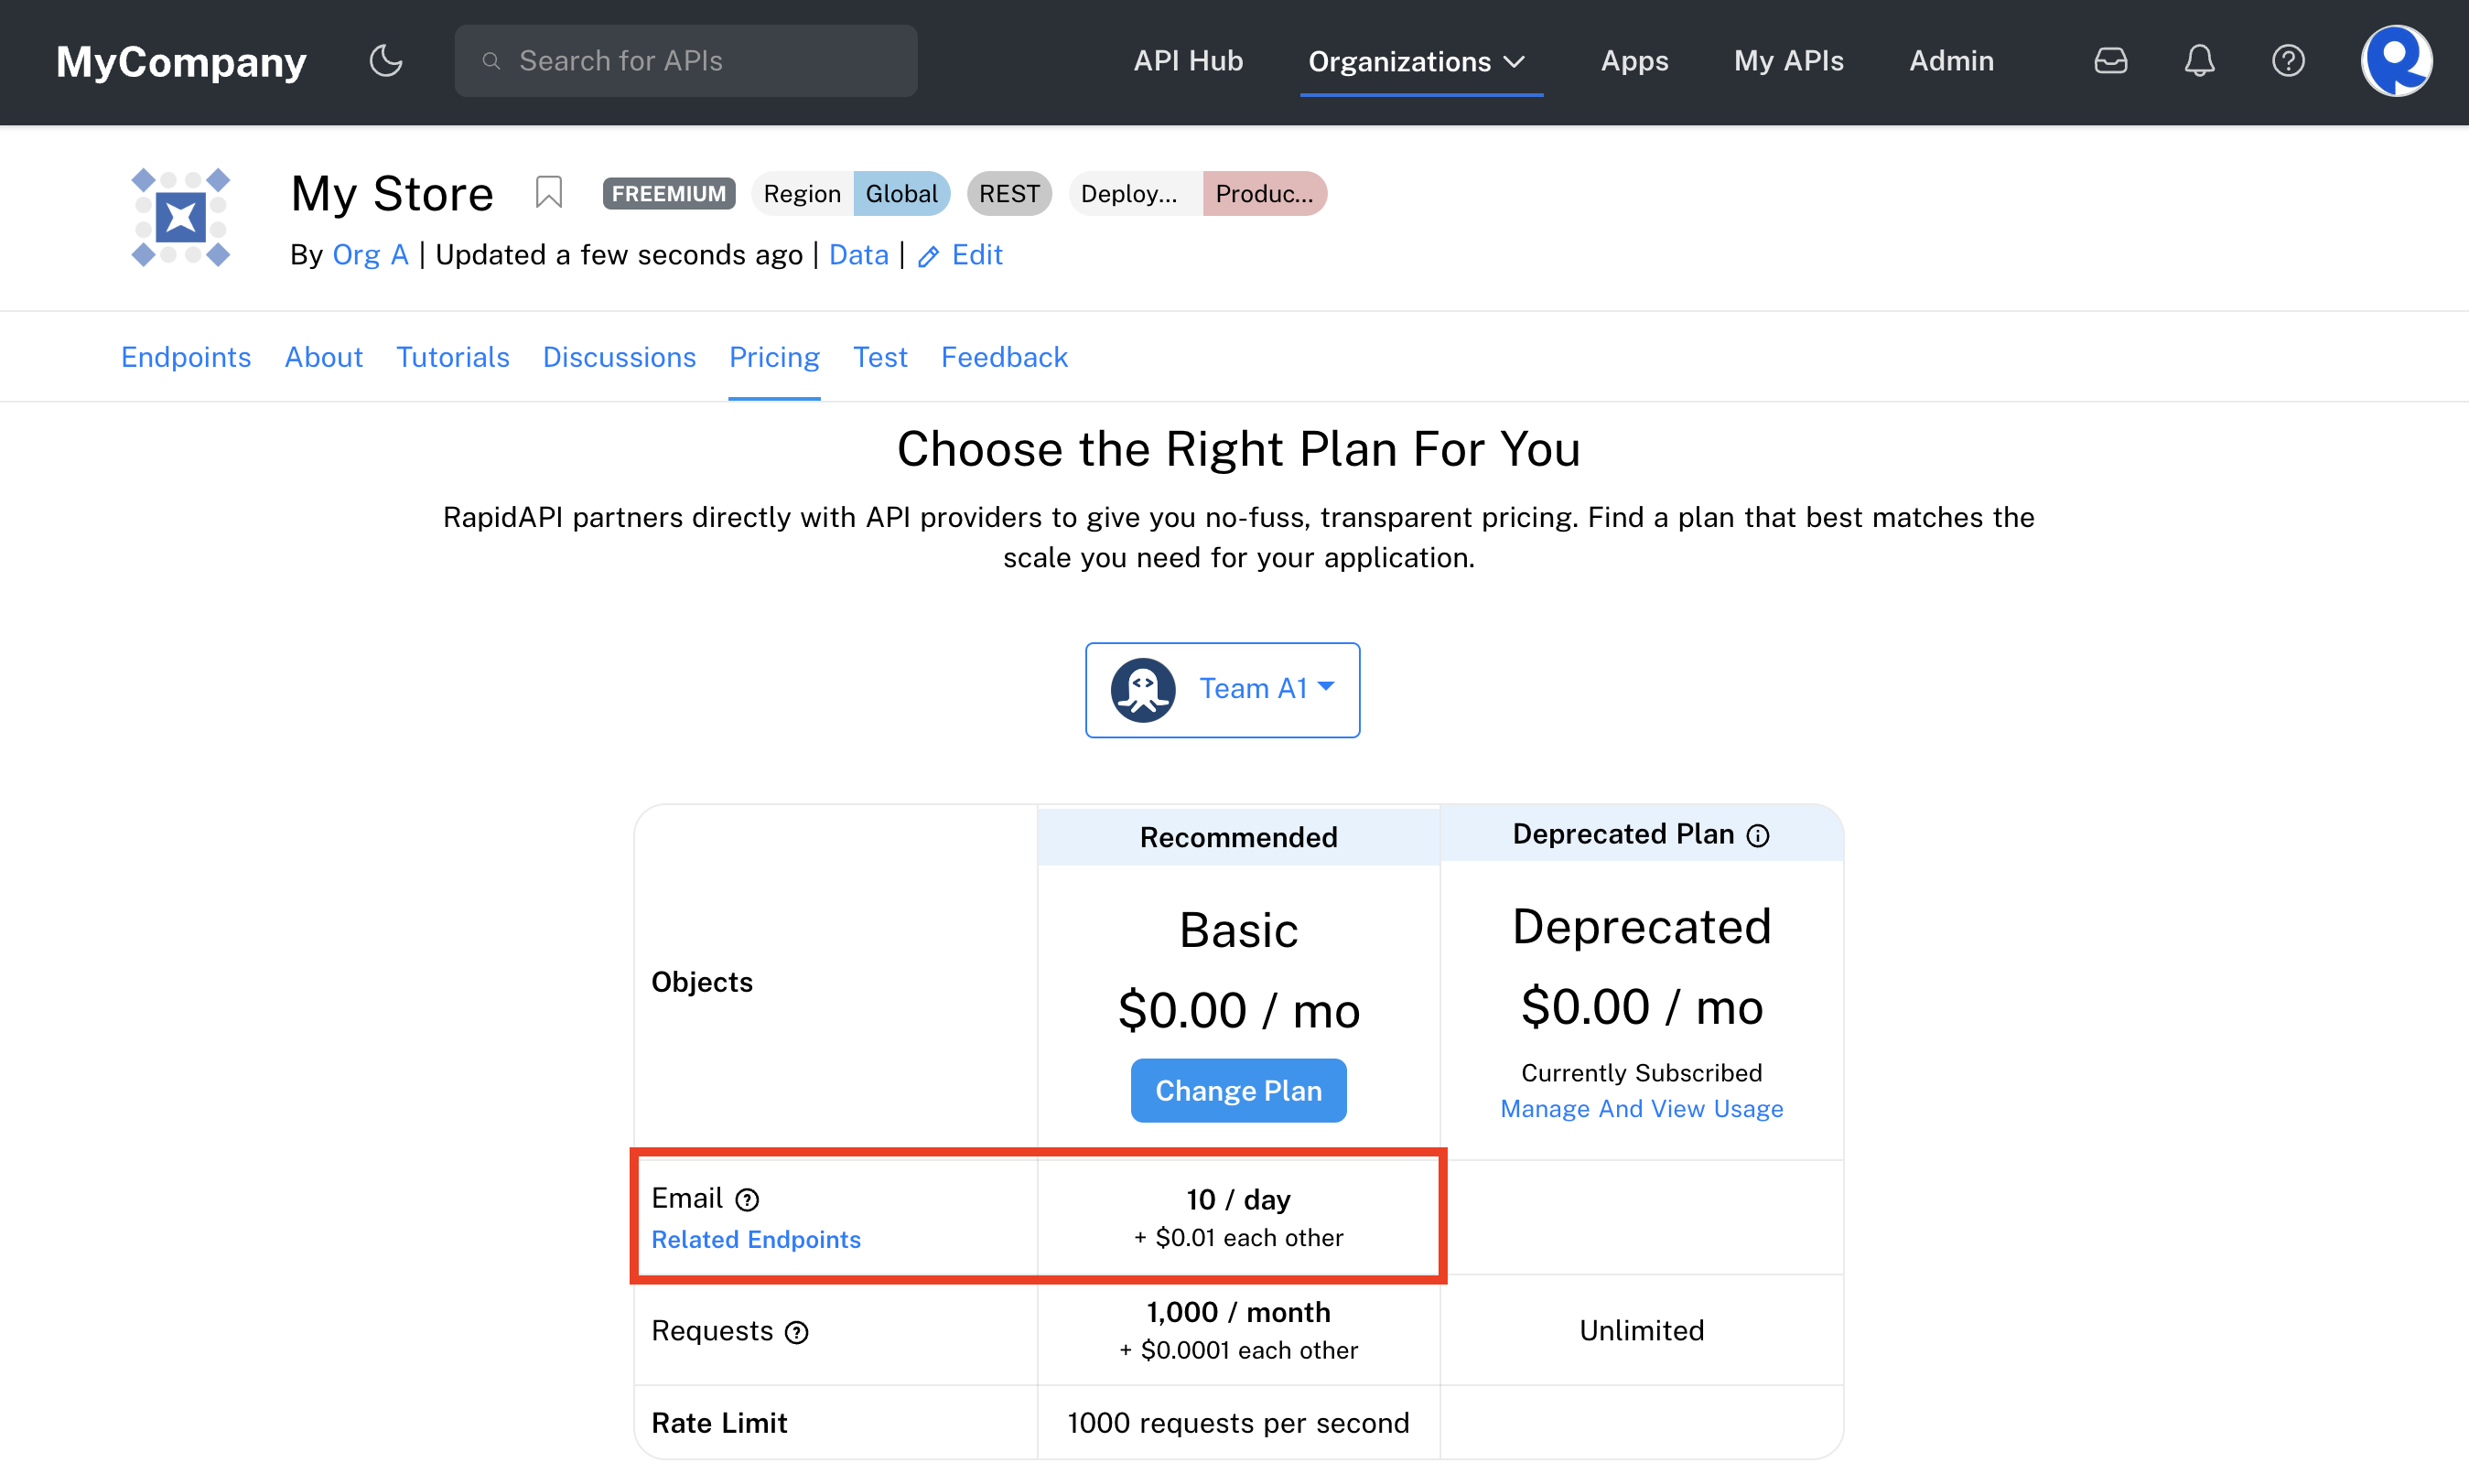
An API listing's Pricing tab with an "Email" Object quota limit.
You can create up to four custom quotas. Some examples of types of custom quotas are videos, messages, downloads, items returned, etc.
Restricted characters
Custom quota objects cannot include special characters like commas. On the API Hub, you may see an error of 'Parse Error' if the billing header contains a special character.
Default quota behavior
By default, Rapid increments each quota by one unit on every request, with the exception of response code errors. If your API returns an error code equal to or greater than 500, RapidAPI won’t increment the usage for that user.
Incrementing quota by endpoint
By having quotas whose usage is increased only when specific endpoints are being requested, it is possible to associate endpoints and quotas. Every time the user requests that specific endpoint, the associated quota will be increased by one unit.
Incrementing quota by more than one increment
It is possible to override the default behavior and increment the quotas by a different number of units by sending a special header in the API response in the following format:
X-RapidAPI-Billing: [Quota]=[Value]
For example, to increment the Messages quota by 10 units, you would add the following header to the response:
X-RapidAPI-Billing: Messages=10
You can increment more than one quota as well by separating the values with a semicolon, like so:
X-RapidAPI-Billing: Messages=10; Images=3; Audio=2
Again, if you decide to increment a certain quota by more than one, we highly recommend including that information in the object's description on the pricing subscription page. Adding this information explicitly will make it easier for developers to understand your API's usage limits.
Features
Features allow API providers to do two main things:
- List a specific benefit of using a particular plan. For example, a "24 Hour Support" Feature can be added to the PRO plan.
- Make certain endpoints available to a plan. For example, an "Admin" Feature can expose the
/adminendpoint for the PRO plan.
Features are clearly displayed on an API listing's Pricing tab and help API consumers see the benefits of upgrading plans.
To add a Feature that can be used for an API's plans, click Add Feature on the Monetize tab.
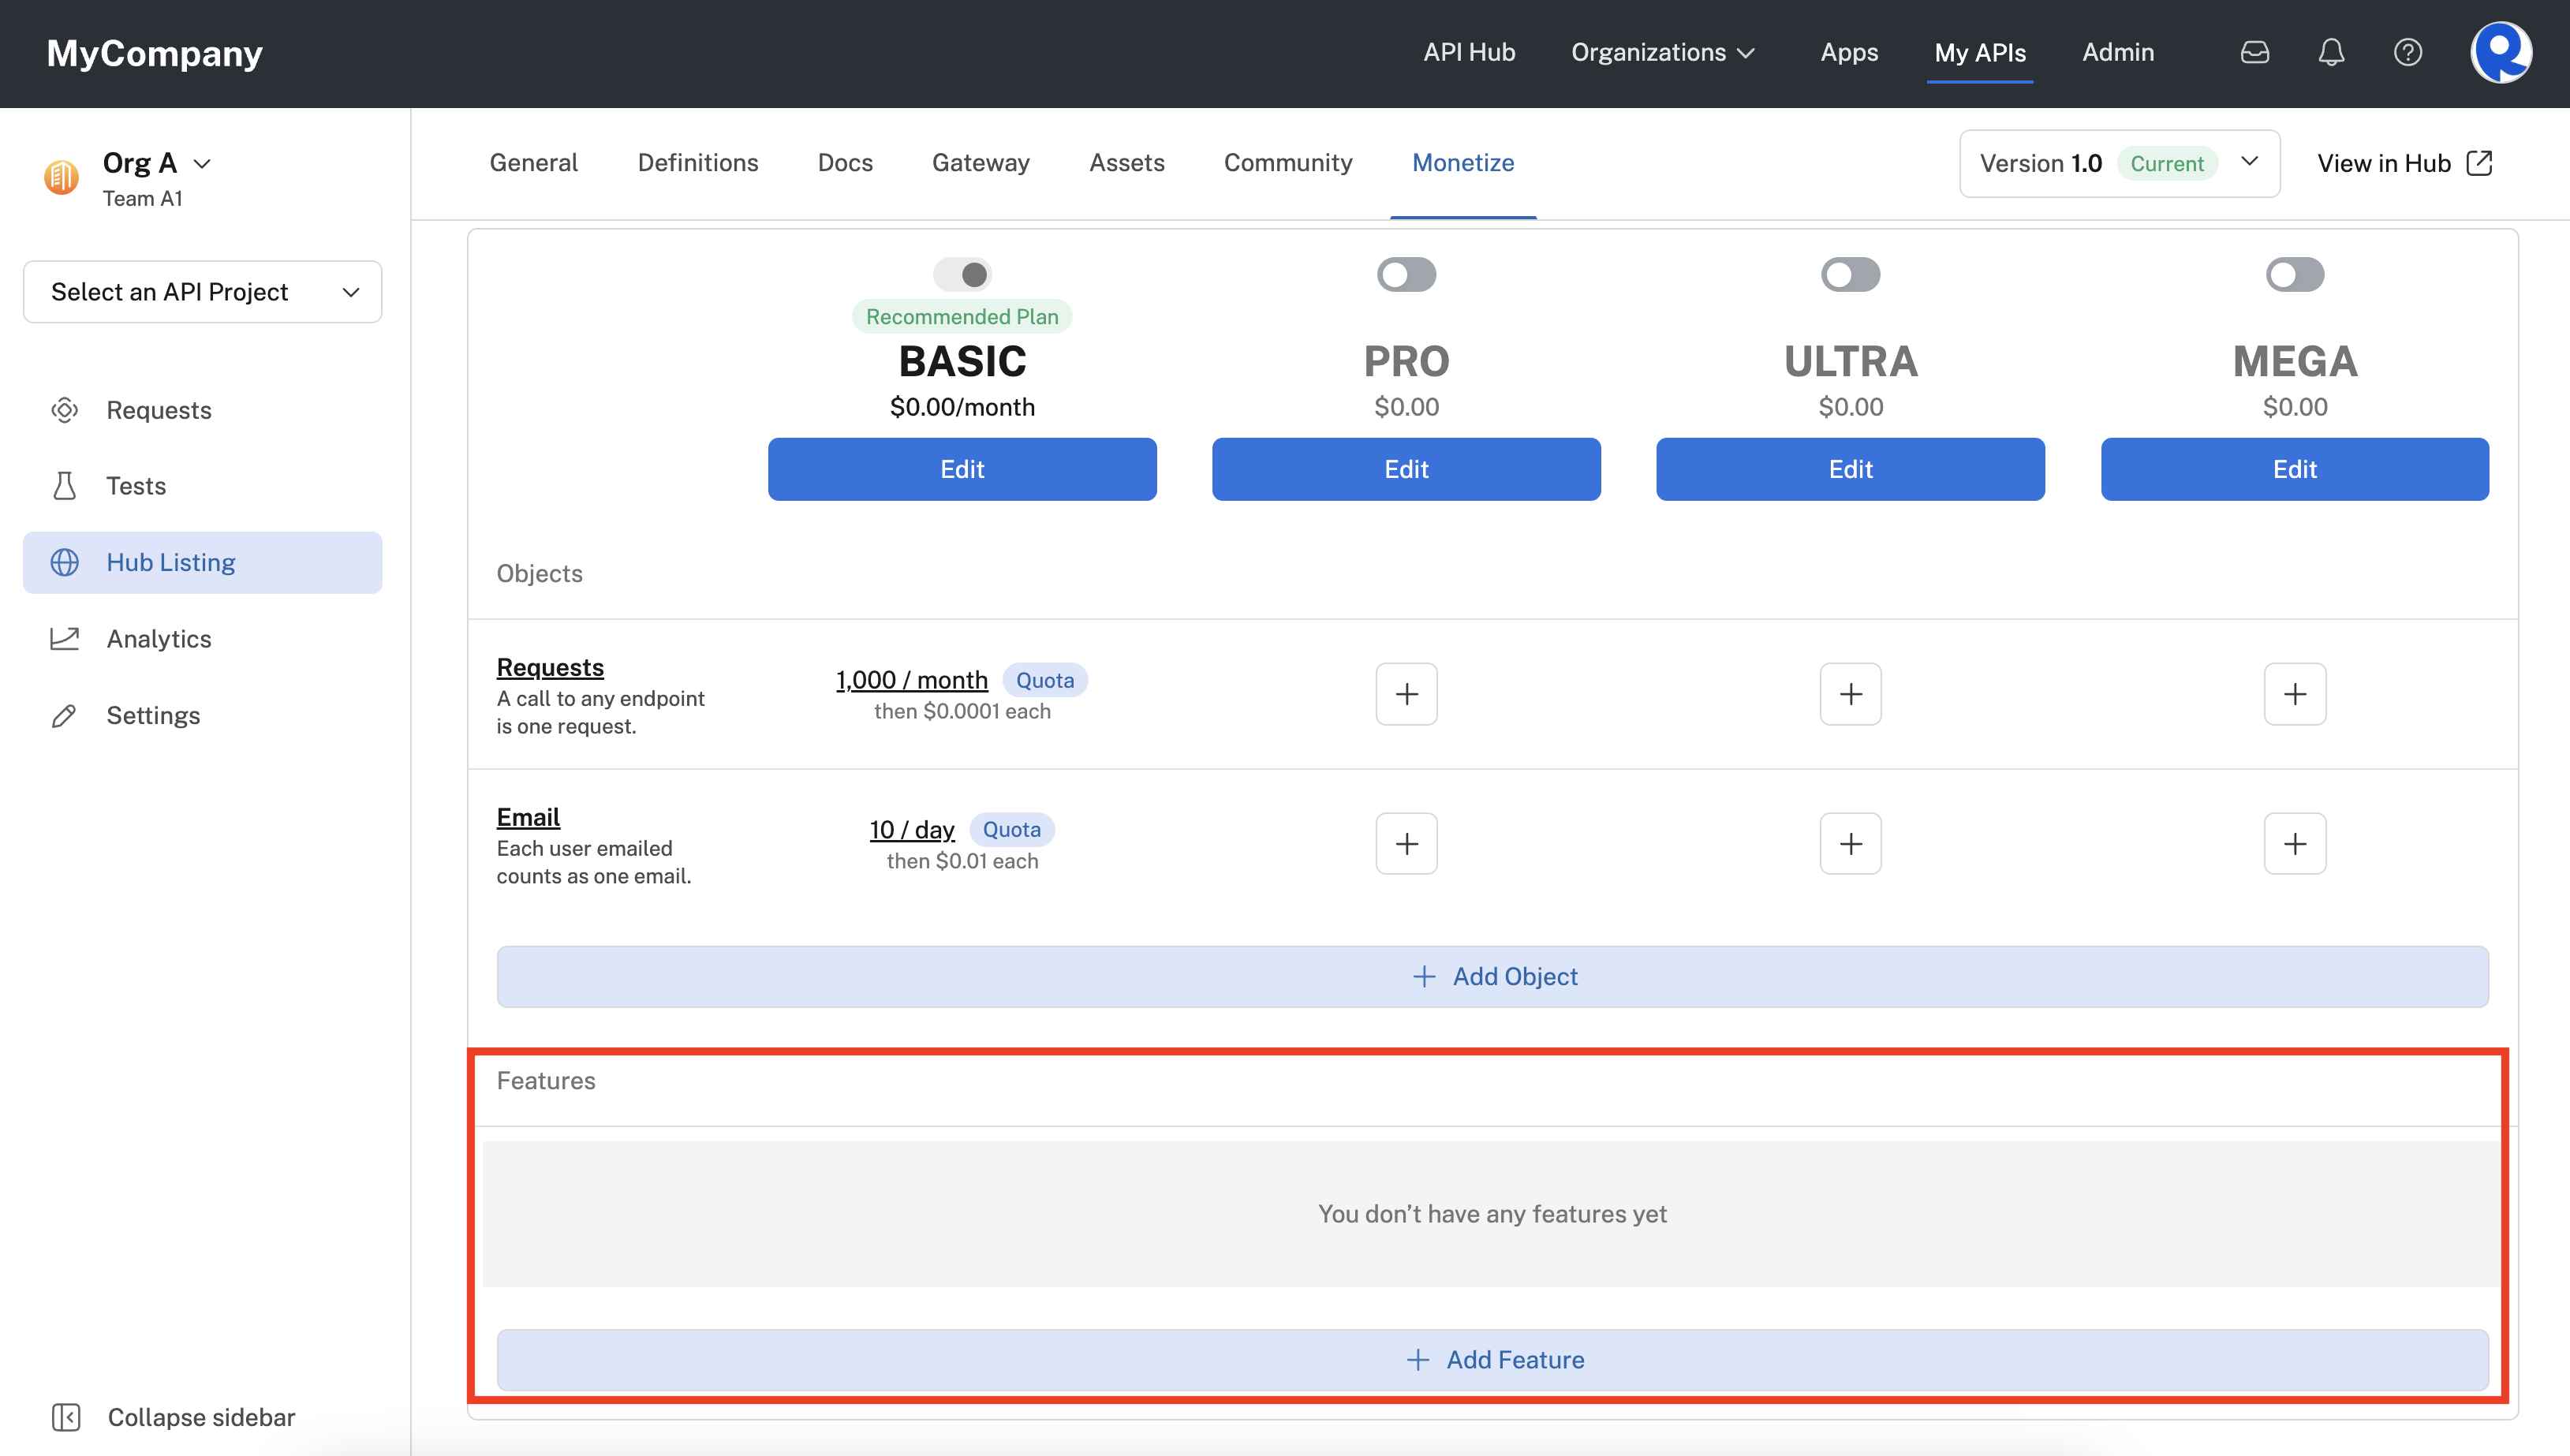
Click Add Feature to make a Feature available for an API's plans.
Here we are adding a Feature named "24 Hour Support". Since this Feature does not relate directly to any of the API's endpoints, we leave the Associated Endpoints (optional) dropdown empty.
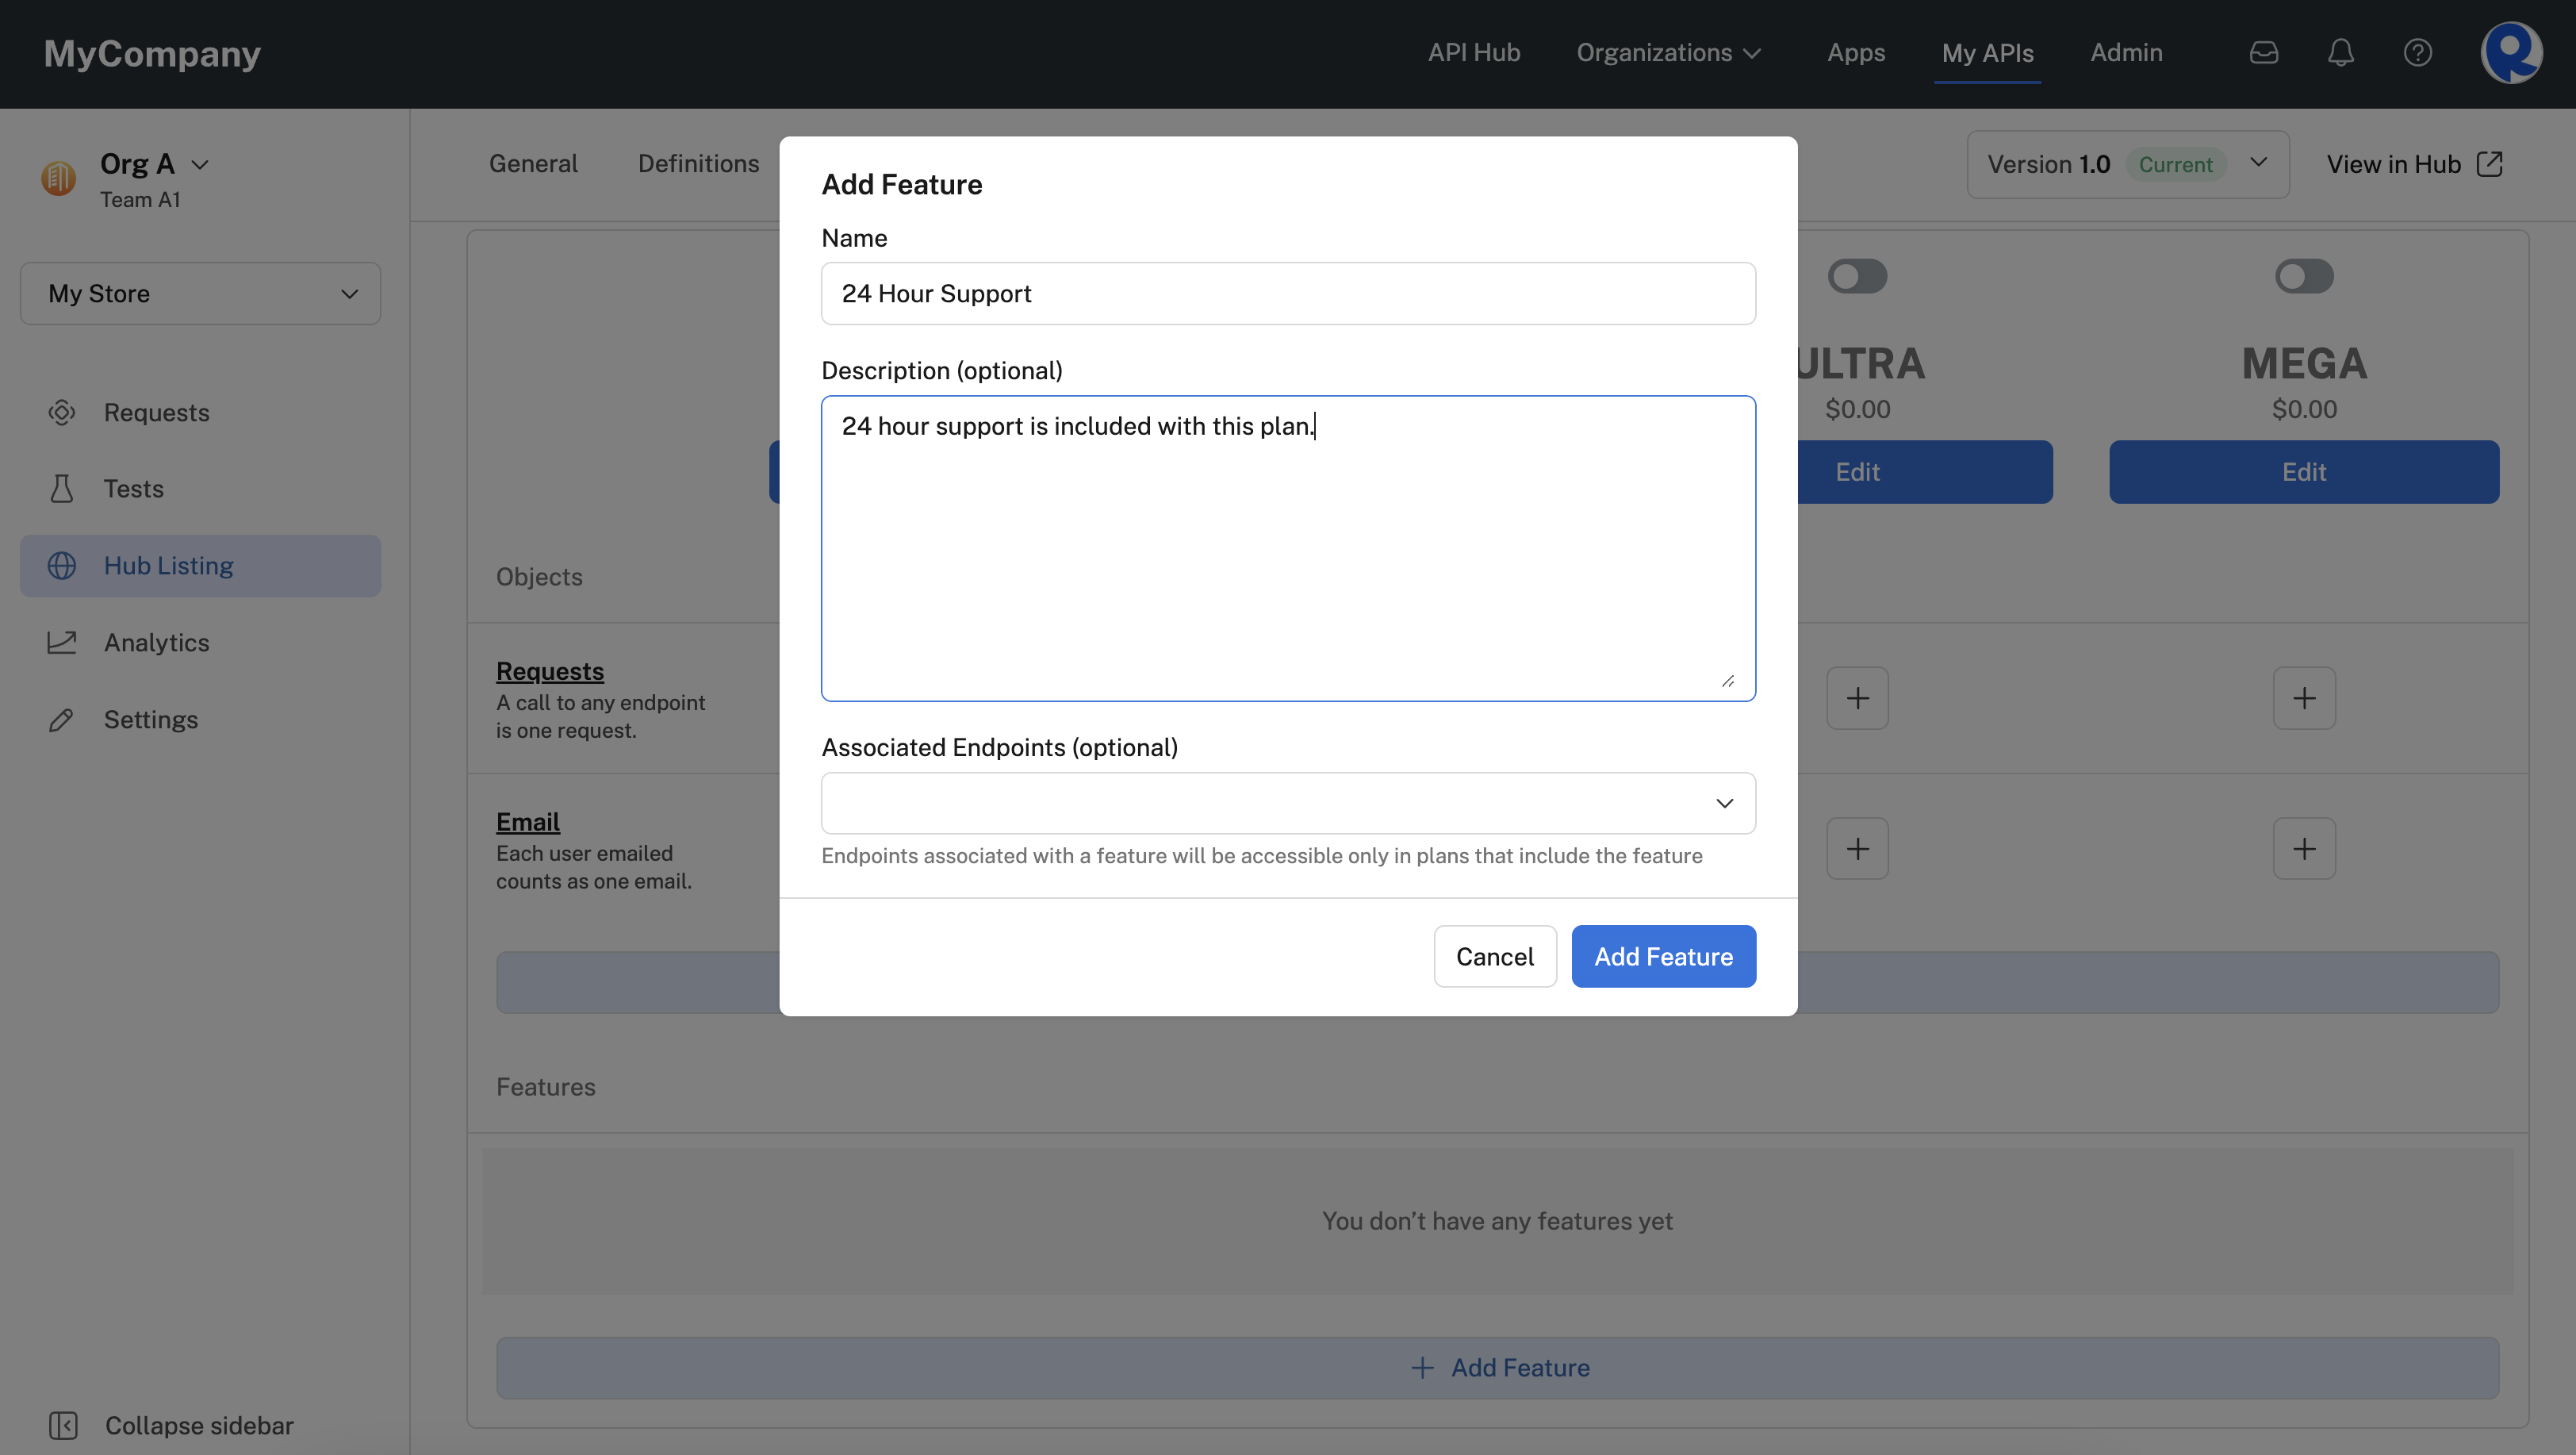
Adding a "24 Hour Support" Feature.
Once you have added a Feature to an API, it can be enabled for plans using the slider (see the screenshot below). Once enabled, you can add a plan-specific note that will be seen by API consumers.

Enabling a Feature for a plan and adding a plan-specific note.
Once a Feature is added to a plan, API consumers see the Feature on the API listing's Pricing tab (as shown below). Notice that API consumers see an X if a plan does not have the Feature enabled. The plan-specific notes are also shown for the plan. Hovering over the ? next to the Feature name displays the Feature's description.
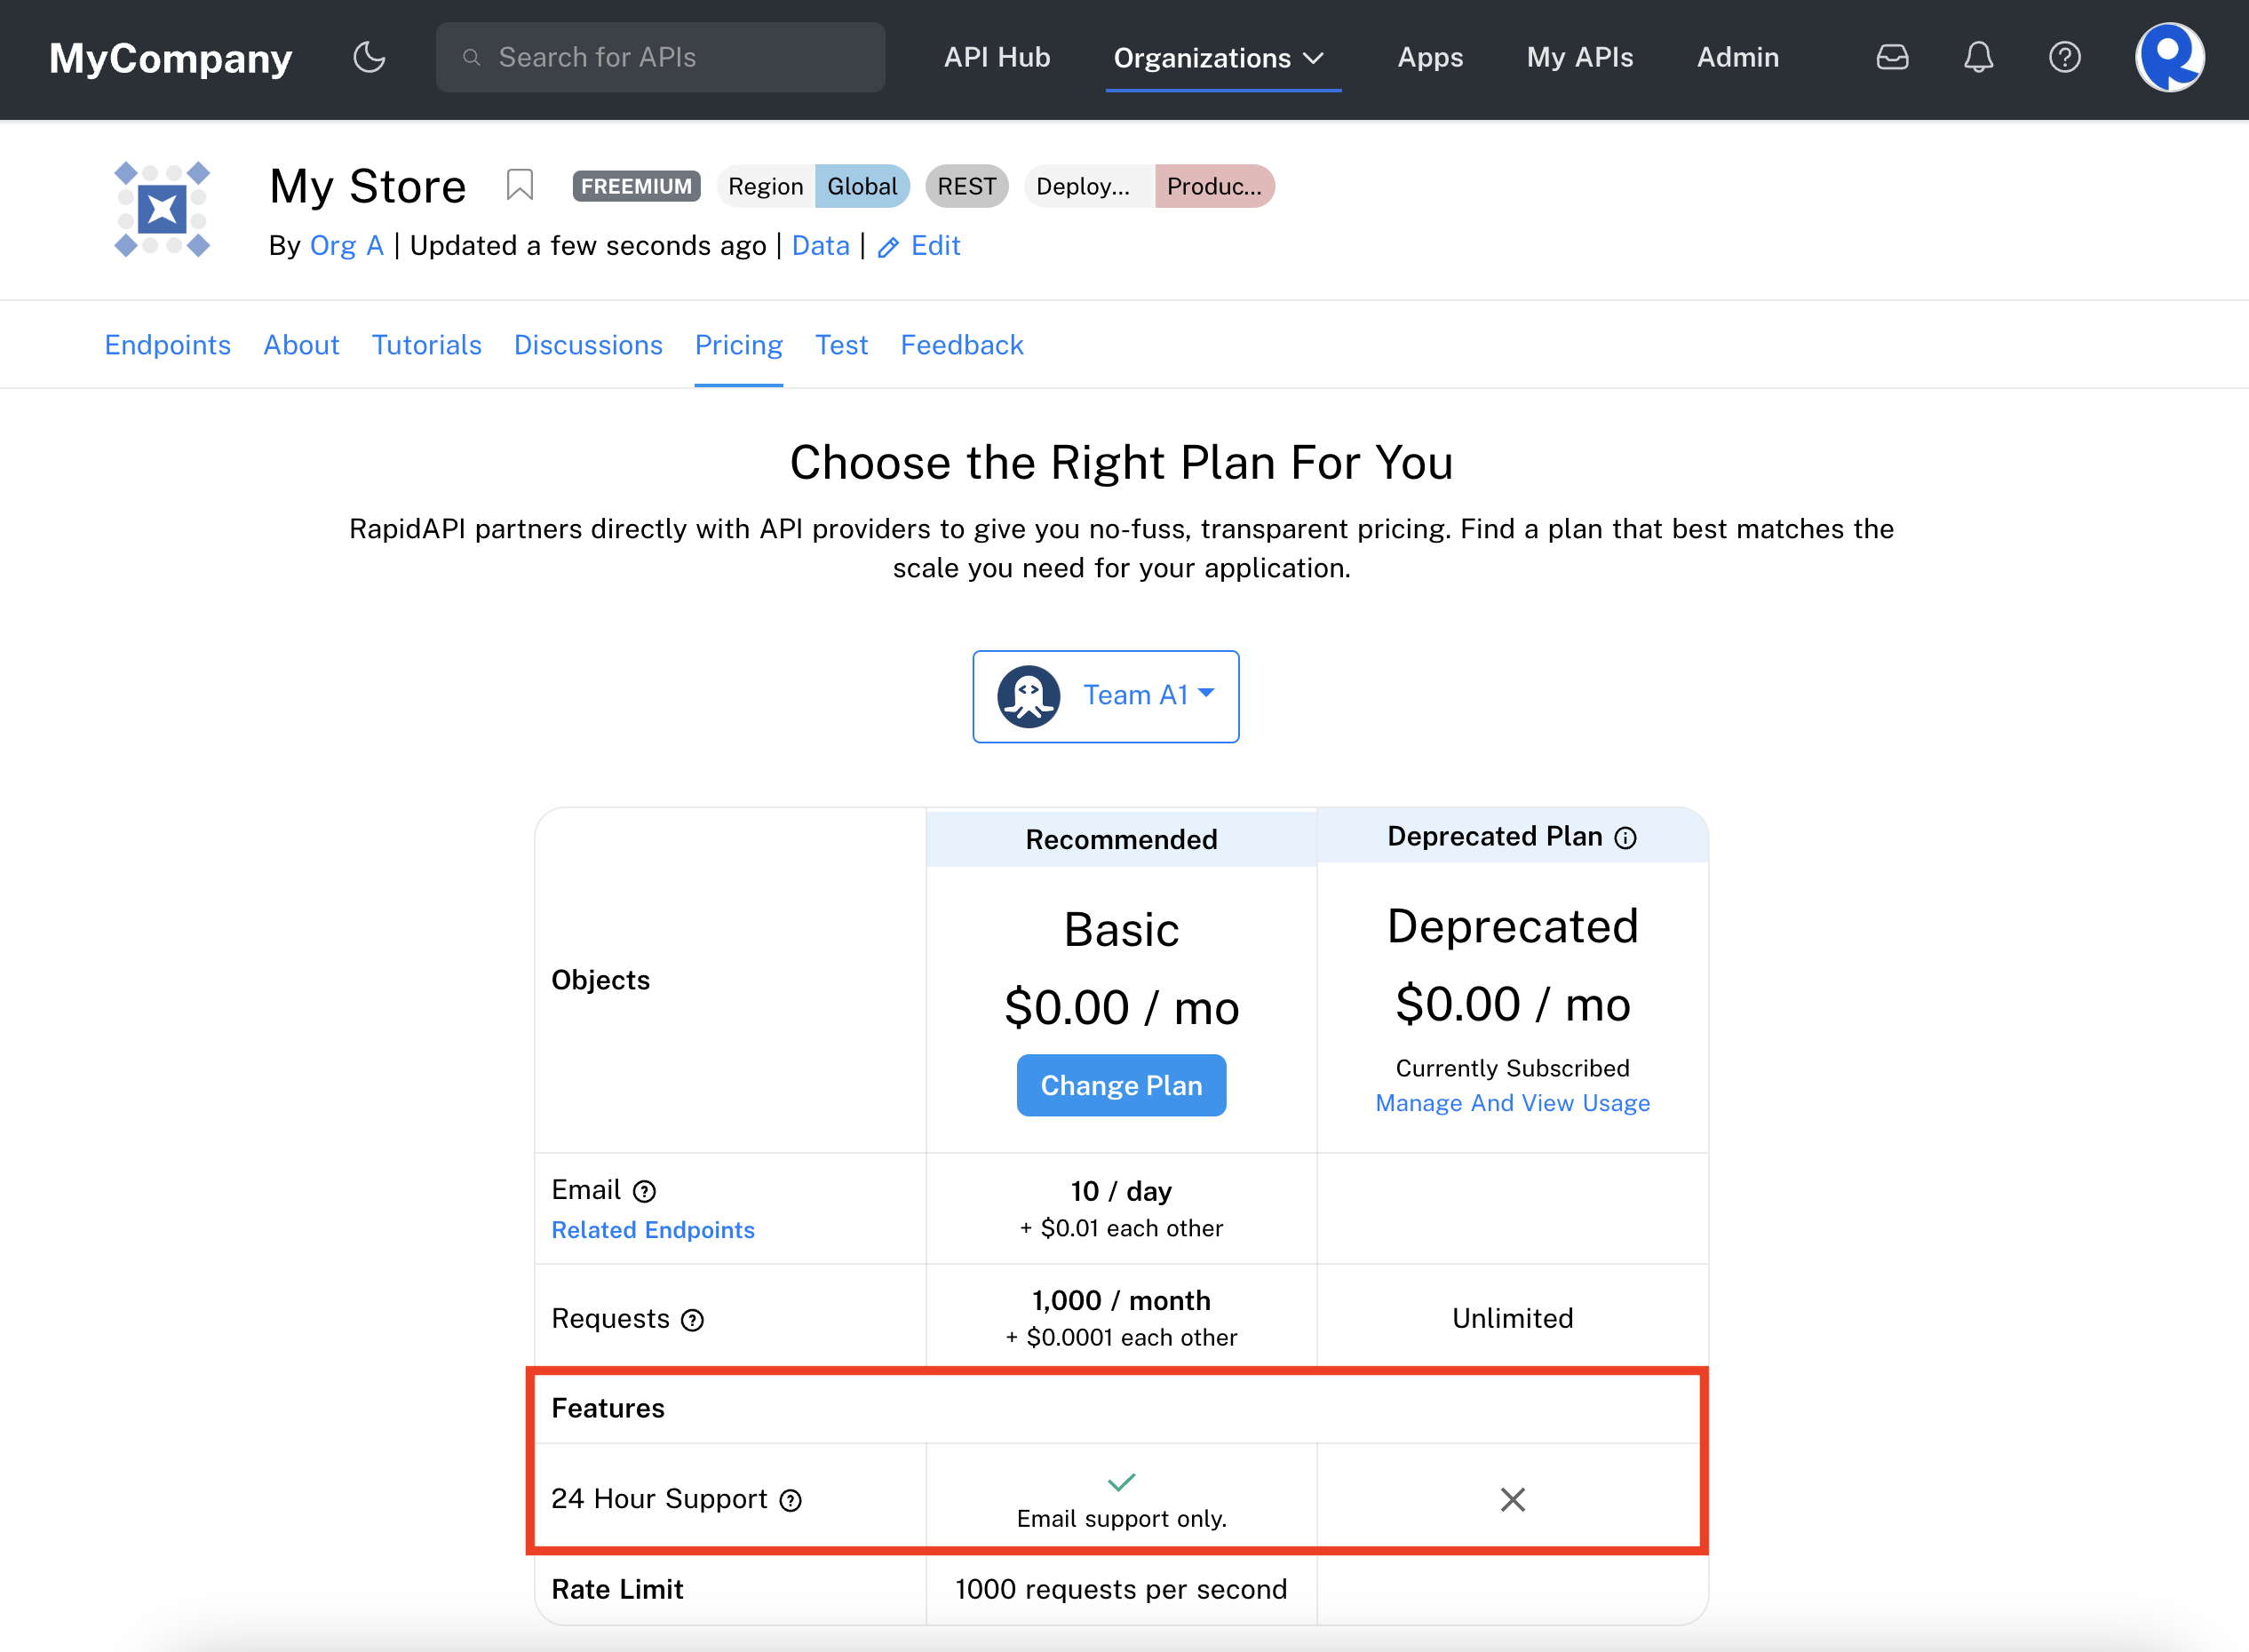
Viewing a Feature on an API listing's Pricing tab.
Next, we will add a Feature named "Admin Access". This Feature will limit access to administration endpoints to only the PRO plan. Plans that do not enable this feature will not have access to the administration endpoints.
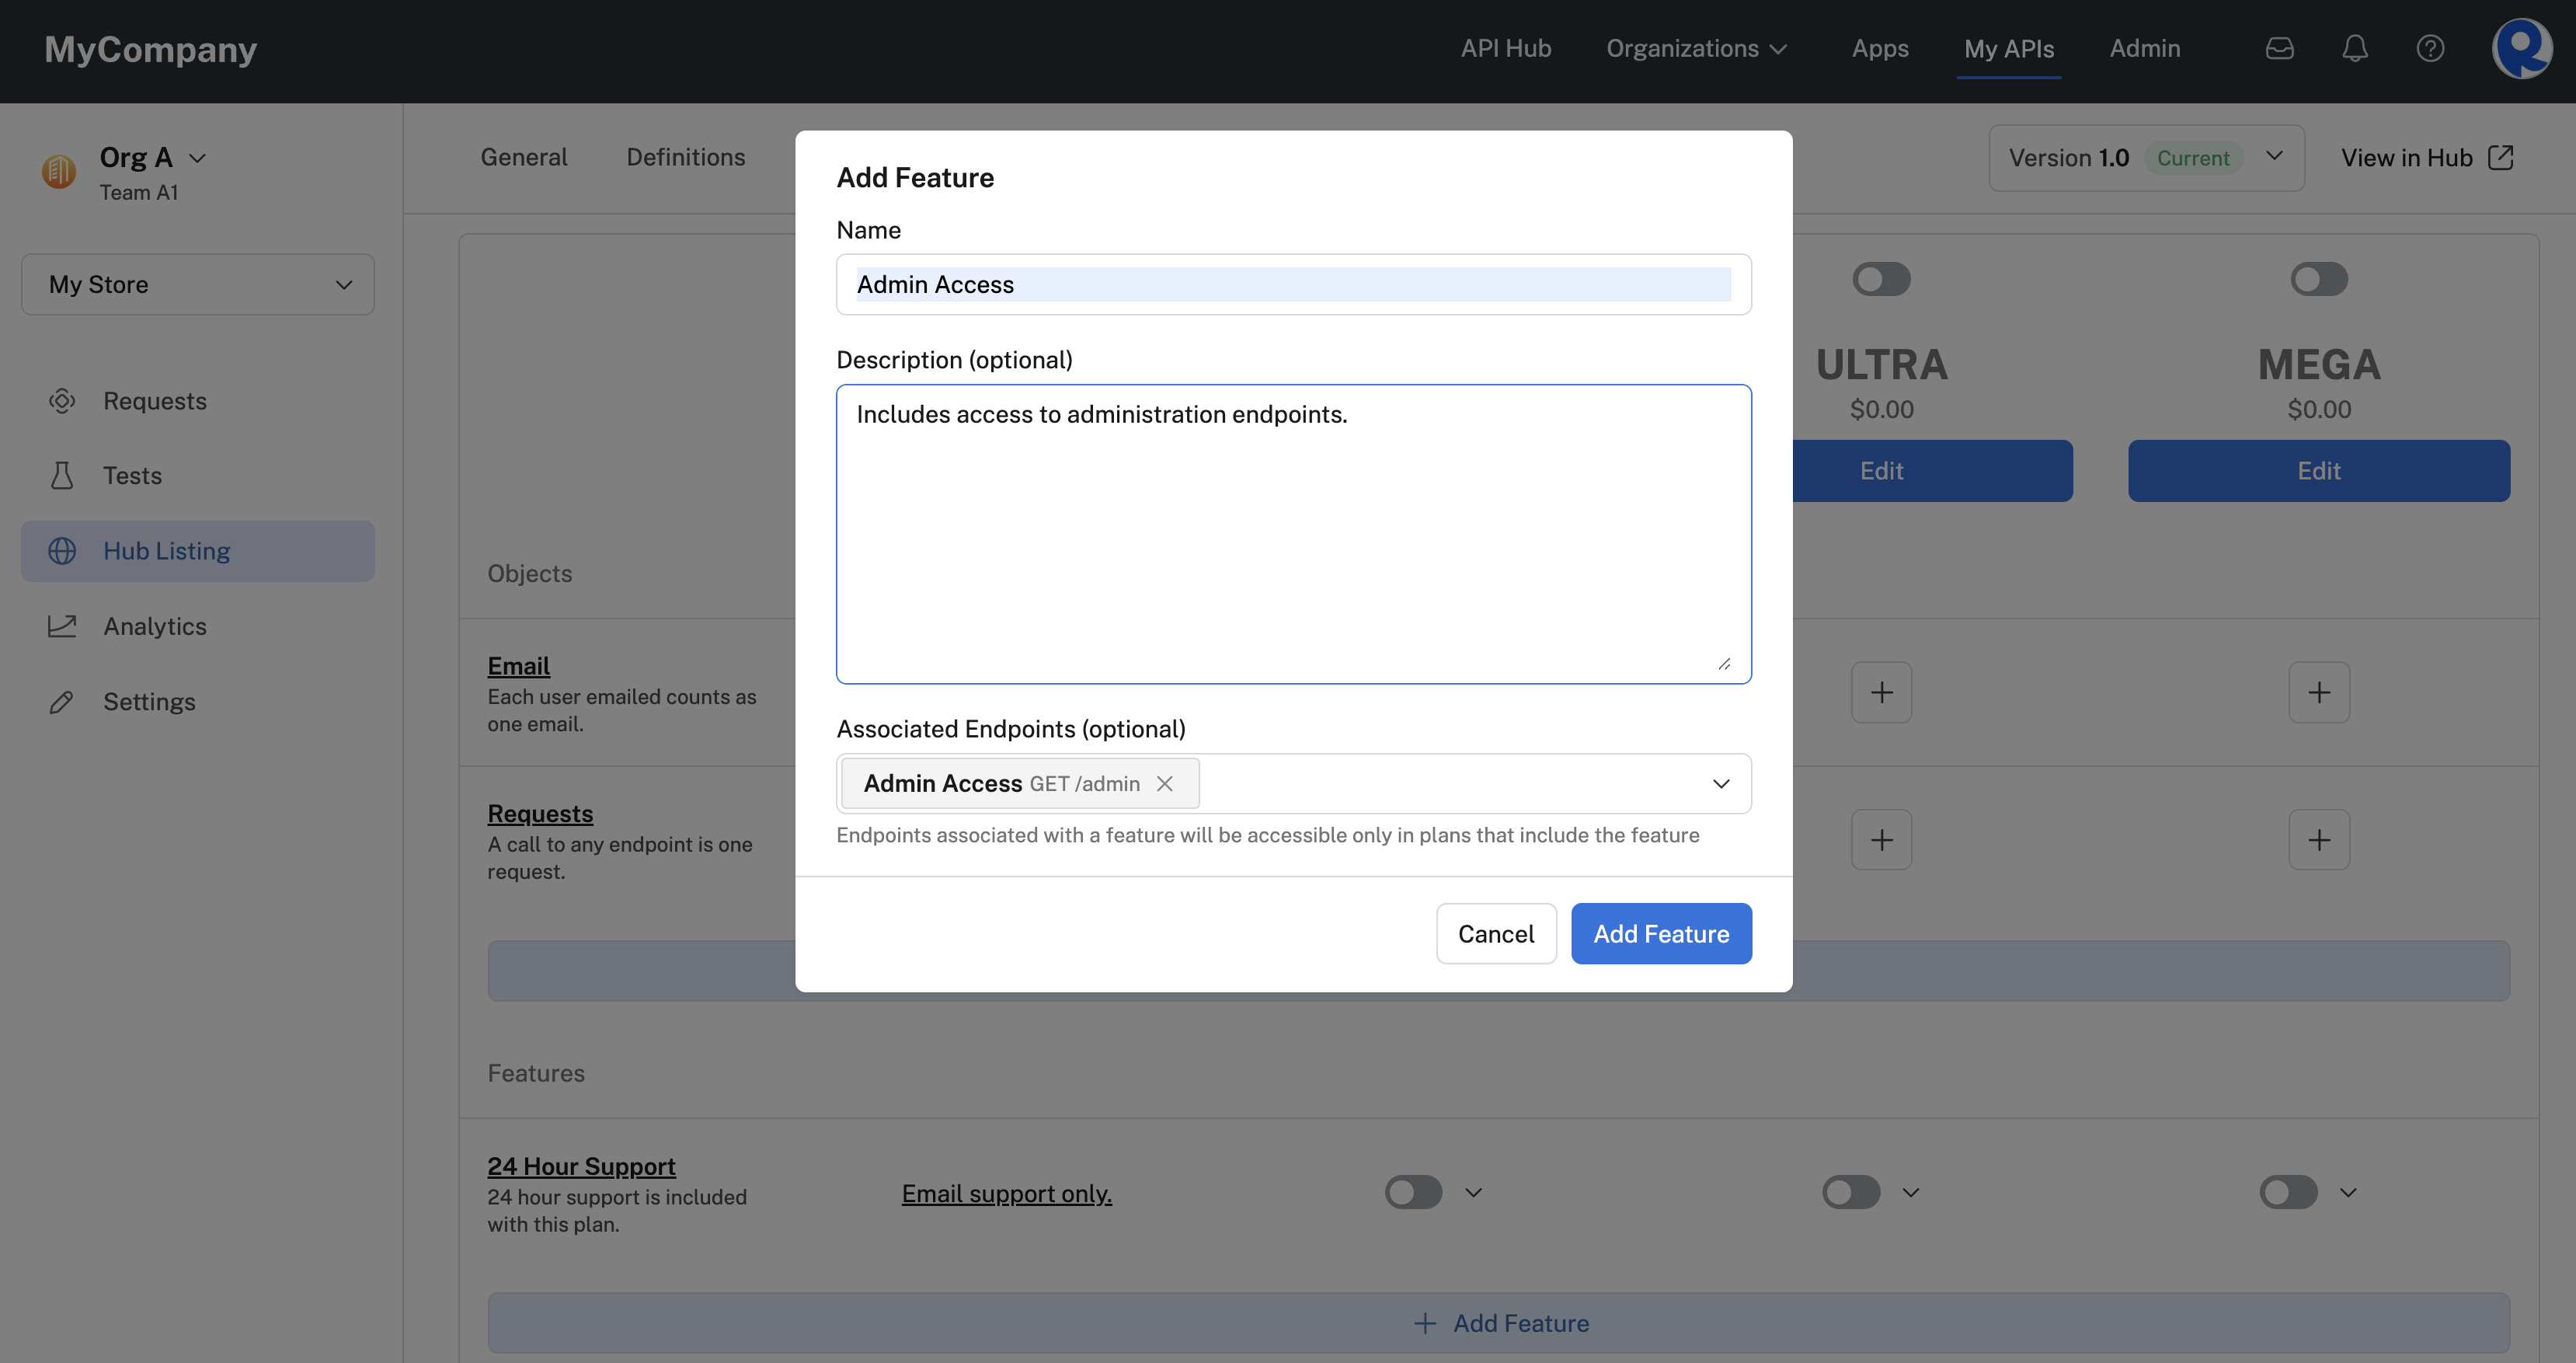
Adding a Feature that makes administration endpoints available to API consumers.
Here we have enabled the PRO plan and enabled the "Admin Access" Feature for it.
Enabling a Feature for the PRO plan.
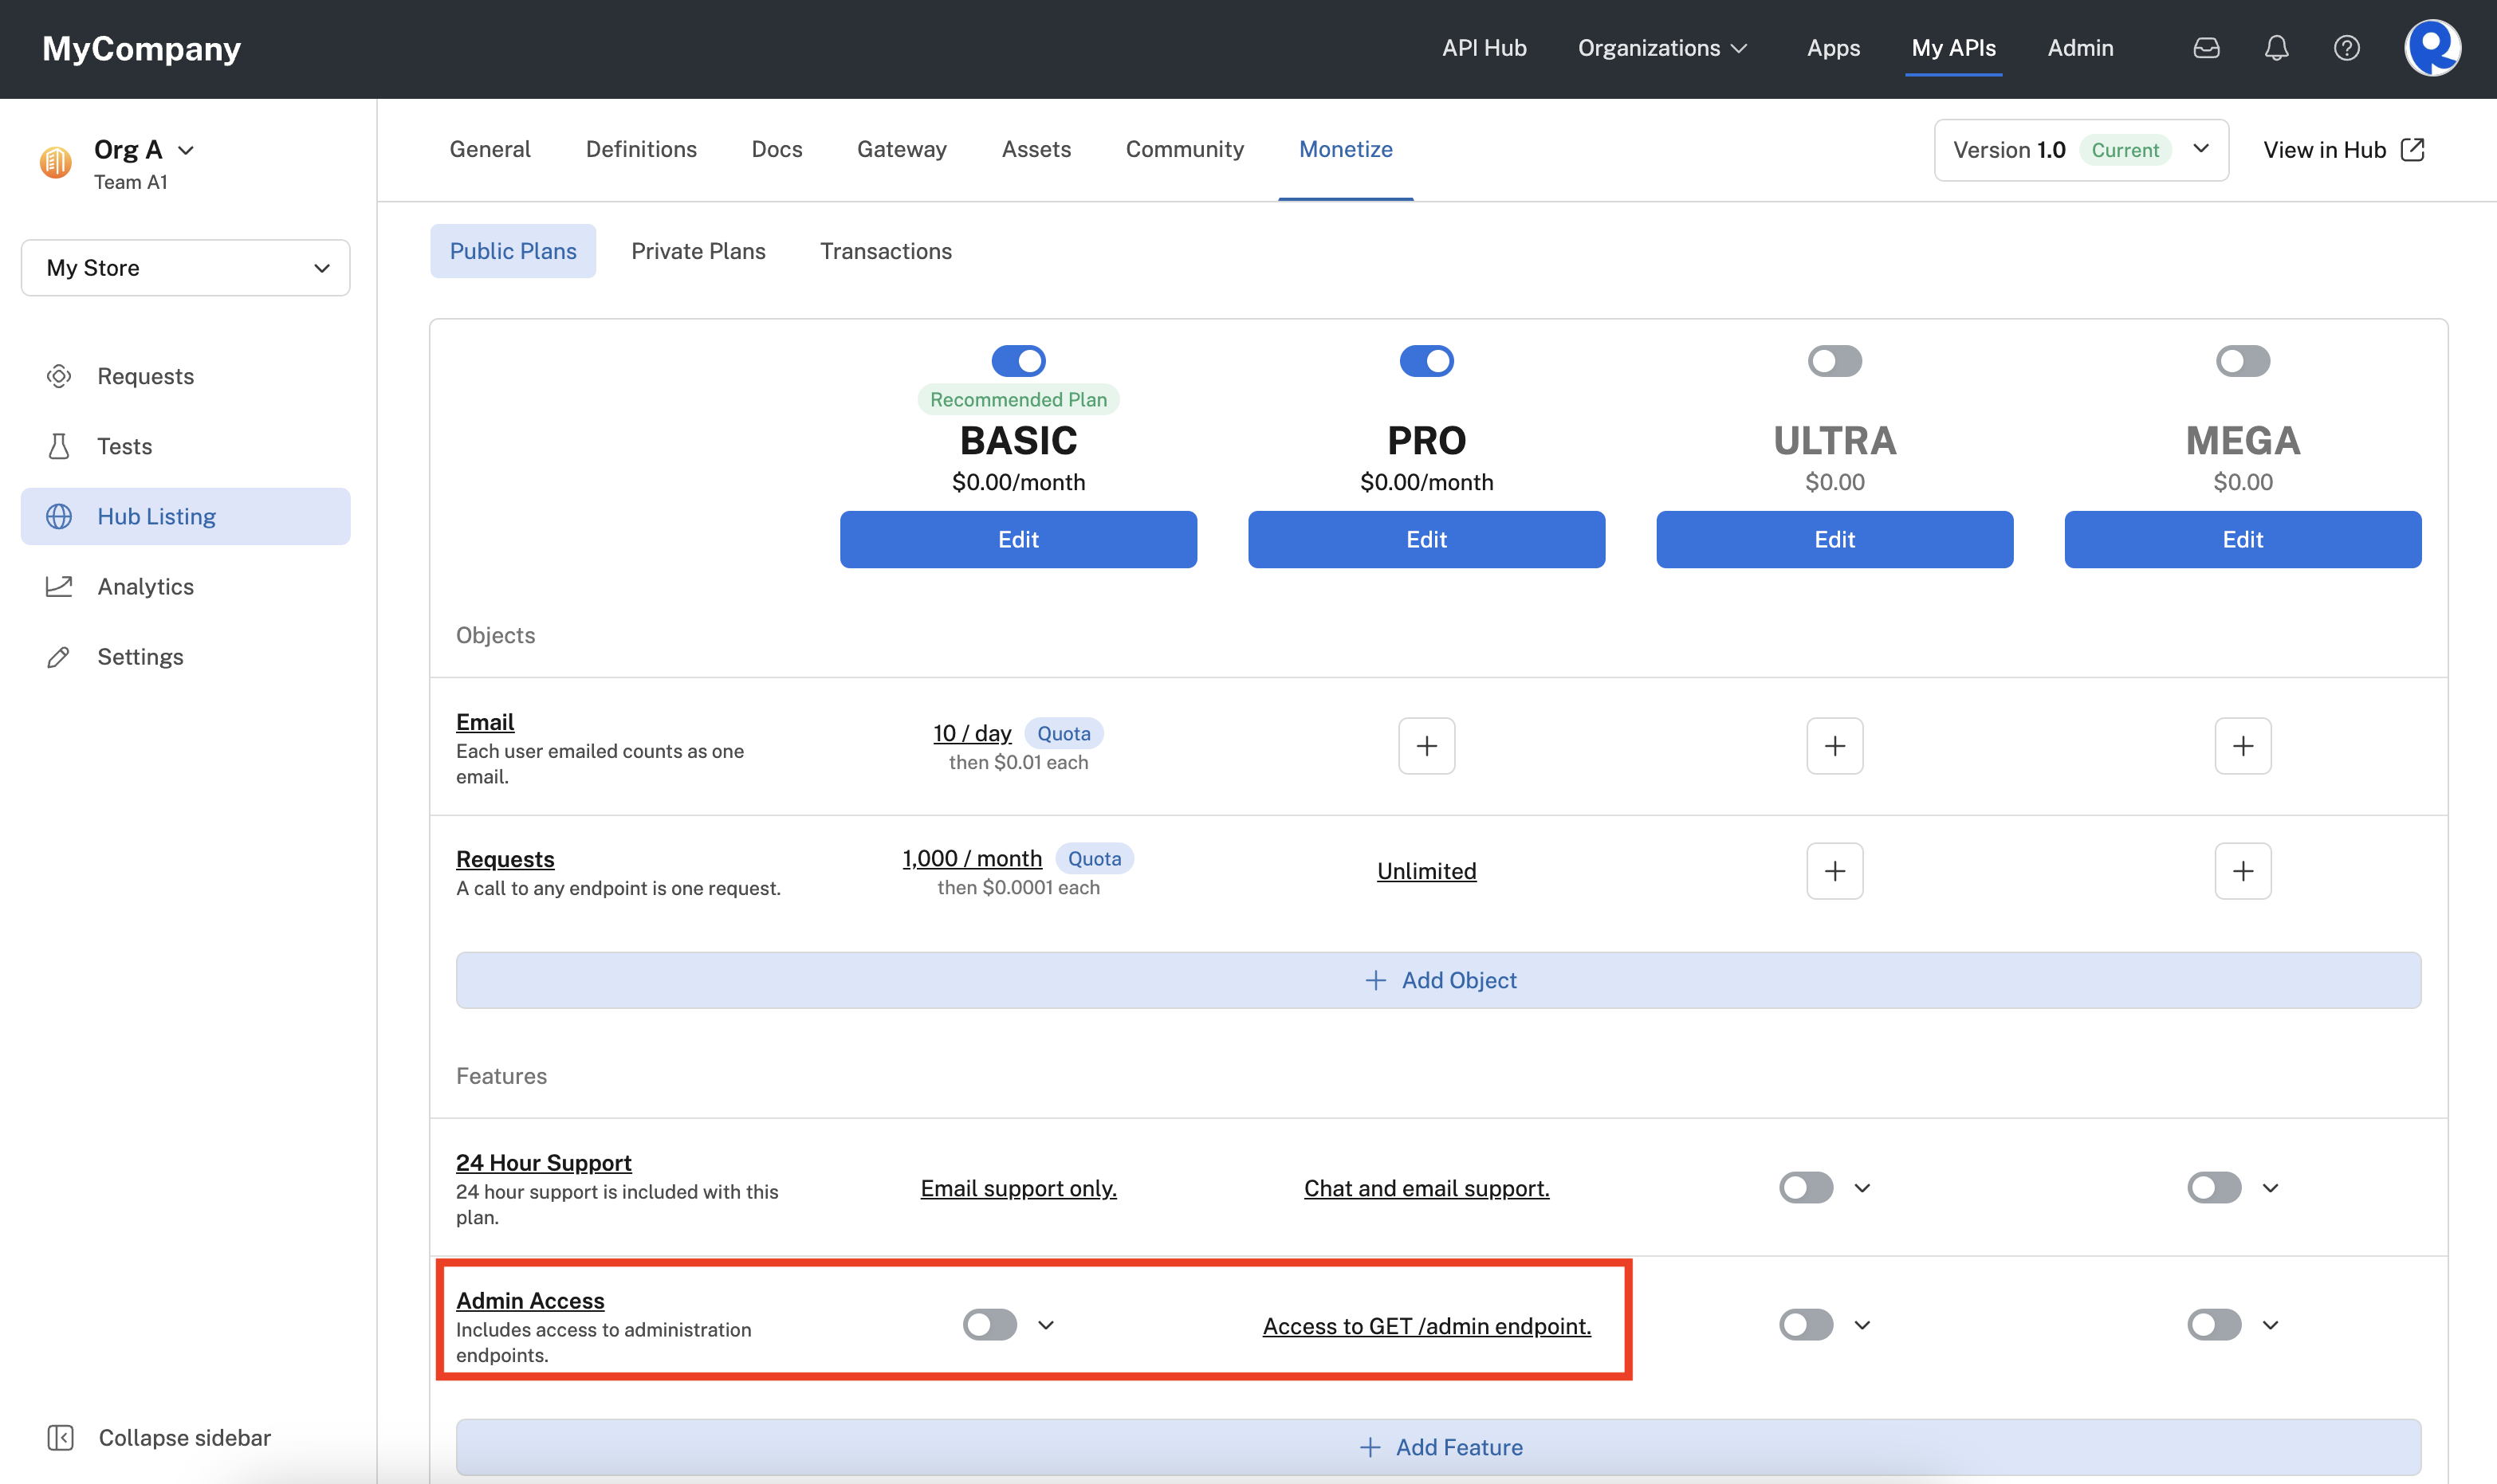
Once the Admin Access Feature is enabled for the PRO plan, the API listing's Pricing tab clearly shows what capability is available in each plan.
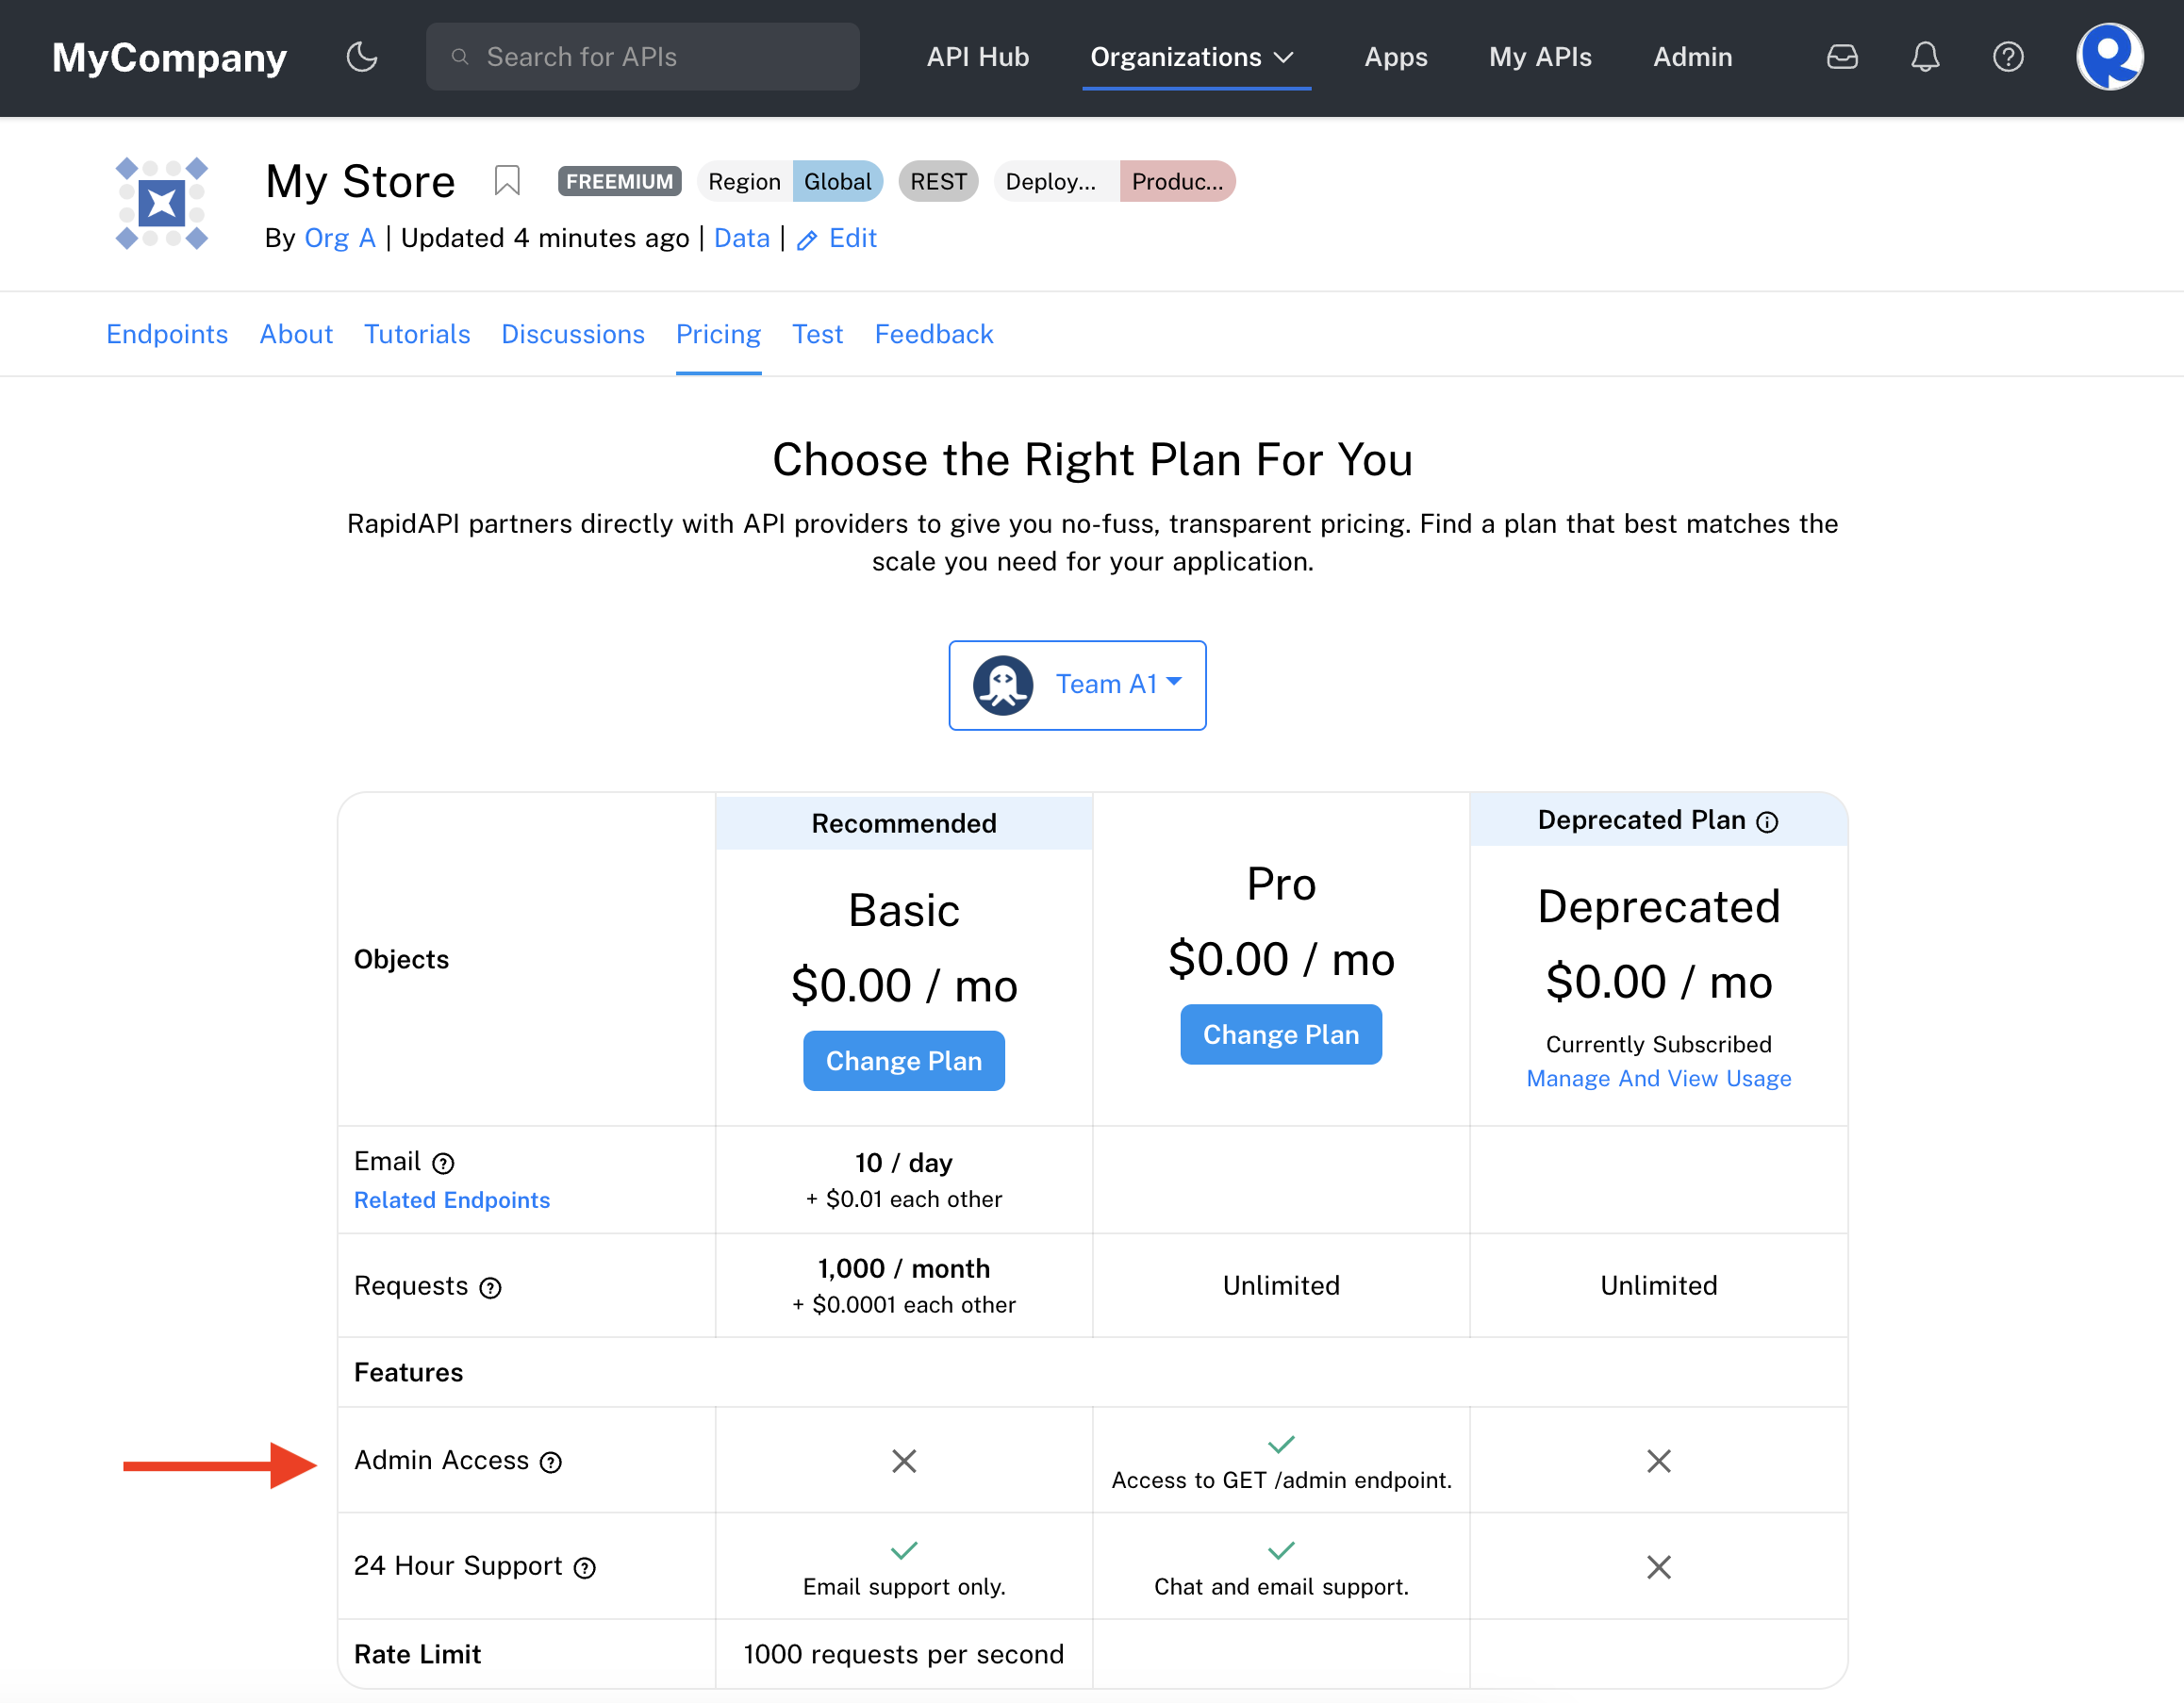
The Pricing tab with multiple Objects, Features, and plans.
If we now subscribe to the BASIC plan and try to test the GET /admin endpoint, the response status is 401 Client Error and the message body is "This endpoint is disabled for your subscription". This is because the BASIC plan does not allow access to the "Admin Access" Feature.
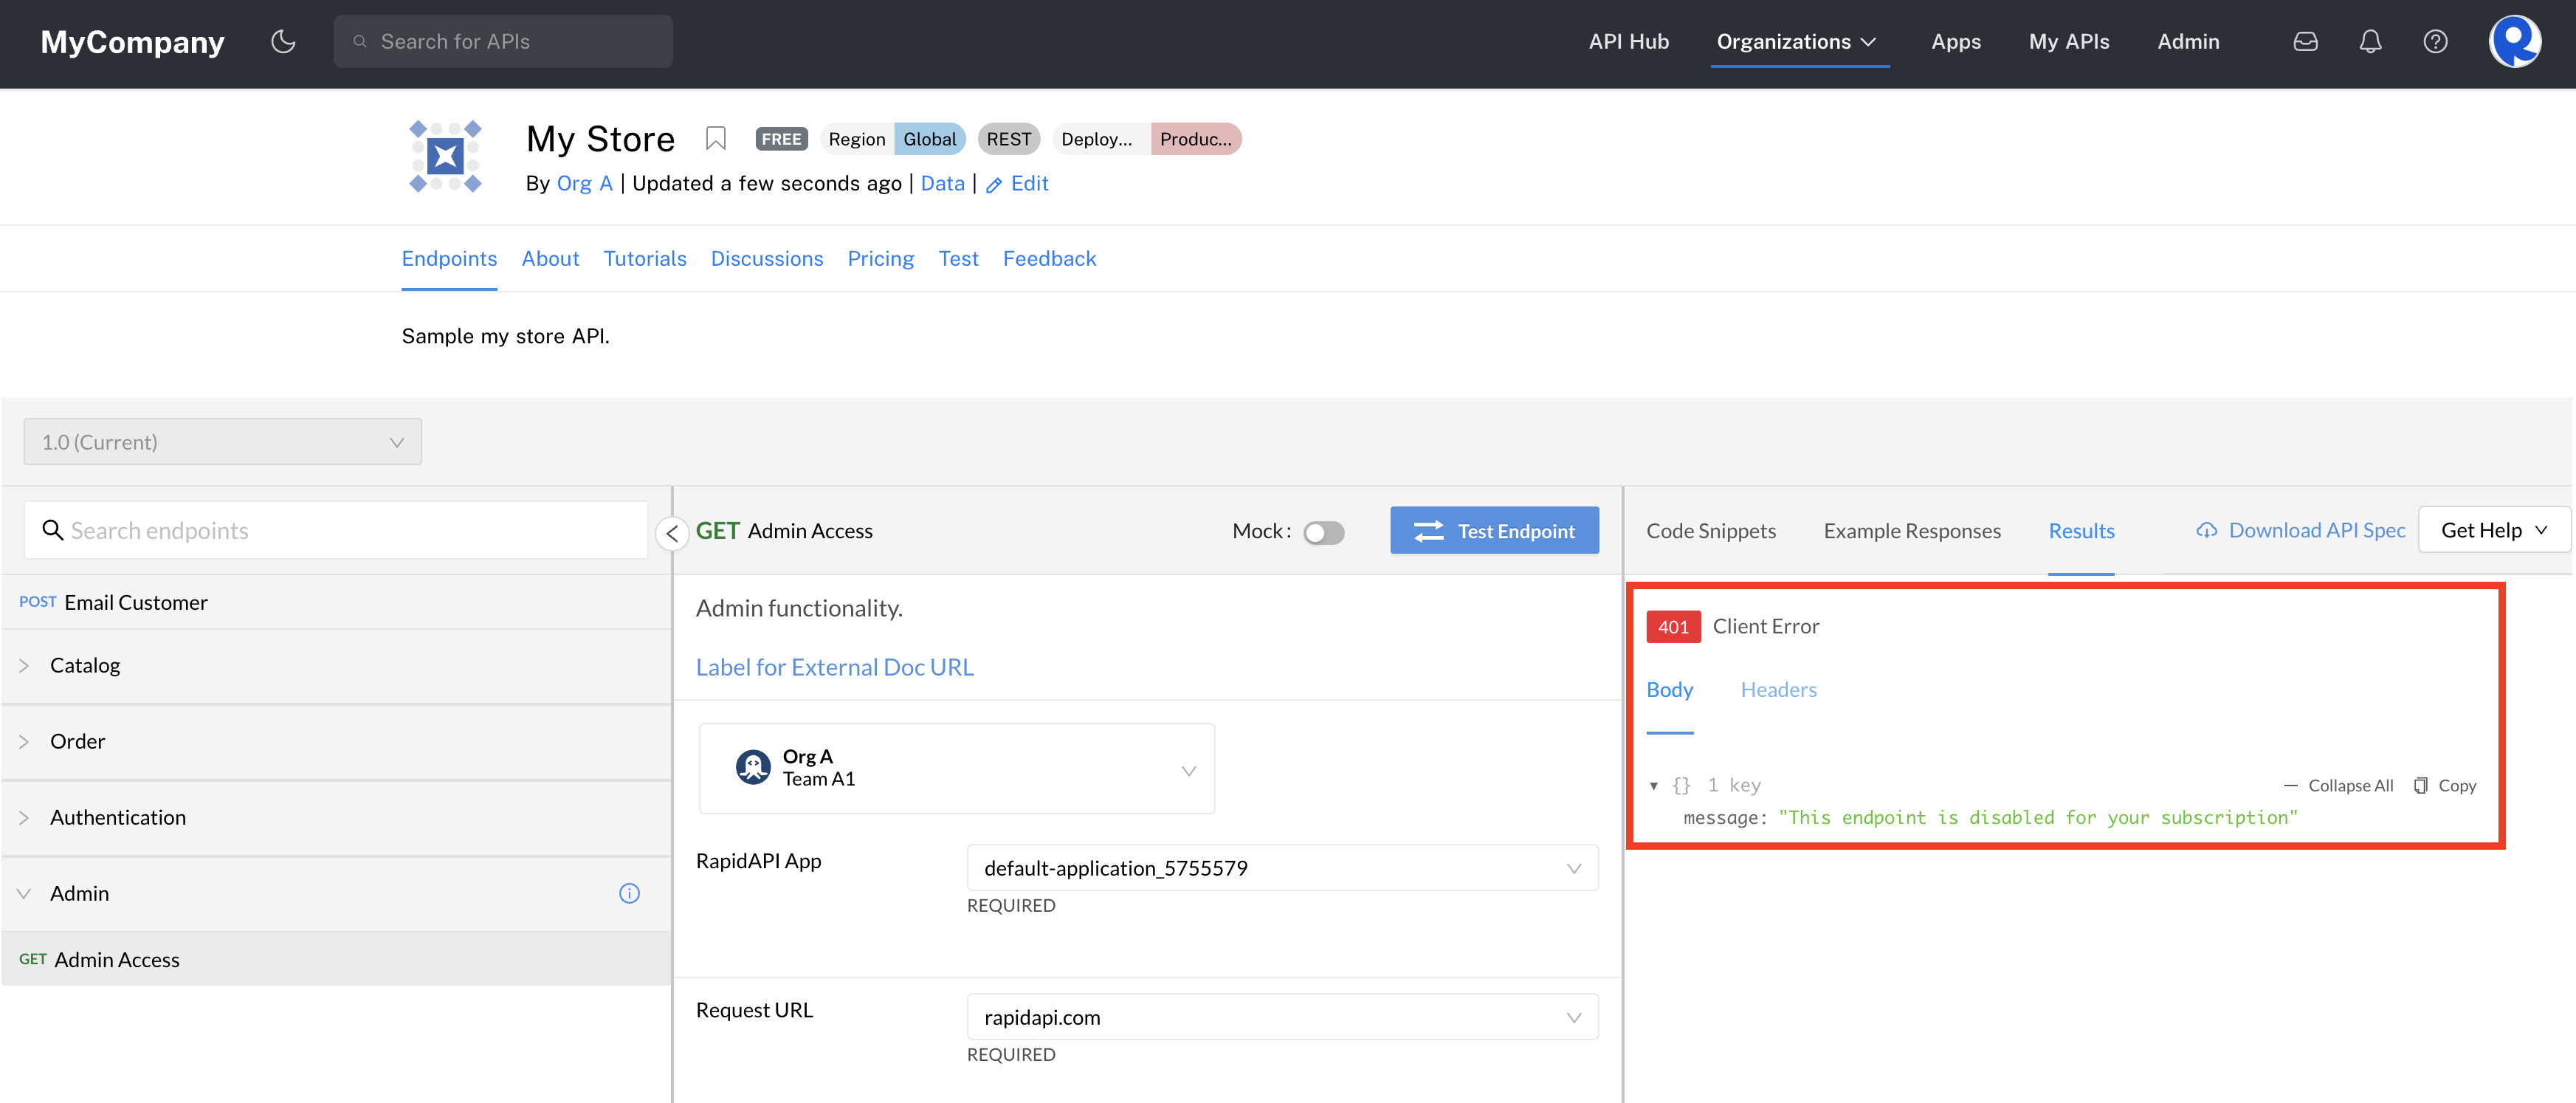
An endpoint is disabled because the plan doesn't include the Feature.
DocuSign integration
Enterprise feature only
Using DocuSign with plans is a feature only available to enterprise customers. If the DocuSign option is not available (see below), please contact your Rapid representative in order to have the feature enabled.
The DocuSign integration allows API providers to configure DocuSign with certain plans. Once configured, API consumers must DocuSign the API provider's contract before they can subscribe to the plan.
To connect a plan to a DocuSign contract, click Edit for the plan and click Login to DocuSign. You then enter your DocuSign credentials and select the template that you want to associate with the plan.
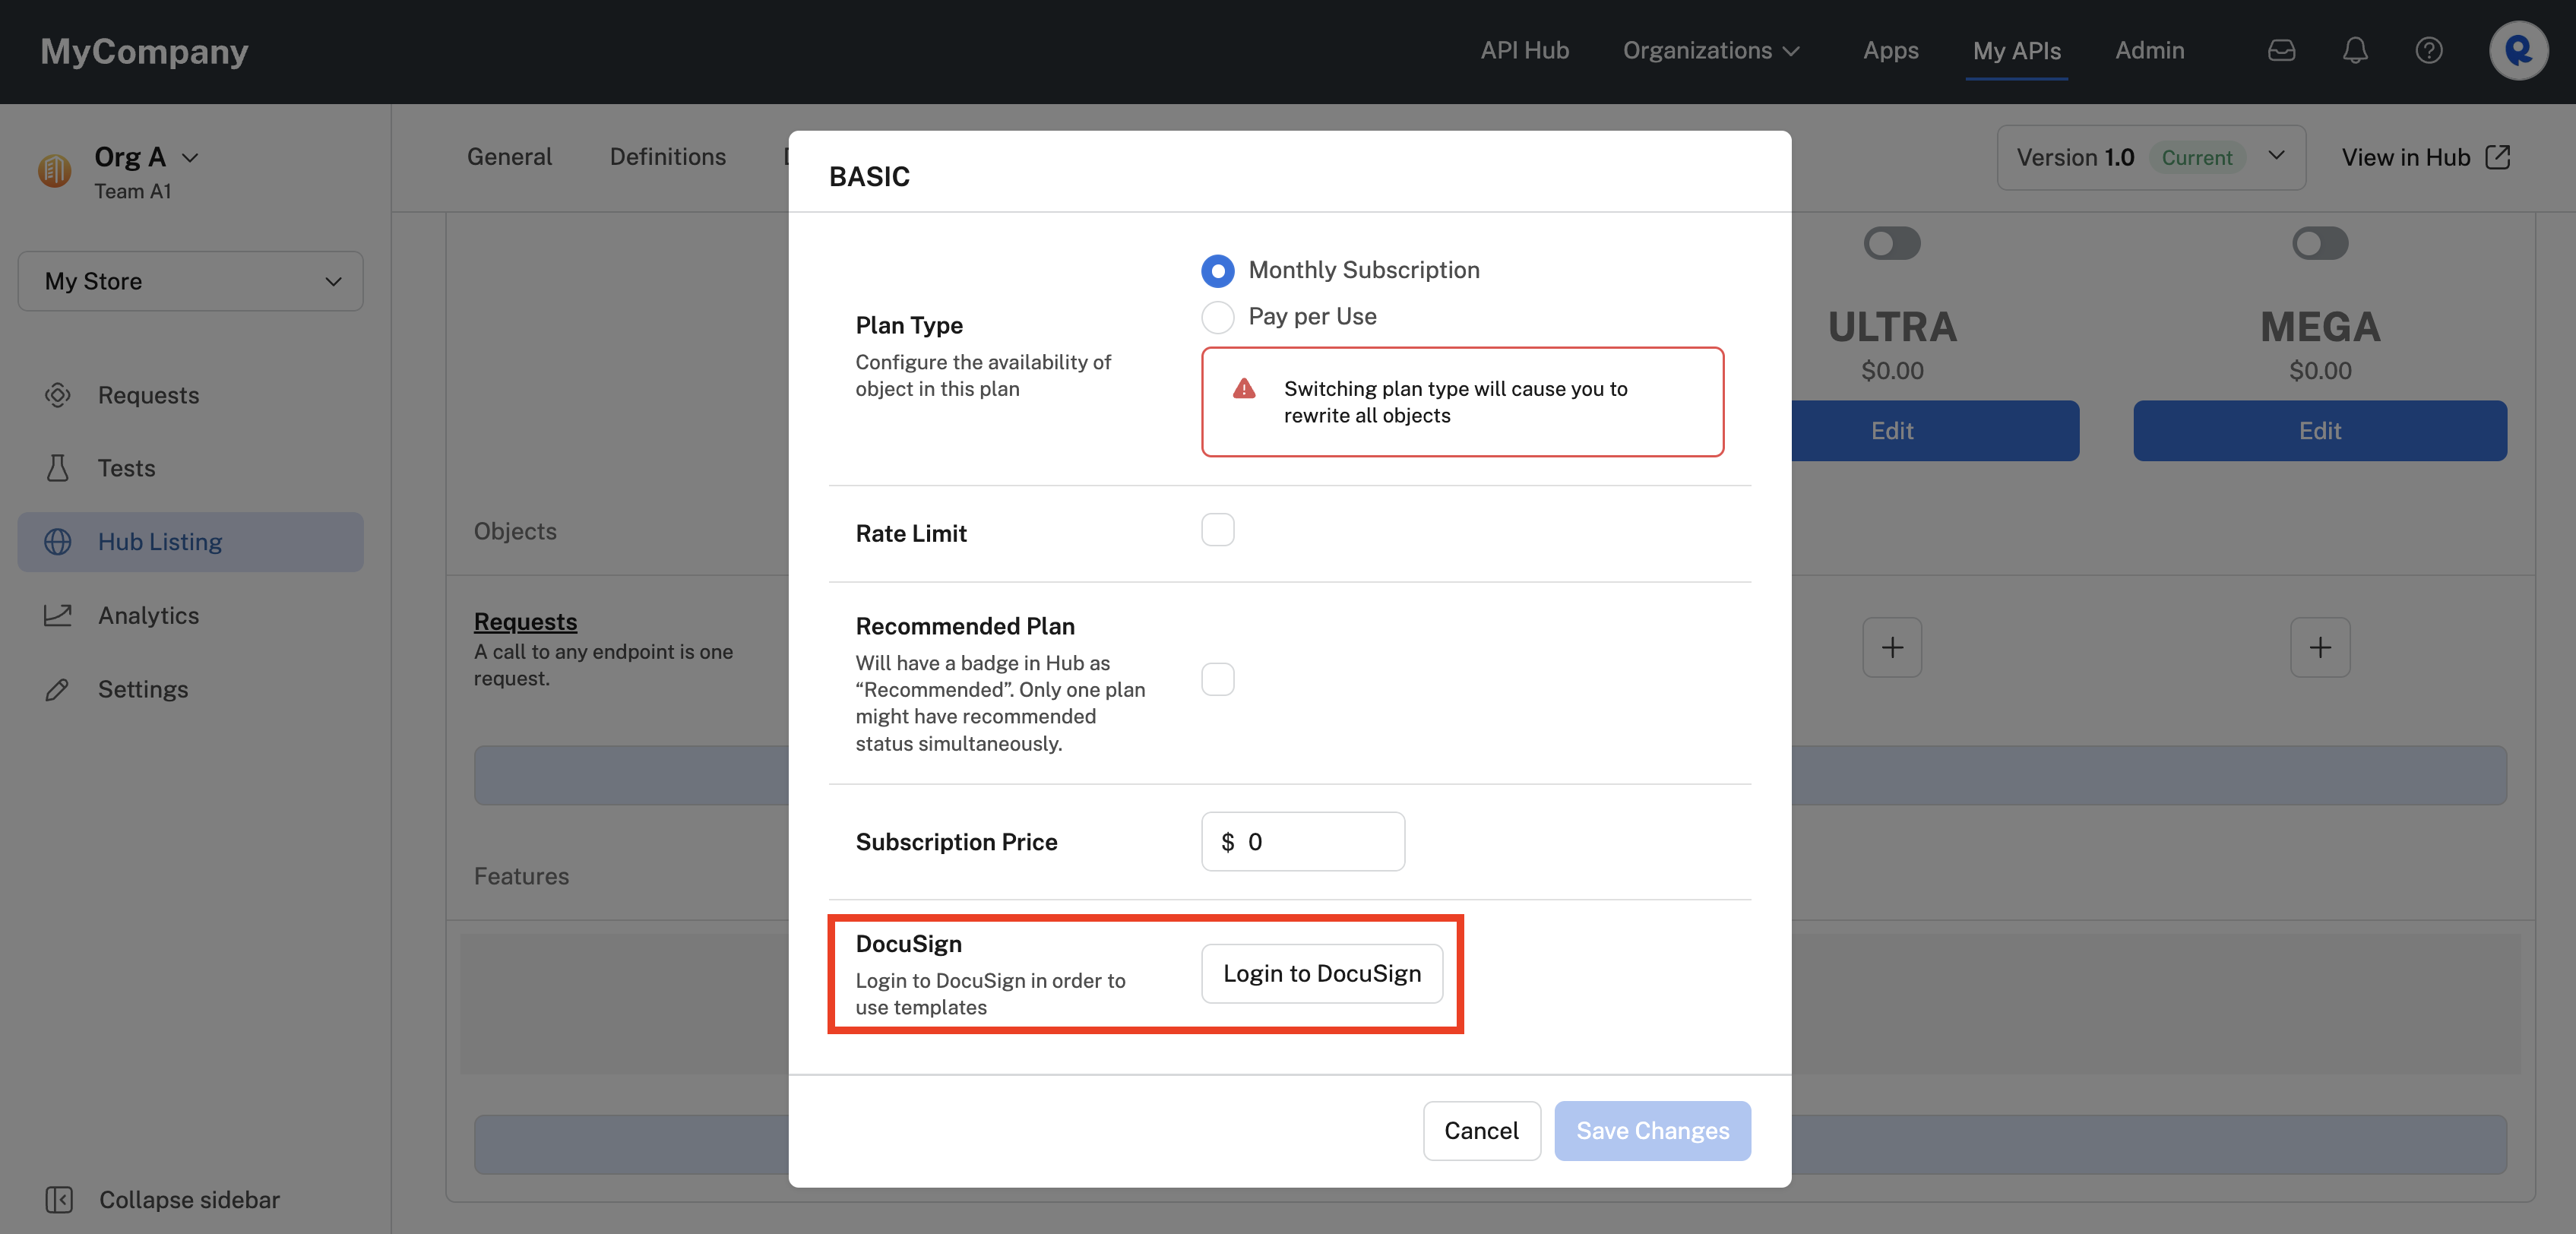
Requiring DocuSign with your plan.
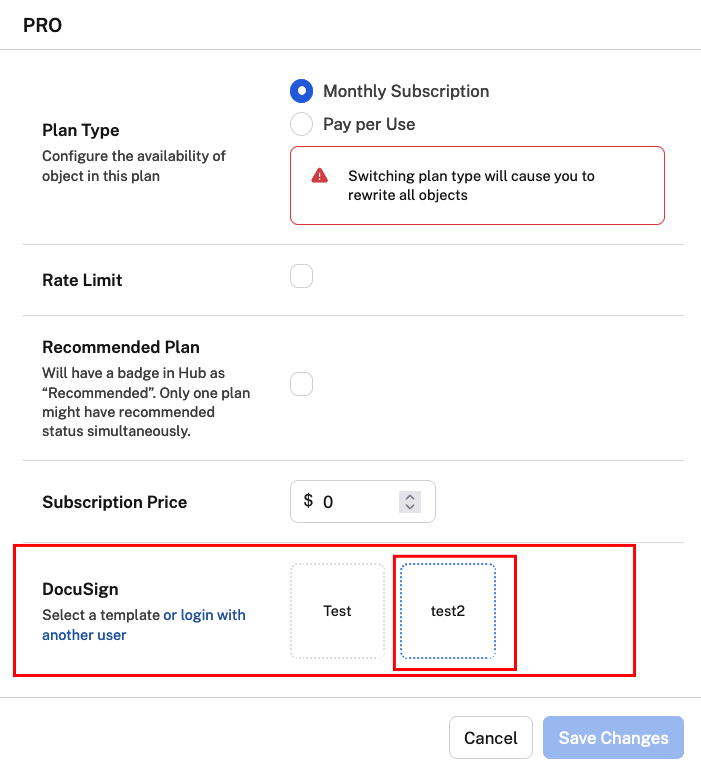
Selecting a DocuSign template from your DocuSign account.
When subscribing to a plan, after click Subscribe or Change Plan on the Pricing tab of the API's listing, API consumers will be prompted to DocuSign the contract. Once the API consumer has signed the contract, they are subscribed to the plan and the owner of the DocuSign account can view signed contracts in DocuSign under Manage > Completed.
Creating and subscribing to private plans
To create or edit a private plan for your API:
- Click My APIs in the header to access Studio.
- In the upper left dropdown, select the team that owns the API. If you personally own the API, select Personal Account.
- Click the API project for which you would like create or edit a private plan.
- In the sidebar, click Hub Listing.
- Click the Monetize tab.
- Click the Private Plans tab.
- Click Add Plan to add a plan. Or select an existing private plan to edit it.
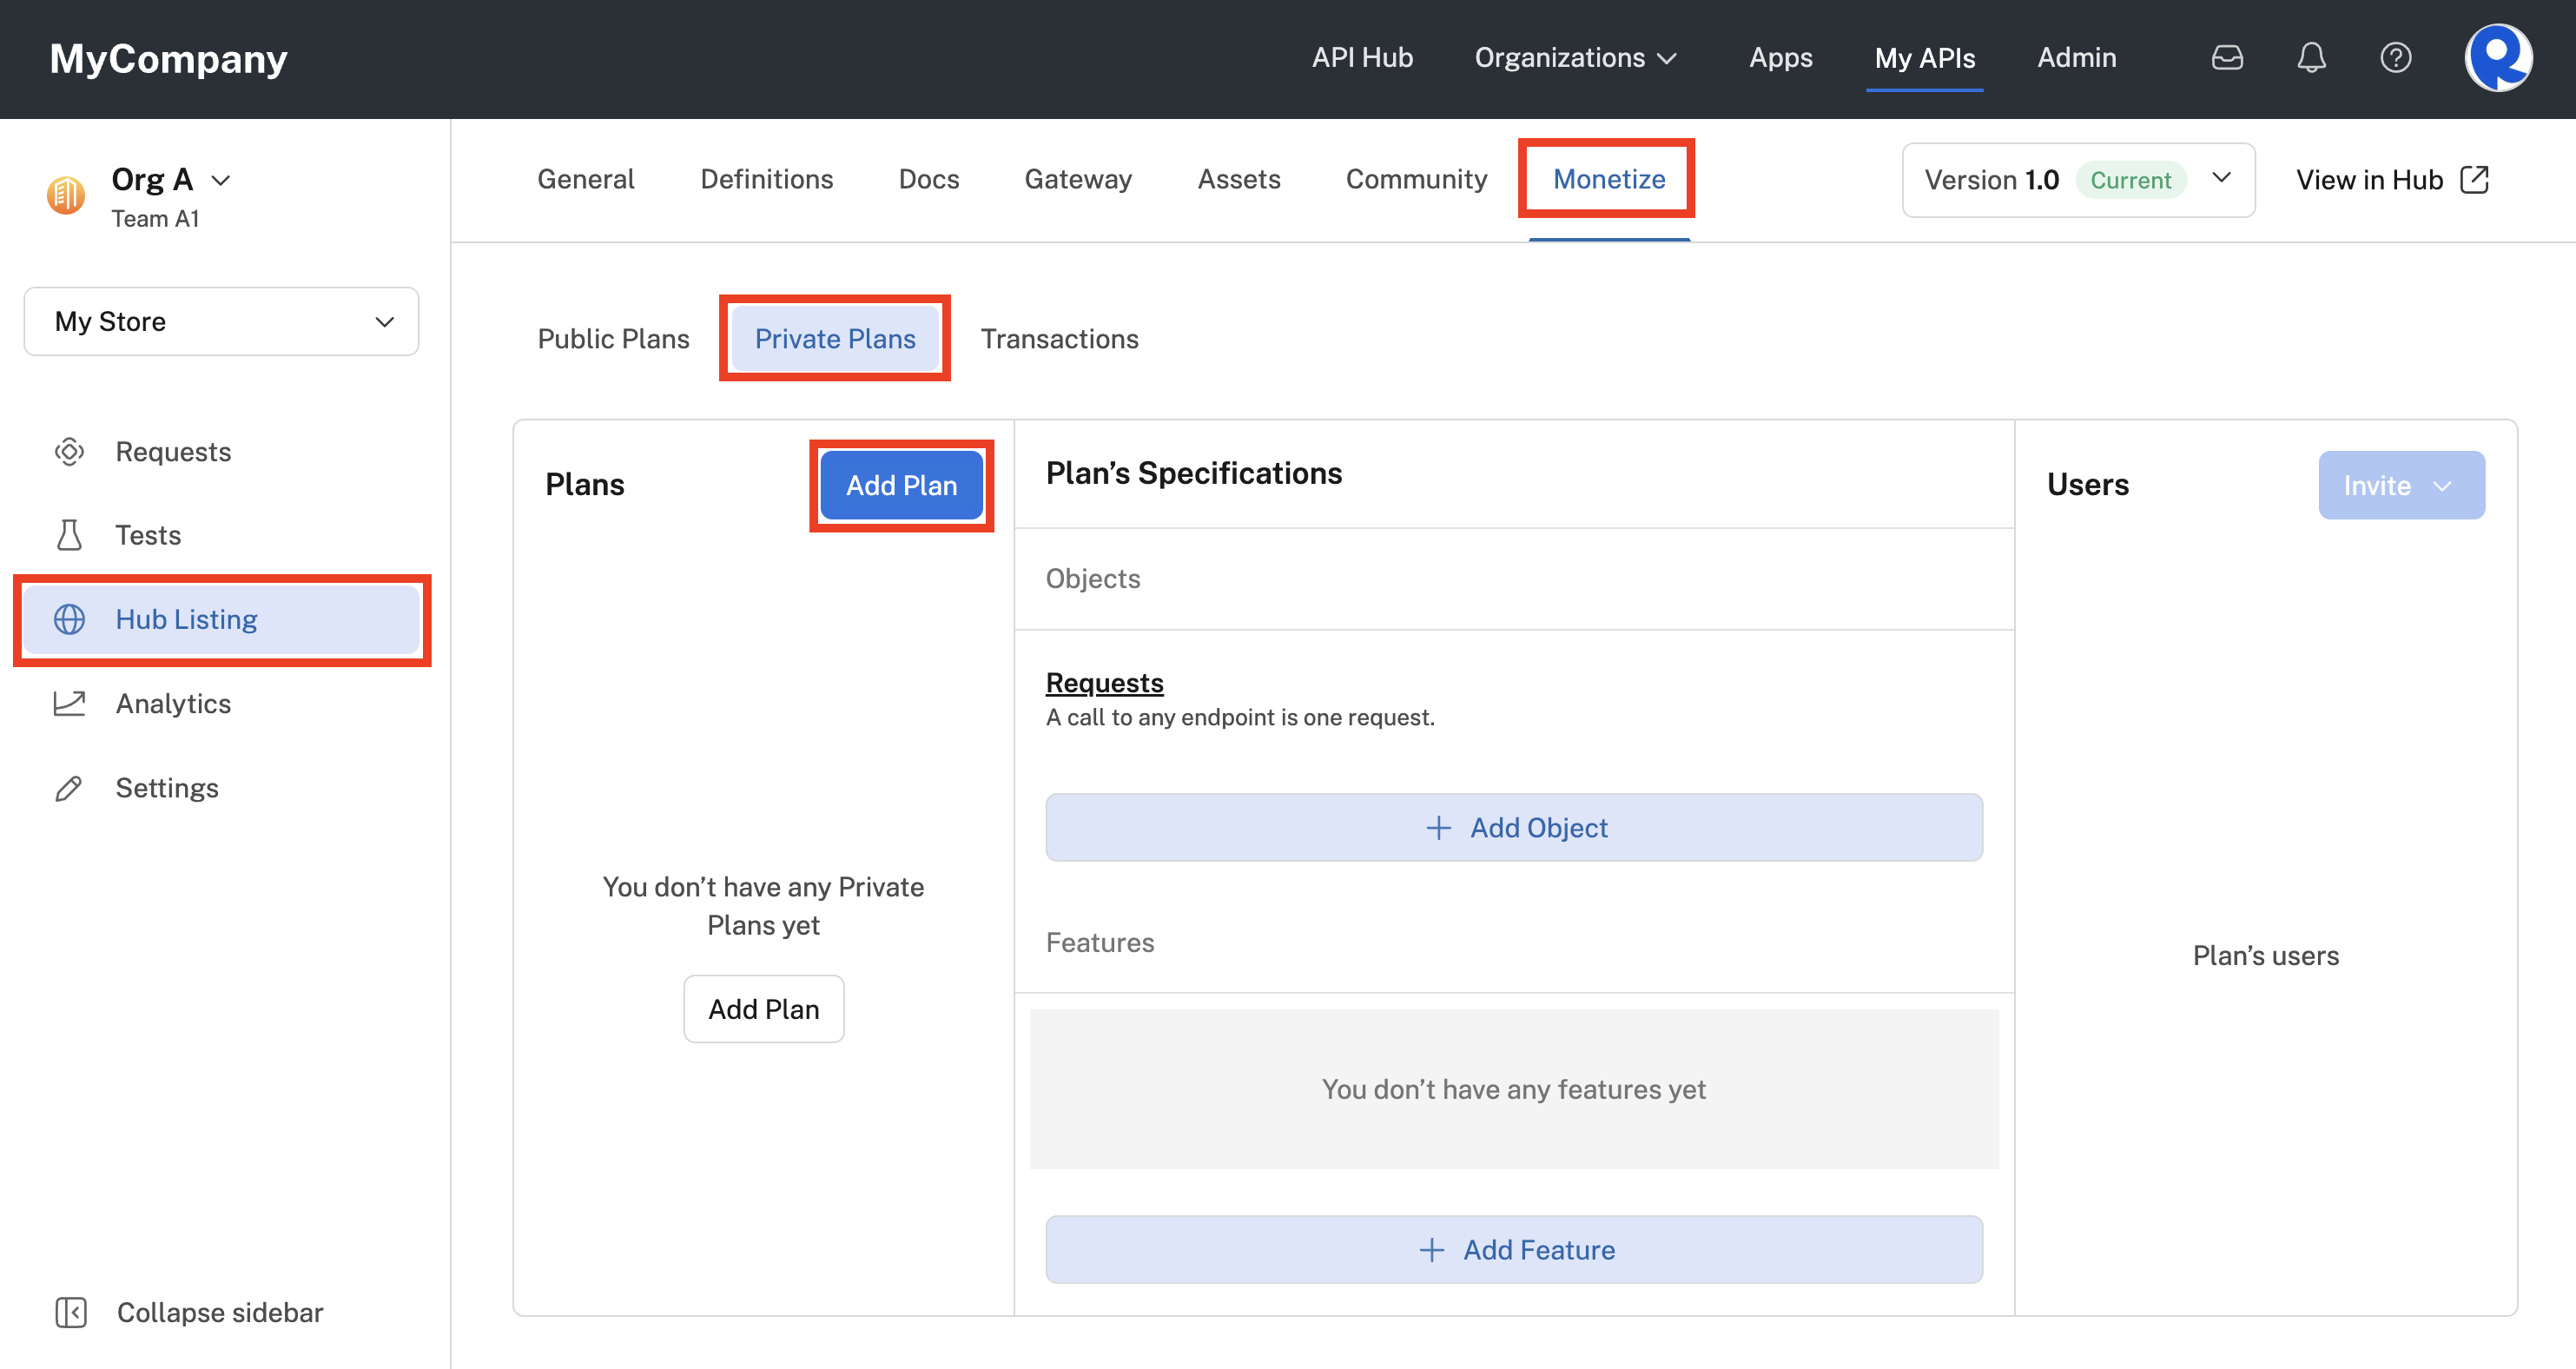
Adding a private plan to an API project.
- In the Add Private Plan dialog, enter the following.
- Enter a Plan Name. Your private plan name will automatically be prepended with "CUSTOM-".
- Select the Plan Type. If you select Monthly Subscription, you also have the option of setting a Subscription Price.
- Optionally click the Rate Limit checkbox. You then enter a numeric Rate Limit and select the units for the rate limit (requests per second, minute, or hour).
- Click Save Changes.
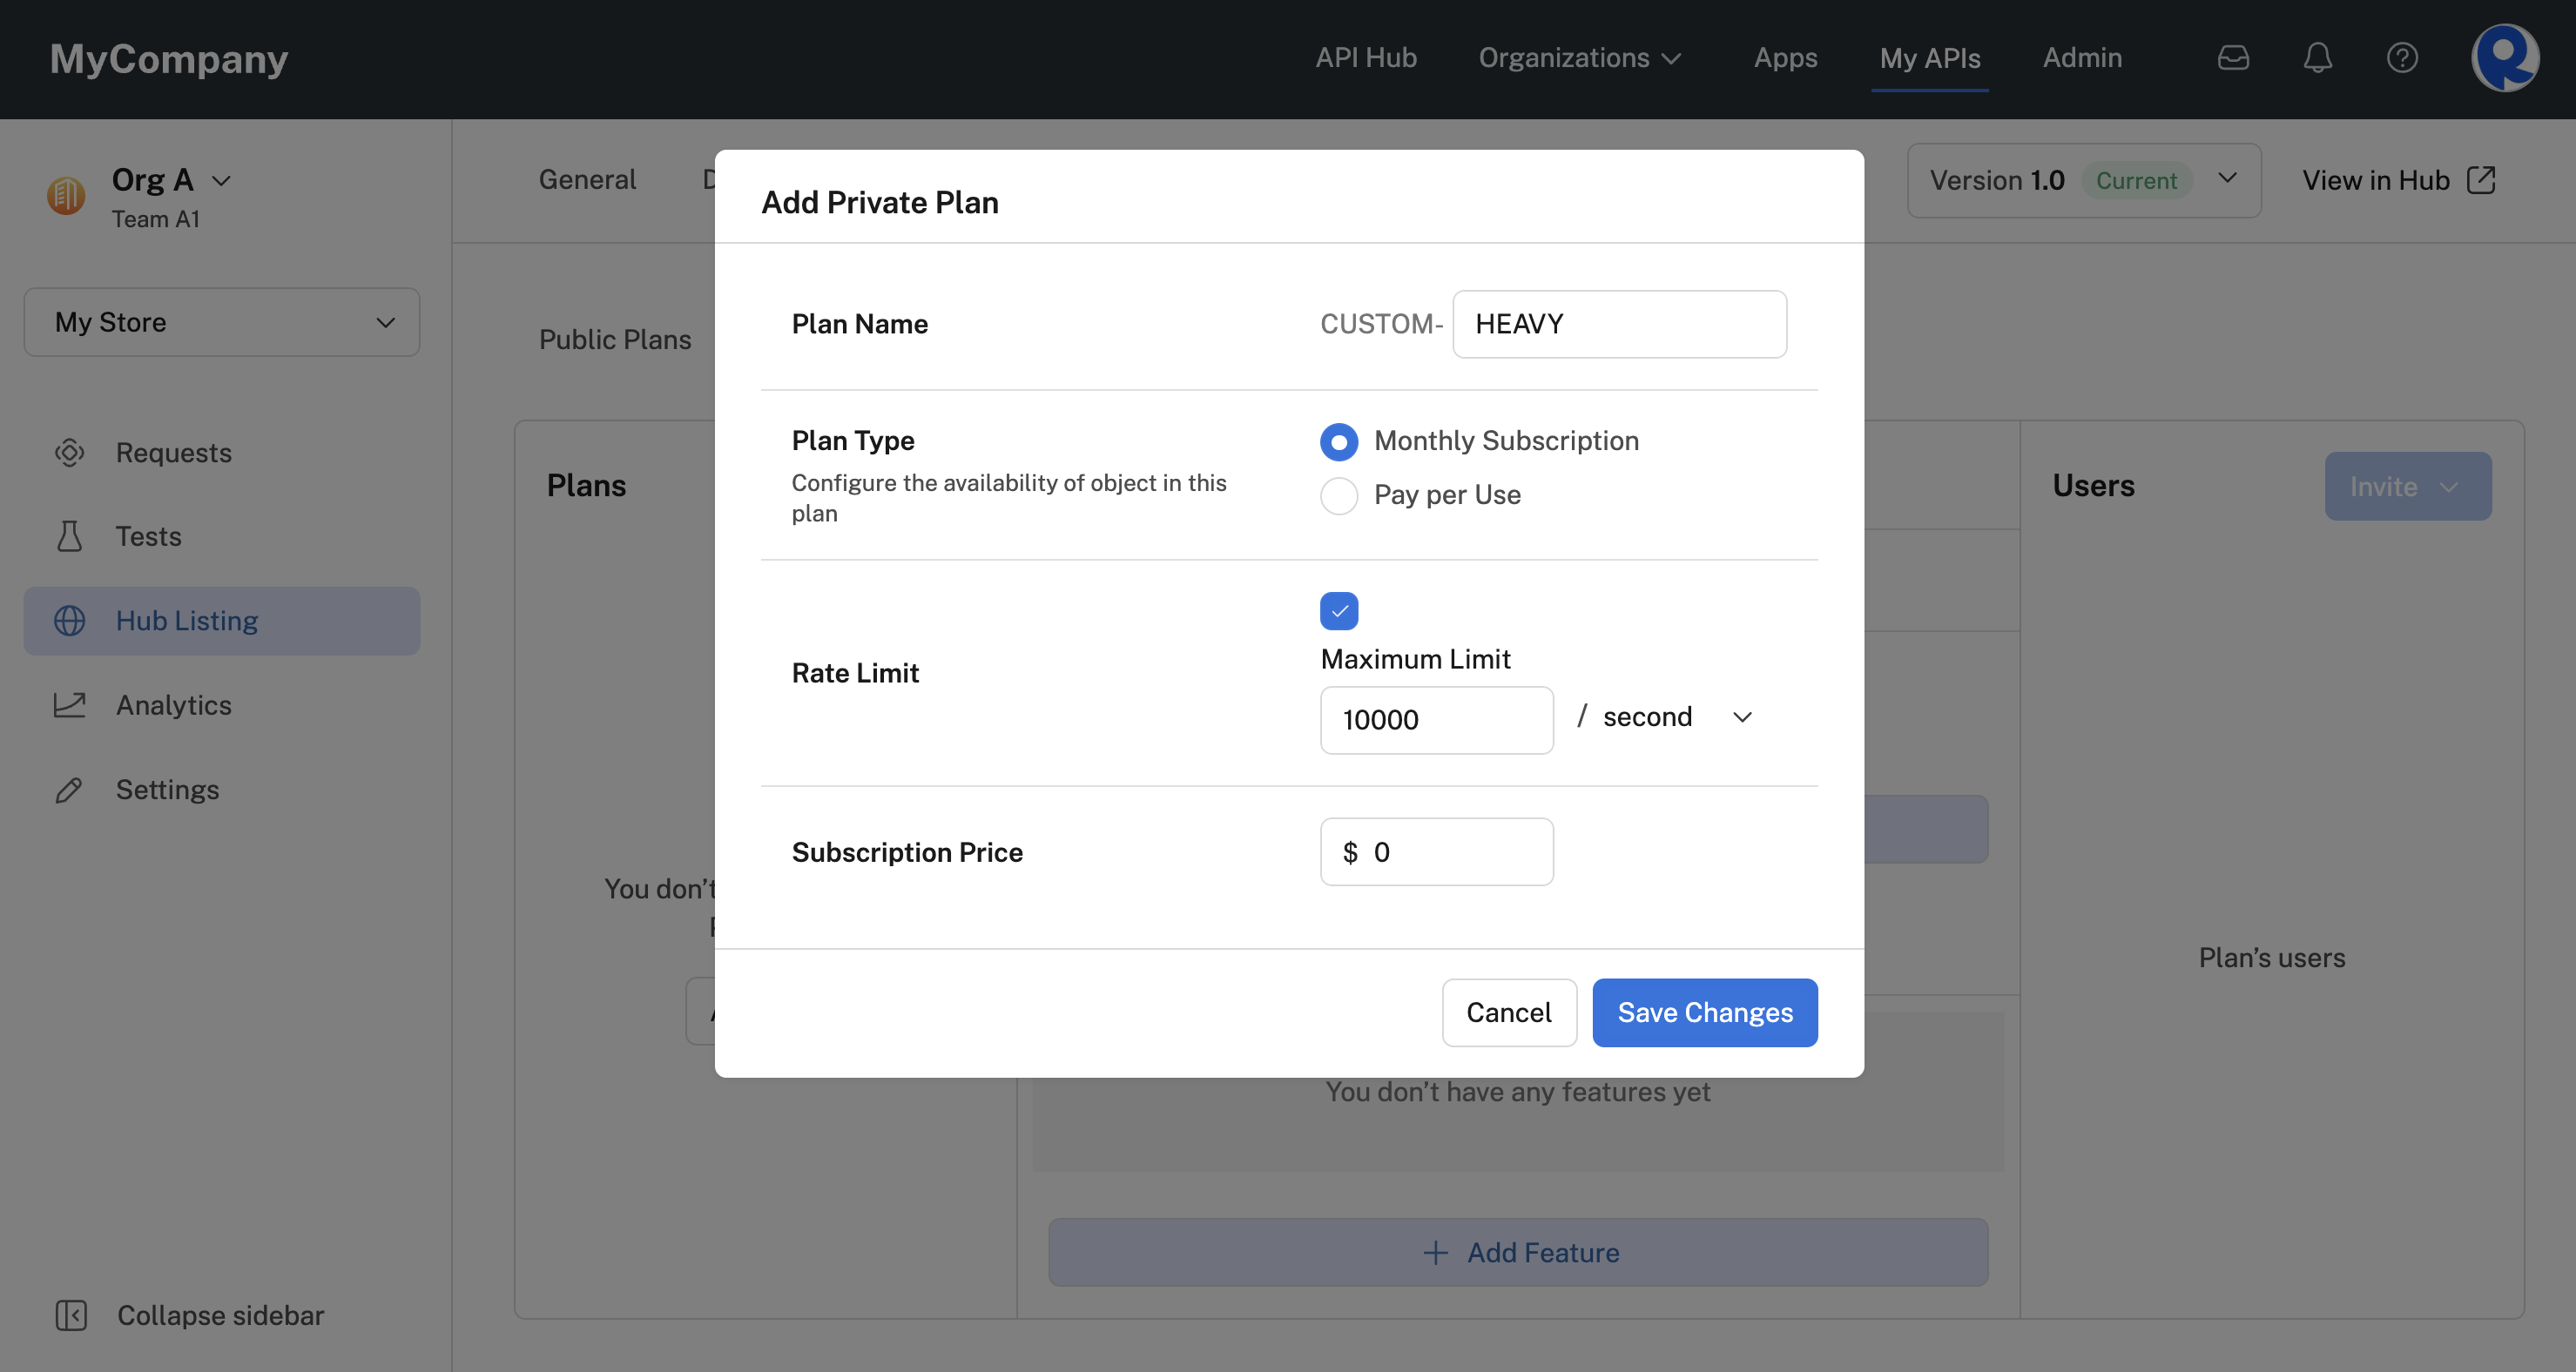
Configuring the plan using the Add Private Plan dialog.
- You can then edit or add the private plan's Objects and Features. (See the screenshot below.)
- To invite users or organizations to use the private plan, in the Users area, click Invite and search for the user or organization. Users will then be sent an email invitation and can click Accept Your Invitation in order to begin using the private plan.

Object, Features, and Users for a private plan.
Subscribing to private plans
Once a user or organization has been invited to use a private plan, they can then subscribe to the private plan in the API listing's Pricing tab. If an individual user was invited to use the private plan, their user context must be selected in the dropdown in order to see the private plan. If an organization was invited to use the private plan, a team from that organization must be selected in order to see the private plan.
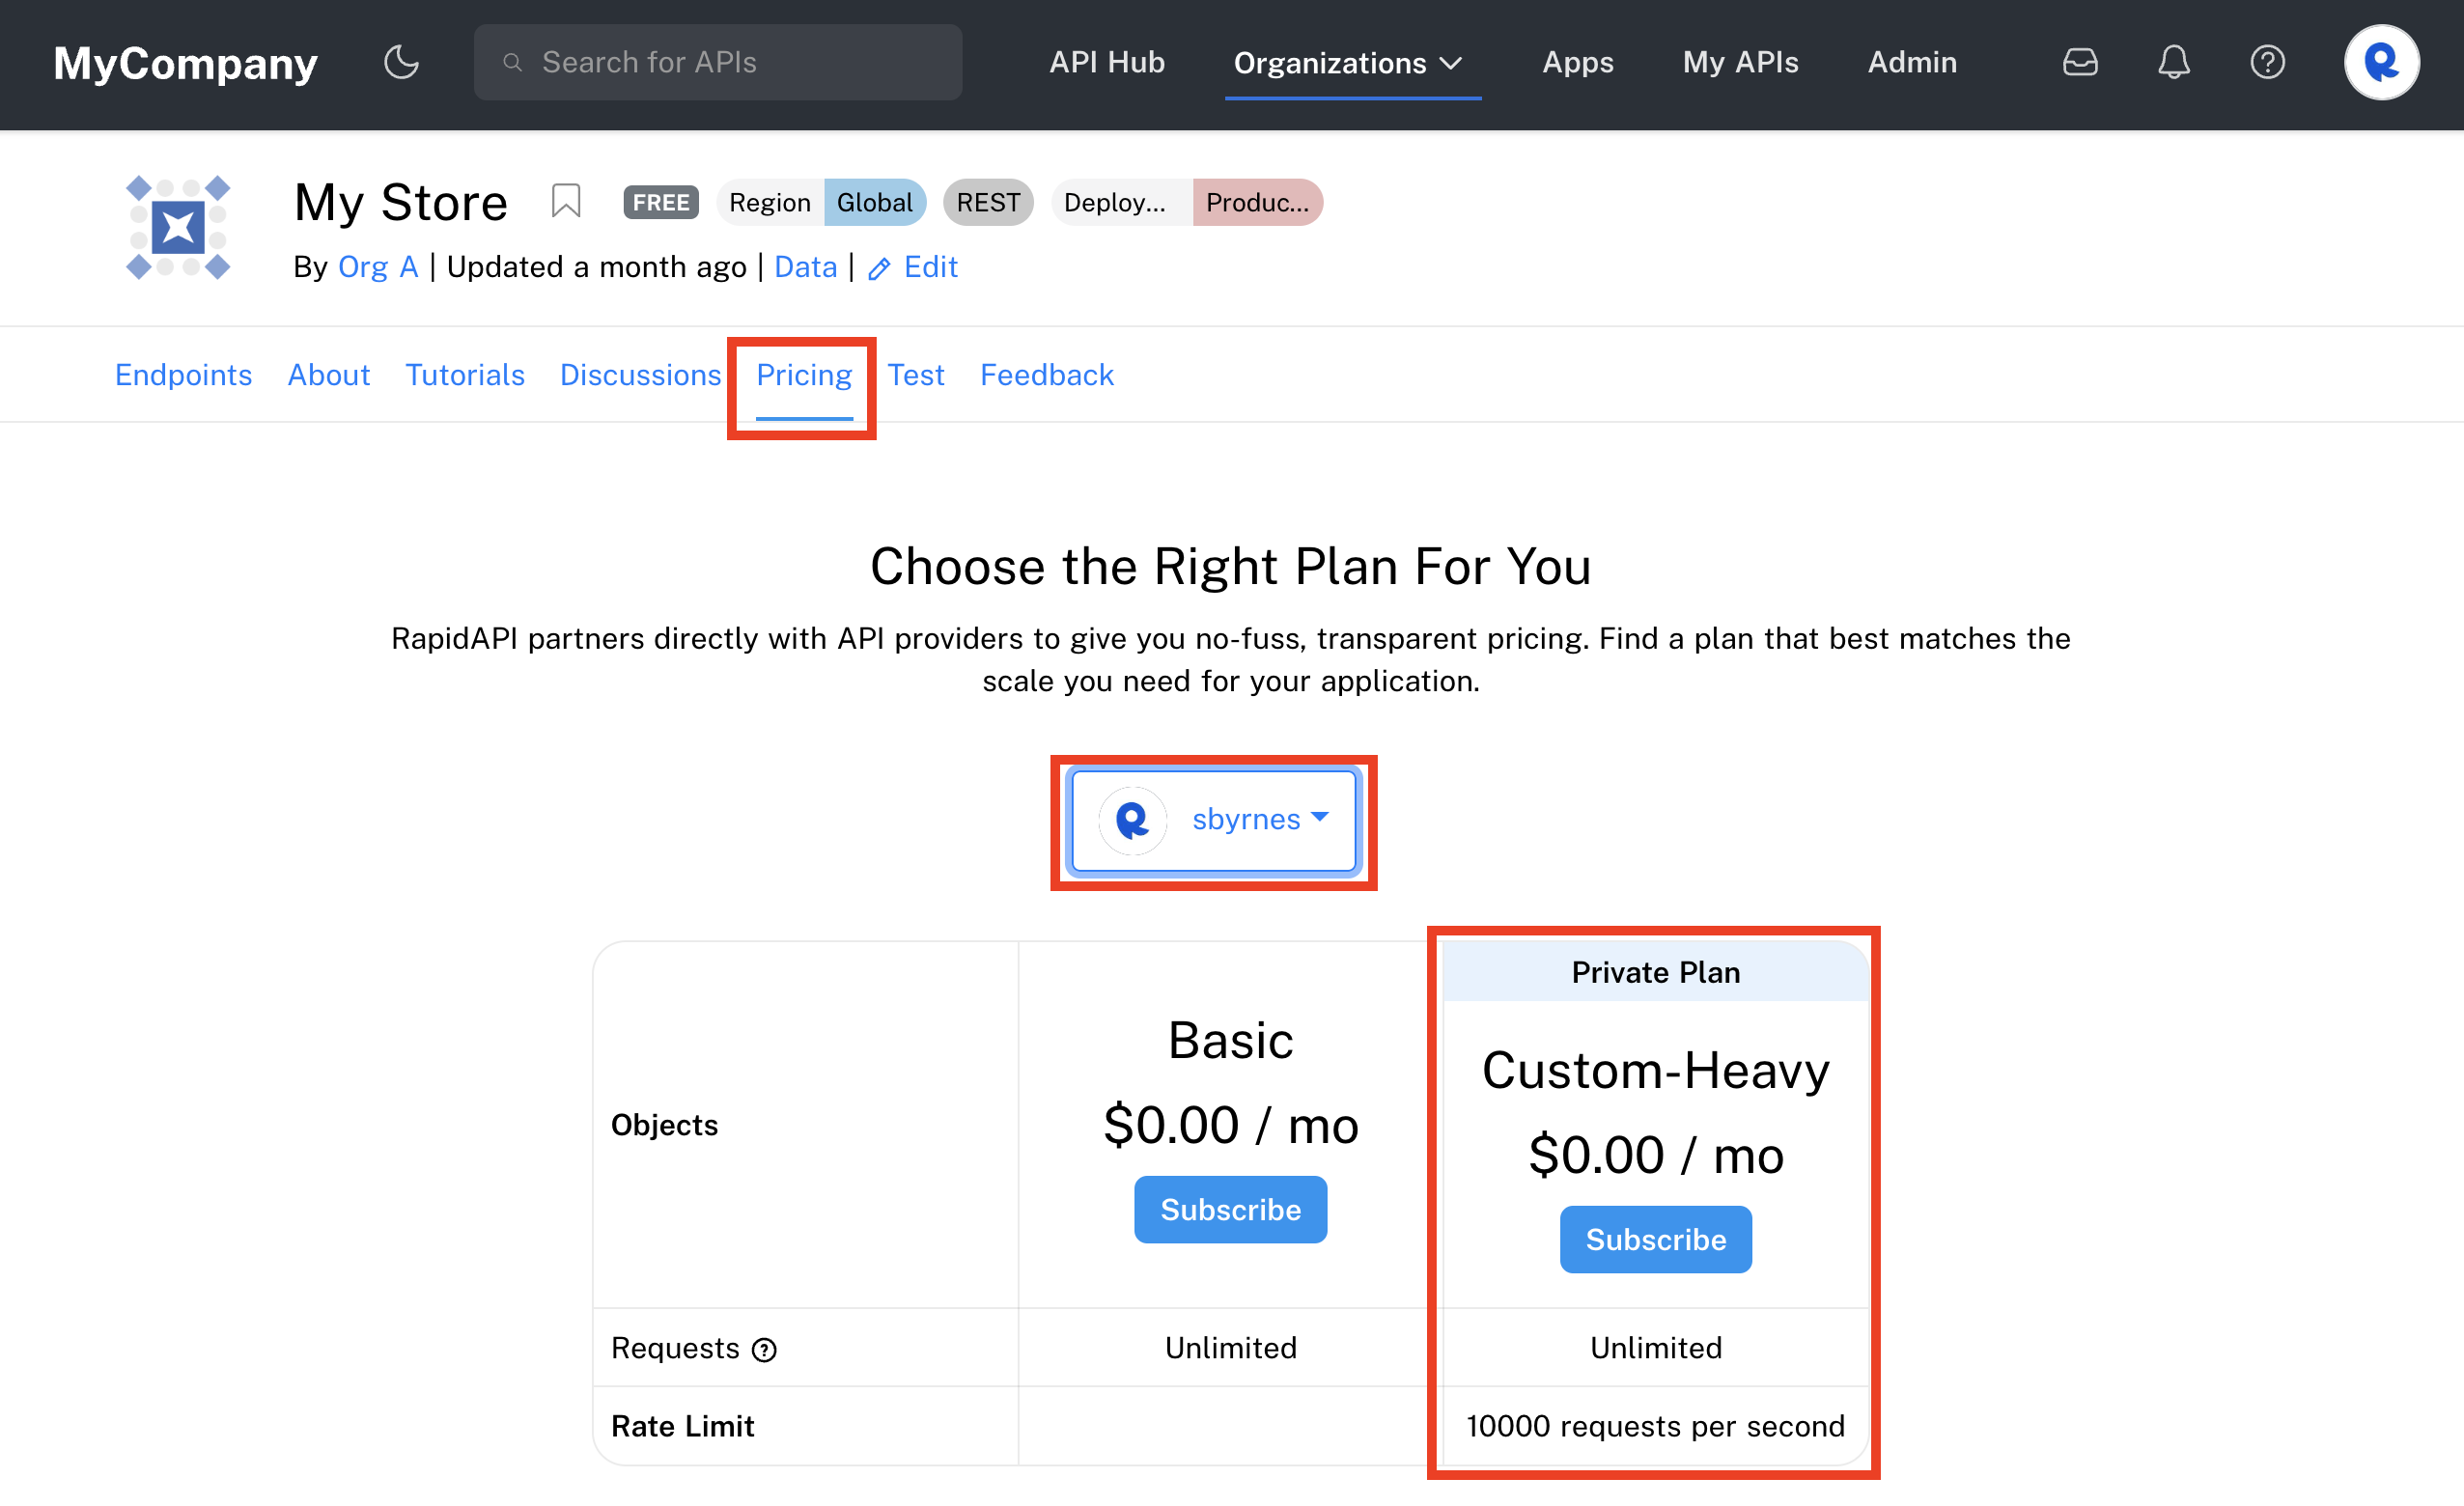
Subscribing to a private plan using the API listing's Pricing tab.
Viewing transactions
If your API includes monetization, you can view and download transactions with your API consumers using the Hub Listing > Monetize > Transactions tab.
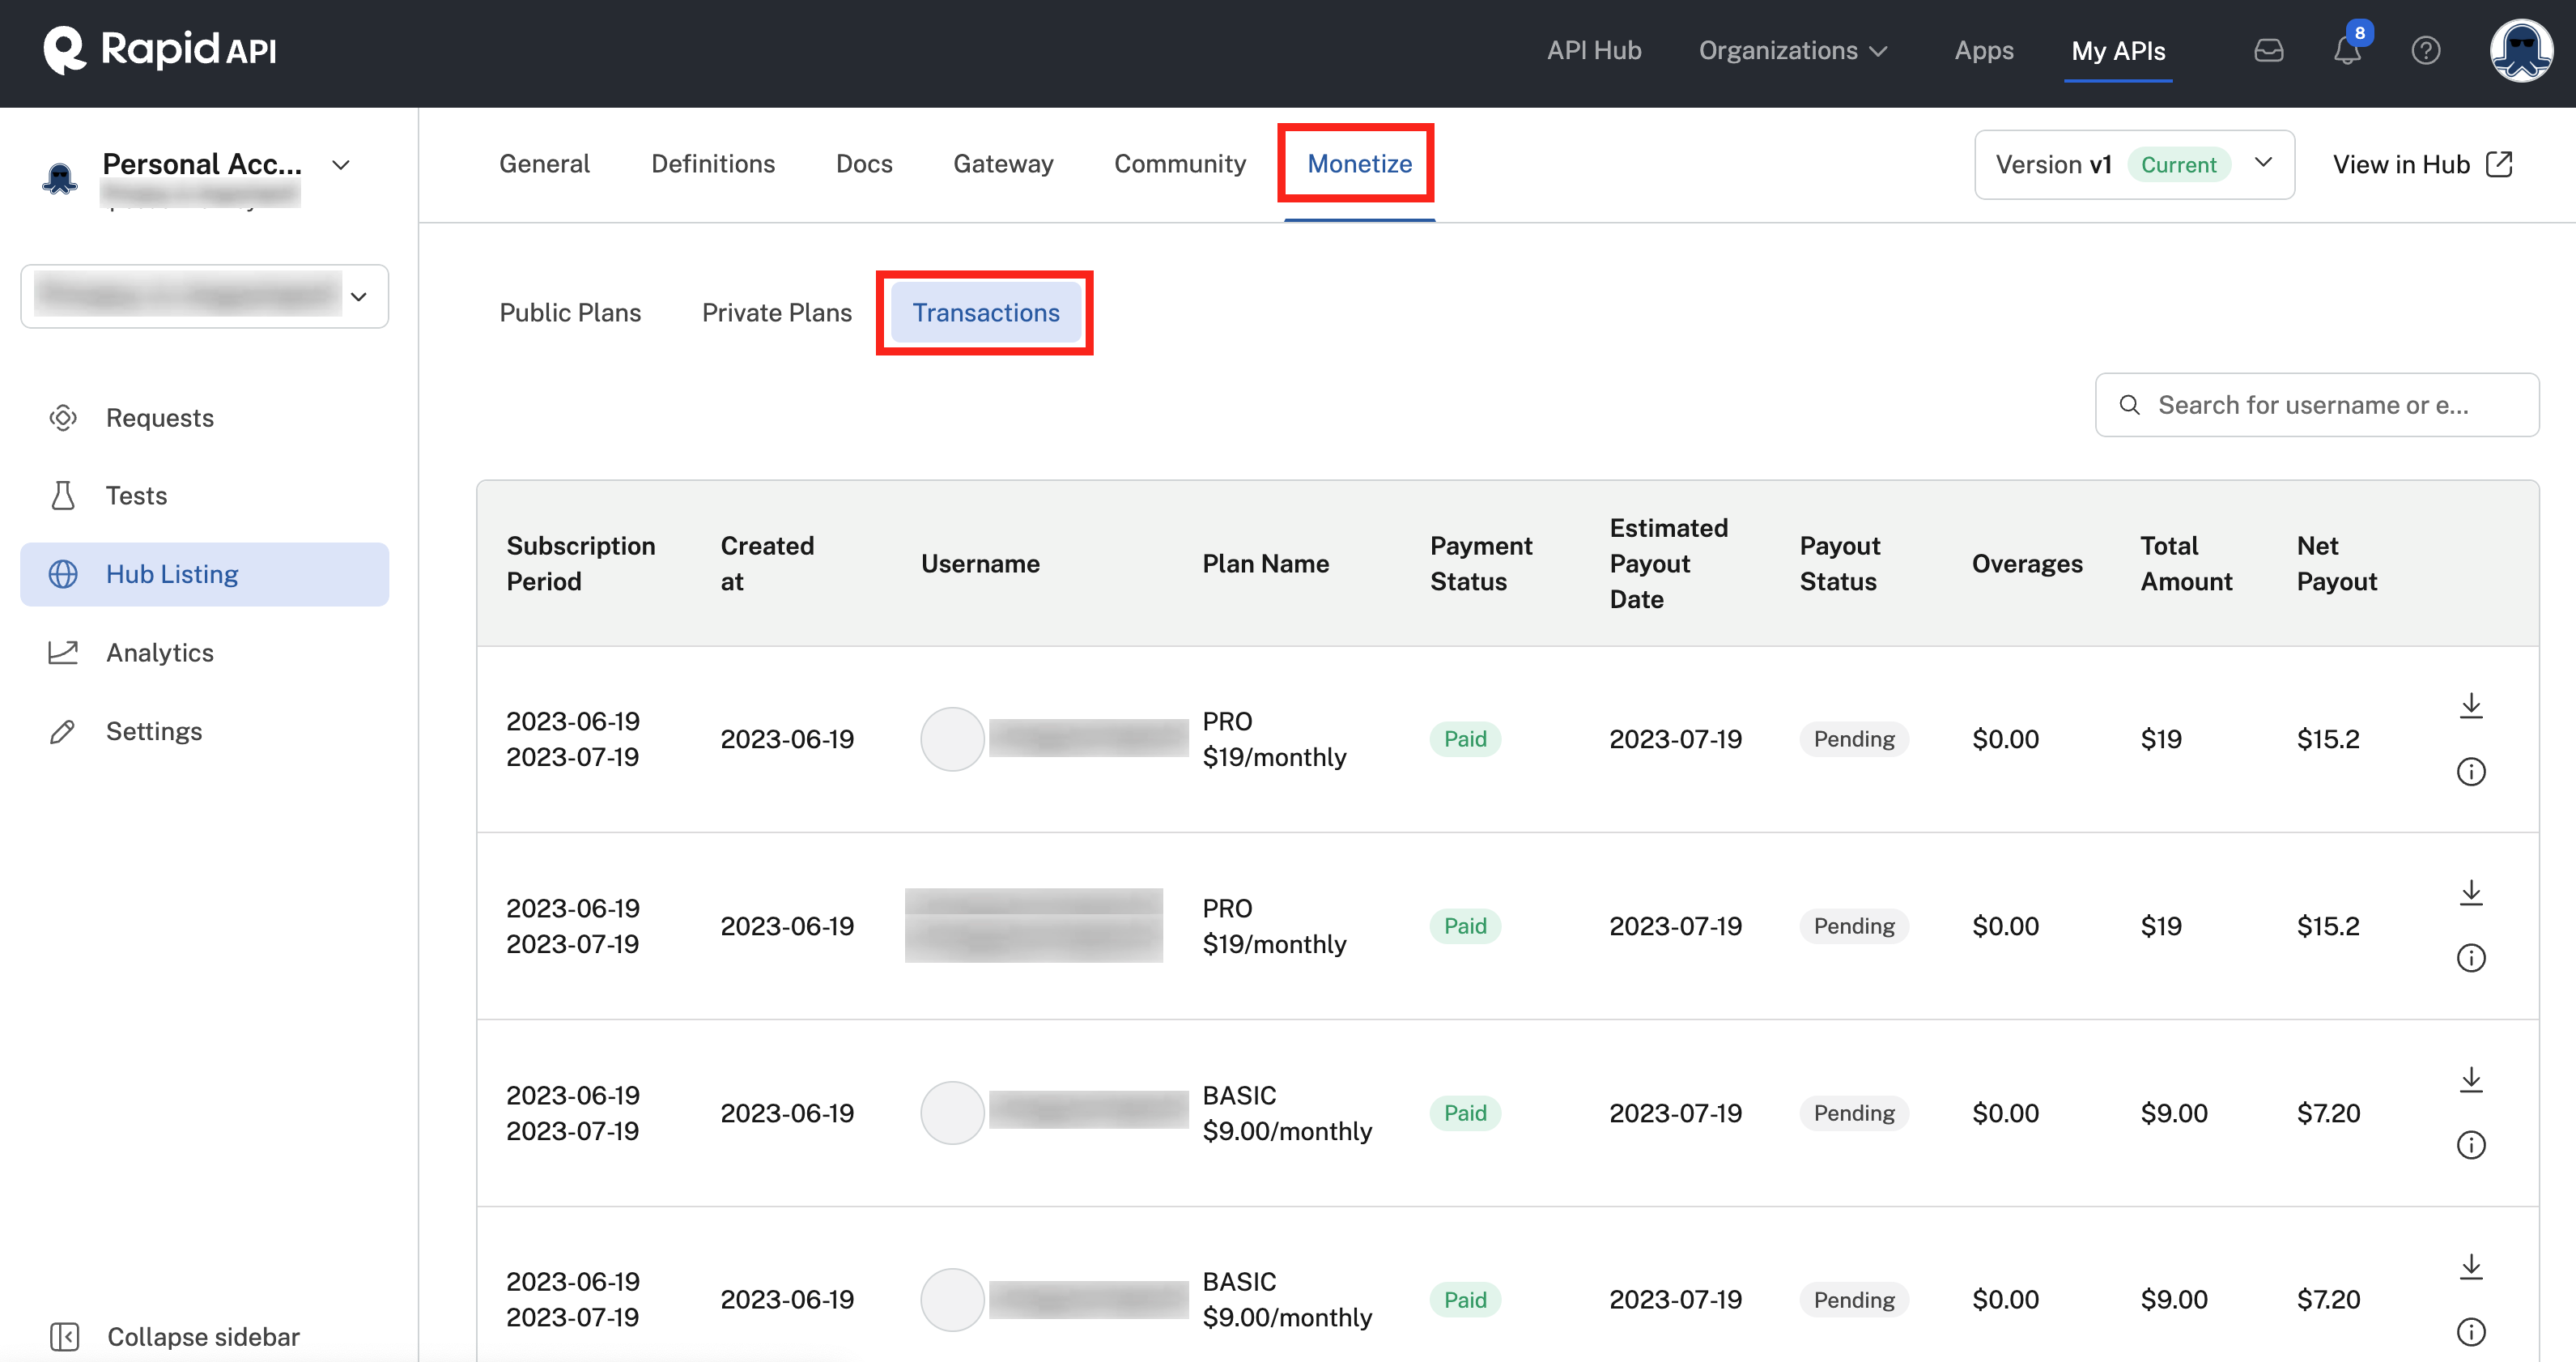
Viewing transactions for a monetized API.
Updated 3 months ago